# Frequently Asked Questions
# Acceptable verification documents by country
See the following list of documents that Openprovider accepts as proof of identity and entity for some of the countries the Openprovider supports. Please, if you are trying to validate data from a country that you can not find here, contact the support team at [support@openprovider.com](mailto:support@openprovider.com).
## Belgium
### Individual identity documents
- Paspoort / Passeport / Reisepass (Passport)
- Rijbewijs / Permis de conduire / Führerschein (Driver's license) - Front and back scans required
- Elektronische identiteitskaart / Carte d'identité / eID (Identity card) - Front and back scans required
- Elektronische vreemdelingenkaart / Carte d’identité d’étranger / Elektronische Ausländerkarte (Identity card for foreigners) - Front and back scans required
- Verblijfsvergunning / Permis de résidence / Aufenthaltsgenehmigung (Residence permit) - creado en los últimos 12 meses
### Company / entity documents
- Btw-registratie / Immatriculation à la TVA / MWST-Identifikation (VAT Registration)
- Un extrait de la Banque-Carrefour des Entreprises (BCE) / Inschrijving in de Kruispuntbank van Ondernemingen (KBO) / Eintragung in die Zentrale Datenbank der Unternehmen (ZDU) (Commercial register extract)
- Un extrait de la Banque-Carrefour des Entreprises (BCE)/Inschrijving in de Kruispuntbank van Ondernemingen (KBO)/ Eintragung in die Zentrale Datenbank der Unternehmen (ZDU) (Commercial register extract)
- Statuten / Statuts / Satzung (Articles of Incorporation)
- Kopie van publicatie in de Bijlagen tot het Belgisch Staatsblad / Copie des annexes publiées dans le registre officiel belge / Ausfertigung zur Veröffentlichung in den Anlagen zum Belgischen Staatsblatt (Copy of appendices published in the official Belgian register)
- Financiële staten / États financiers / Jahresabschluss (Financial statements)
## France
### Individual identity documents
- Passeport (Passport)
- Permis de conduire (Driver's license) - Front and back scans required
- Carte d'identité (Identity card) - Front and back scans required
- Carte Vitale avec photo (Health insurance card)
- Carte d'identité avec photographie délivrée par les autorités militaires (Military identity card)
- Carte d'identité de parlementaire (Parliamentary identity card)
- Carte d'identité d'élu local (Elected official identity card)
- Carte du combattant avec photographie (Veteran's identity card)
### Company / entity documents
- VAT Registration
- Comptes annuels (Financial statements)
- Extrait K, L, Kbis ou Lbis (Commercial register extract)
- Extrait d'immatriculation D1 (Artisan register extract)
- Avis de situation au répertoire Sirene (Siren register extract)
- Lettre de confirmation de numéro SIREN délivrée par l'Urssaf (Siren number confirmation)
- Statuts de l'entreprise (Articles of incorporation)
- Statuts de l'Association (Articles of Association – only acceptable for non-profits)
- Attestation d'Immatriculation (Attestation d'Immatriculation (not expired)) - created in the last 12 months
- - Parution dans le Journal Officiel (Extract from the Official Gazette – only acceptable for non-profits)
## Germany
### Individual identity documents
- Reisepass (Passport)
- Führerschein (Driver's license) - Front and back scans required
- Personalausweis (Identity card) - Front and back scans required
- Aufenthaltstitel (Residence permit) - Front and back scans required
### Company / entity documents
- USt-Registrierung (VAT Registration)
- Gewerbeanmeldung (Trade registration)
- Gewerbeschein (Trade license)
- Freistellungsbescheid
- Handelsregisterauszug (Commercial register extract)
- Vereinsregisterauszug (Register of Associations Extract)
- Jahresabschluss (Financial statements)
## India
### Individual identity documents
- - Passport
- - Individual PAN card
### Company / entity documentsAcceptable ways to verify legal entity for businesses:
- Entity PAN cardAcceptable ways to verify legal entity for limited liability companies:
- Entity PAN cardAcceptable ways to verify legal entity for sole proprietorships:
- Registration certificate
- Registration Certificate of Establishment
- Certificate or registration document issued by the sales tax, service tax, or professional tax authorities
- License or certificate of practice issued in the name of the proprietary concern by any professional body incorporated under a statute
- CST/VAT certificate
- GST certificate
- Sales tax return
- Income tax return
## The Netherlands
### Individual identity documents
- paspoort (Passport)
- rijbewijs (Driver license) - Front and back scans required
- nationaal ID-bewijs (National ID) - Front and back scans required
- verblijfsvergunning (Resident permit ID)
- Nederlands vreemdelingendocument (Dutch aliens document)
### Company / entity documents
- btw-registratie (VAT Registration)
- uittreksel Kamer van Koophandel (Company registration certificate)
- statuten (By-laws memorandum)
## Spain
### Individual identity documents
- Pasaporte (Passport)
- Permiso de conducir (Driver license)
- Documento nacional de identidad (DNI) (National ID) - Front and back scans required
- Tarjeta de Identidad de Extranjero Card (Resident permit ID)
### Company / entity documents
- VAT Registration
- Documento acreditativo del NIF (NIF document)
- Escritura de constitución (Company registration certificate)
## Poland
### Individual identity documents
- Paszport (Passport)
- Prawo jazdy (Drivers License)
- Dowód osobisty (Identity Card)
- Zezwolenie na pobyt (Residence Permit)-scans of front and back are required
### Company / entity documents
- Odpis z Krajowego Rejestru Sądowego—KRS + REGON
- Numer Krajowego Rejestru Sądowego (KRS) (National Court Register number)
- Zaświadczenie o numerze identyfikacyjnym REGON (REGON certificate)
## United Kingdom
### Individual identity documents
- Passport
- Driver's license
- Resident permit—front and back scans required
- Citizen Card
- Electoral ID
### Company / entity documents
- VAT Registration
- Certificate of Incorporation
- Companies House Document
- HM Revenue and Customs: VAT Certificate
- HM Revenue and Customs: Account Statement
- Charity Commission Document
- OSCR Scottish Charity Regulator
## United States
## Individual identity documents
- Passport
- Passport card
- Driver's license
- State-issued ID card
- Resident permit ID / U.S. Green Card
- Border crossing card
- Child ID card
- NYC card
- U.S. visa card
### Company / entity documents
- IRS Letter 147C
- IRS SS-4 confirmation letter
# Can not log in the Control Panel
## Question
How to solve issues with logging in the control panel?
## Answer
There are several errors the reseller can come across when trying to enter the control panel.
The most common errors are here described with the steps on how to solve it.
\- [Access Denied/You are trying to login from an IP address which is not whitelisted.](#bkmrk-access-denied%2Fyou-ar)
\- [2 Factor Authentication](#bkmrk-2-factor-authorisati)
\- [Invalid e-mail address when using the "forgot password" option](#bkmrk-invalid-e-mail-addre)
\- [Password Reset link redirecting to sign in page](#bkmrk-password-reset-link-)
### **Access Denied/You are trying to login from an IP address which is not whitelisted.**
( Fout #10005 / Error #10005)
This error will be shown when the reseller try to log in from a non-authorised IP address.
The reseller has the option to insert IP address on the blacklist or whitelist of the control panel for RCP and API access.
This is an extra security feature the reseller can use to make sure only the people have access, can log in to the control panel
Whitelist - Only these IP addresses **may** access the control panel
Blacklist - These IP addresses **may NOT** access the control panel
*New Interface:*
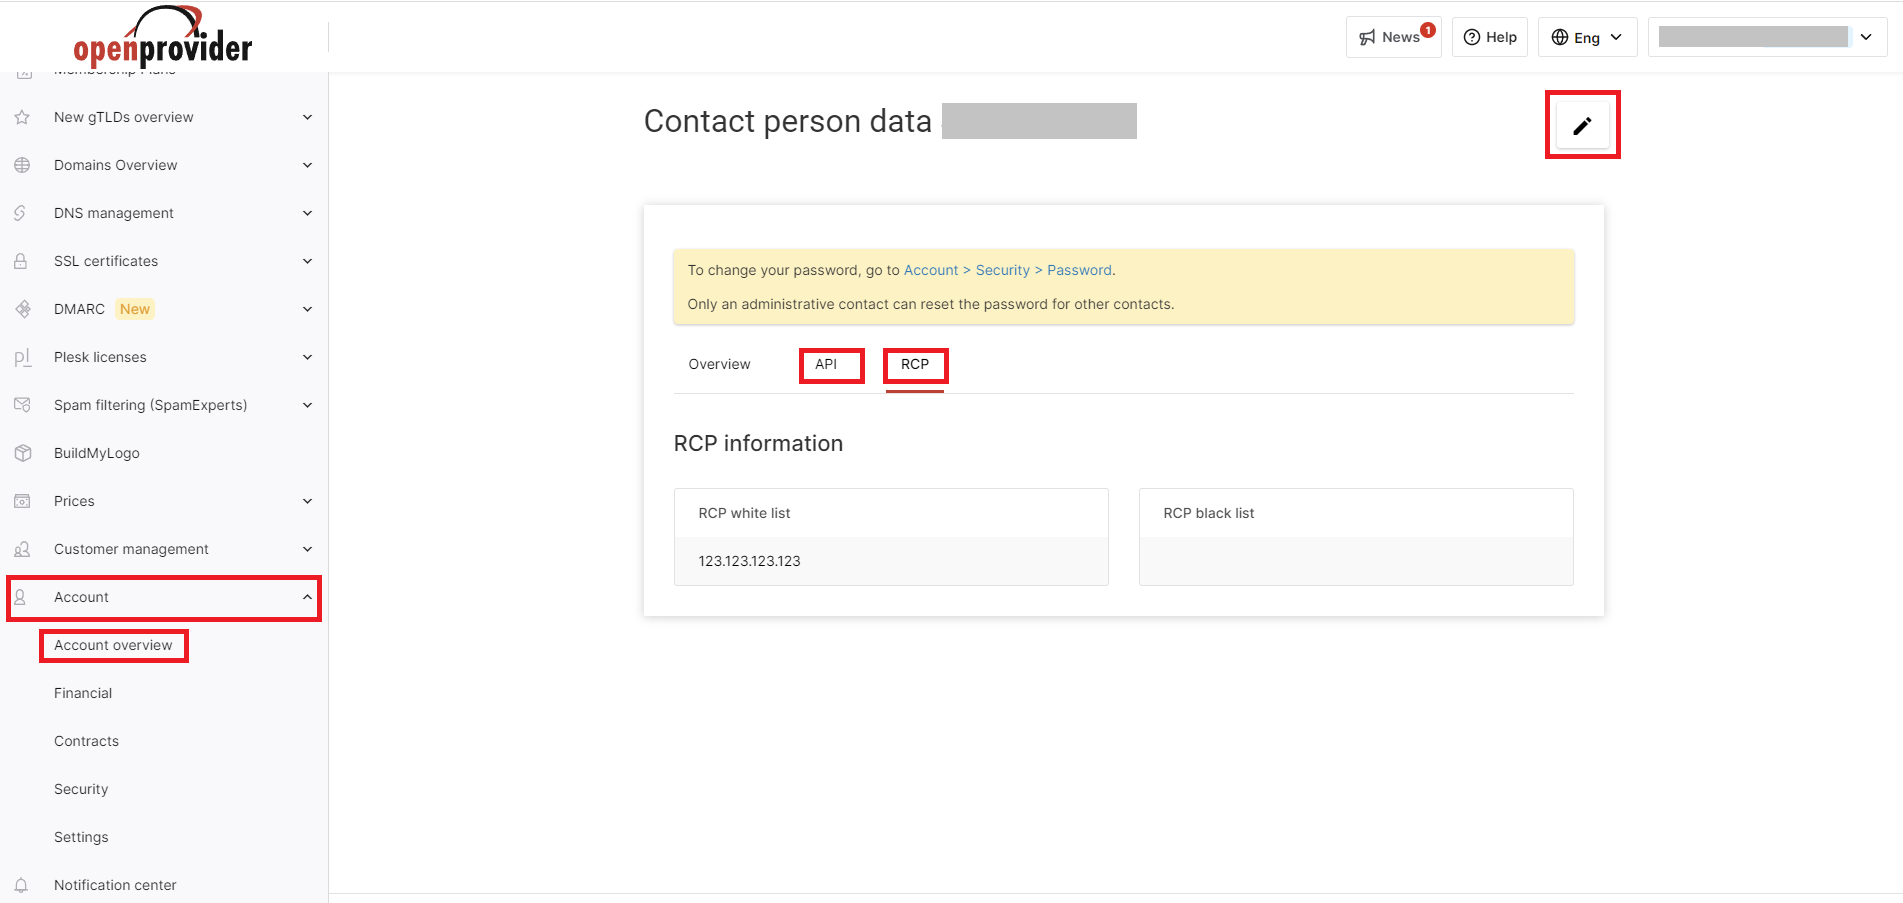
When the reseller receives the error **Access Denied**, it means the reseller is trying to log in from an IP address which is not allowed.
Make sure the reseller log in from the correct IP address or ask an other user of their account to add or remove IP black / whitelisting so the reseller can log in again.
##### What to do when you get this error when trying to log in?
1 - check your IP address.
For instance via [whatsmyip.net](http://whatsmyip.net/)
Review why this IP might be different then what you entered in the control panel.
Perhaps you work from home / different location, or have VPN enabled / disabled, you use a (new) module (WHMCS) or your IP address is just updated.
2 - In case your account has several users, contact a colleague or other user and ask them to review your IP whitelisting settings and update it if required.
3 - In case you are not able to get access to the RCP and no other users can assist, you can contact the support department for help. As this is a security feature, the team must verify the request, so make sure you sent the request from the connected email address of the user and mention:
\- Your ResellerID,
\- Username and
\- The IP address which you want to have removed.
### **2 Factor Authorisation (2FA)**With Openprovider's two-step authorisation, the level of access control is doubled, as on the one hand side reseller *know* something to login with (username and password) and on the other hand the reseller *has *something to login with (a device that can generate a direct and unique code).This extra level of security is optional as a second layer of security. When the reseller decide to activate the extra security layer, the so-called 2FA, it will generate a **‘time-base one-time password** (TOTP): a code that changes continuously and that is generated on a personal device of choice such as a smartphone, or a browser plugin. The most used applications are Google Authenticator and FreeOTP, both available in most app stores.
This means the reseller need this device to log in to the control panel. In case this is no longer an option, when the phone got lost, or reset the phone or removed the app by accident, the reseller can not log in to the control panel anymore.
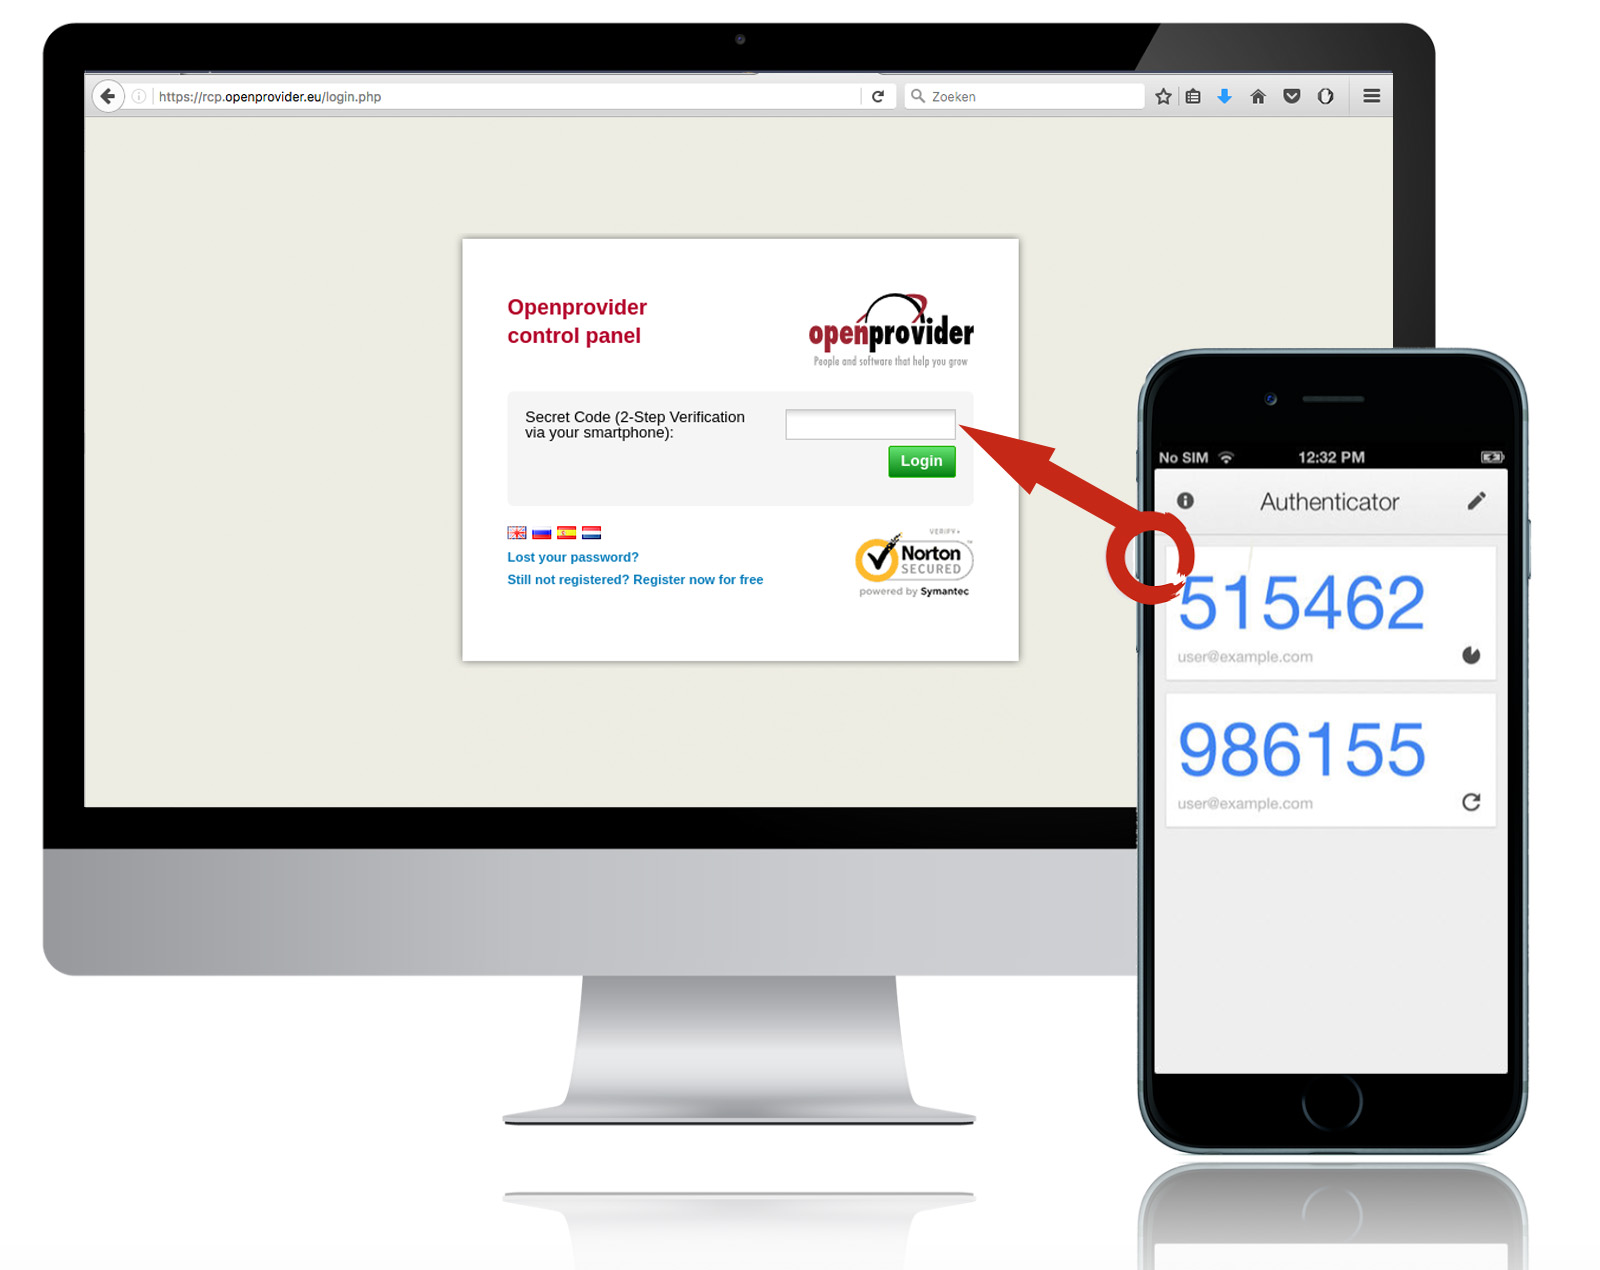
In that case, please sent an email to [support@openprovider.com,](mailto:support@openprovider.com,) and make sure the email contains the following information:
\- sent it from the connected email address of the resellers Openprovider account
\- mention reseller **username or ResellerID**
\- explain the reason why the reseller does not have access to the 2FA anymore
Openprovider support will be in contact with the reseller (during working-hours) and may be able to help to regain access to the resellers account
Installation of the app is quite easy: download a version of the app, scan the [QR-code in your Openprovider control](https://cp.openprovider.eu/account/twofactor.php) panel and confirm the entry.
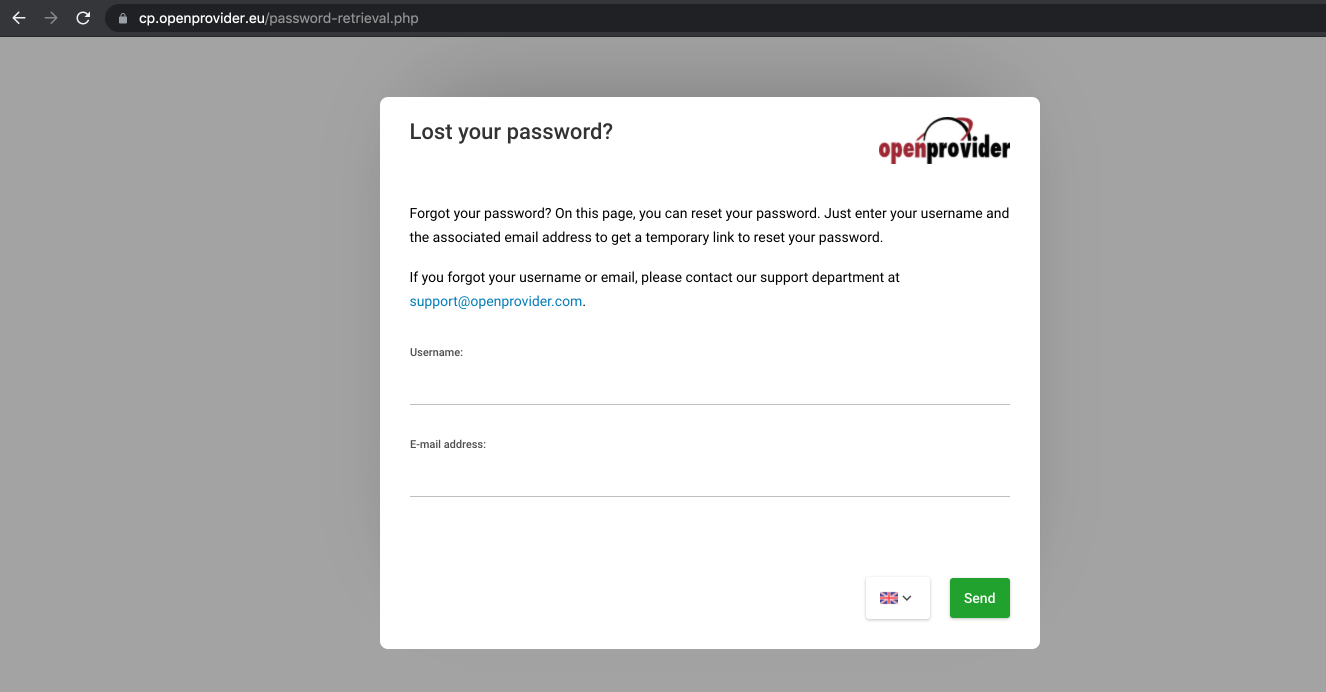
### **Invalide-mail address when using the "Forgot Password" option. **
This error will appear when the reseller is requesting a password reset via the option "[forgot password](https://cp.openprovider.eu/password-retrieval.php)" but the username and the email address to not match with Openprovider database.
Please note; Username and email address are case-sensitive and make certain the reseller does not copy blank spaces in any of the fields.
When the reseller does not remember the correct details, please sent an email to Openprovider and mention as much details, so Openprovider can easily find the resellers account. (username, resellerID, email address, domain-name in the reseller account)
### **Password Reset link redirecting to sign in page**
This can happen if you have IP restriction enabled on your account (IP whitelist for RCP) and you are accessing the password reset link from a non-whitelisted IP address. Please [contact Openprovider Support](https://openprovider.help/books/quick-start/page/contact-openprovider-support) team for assistance.
If you still have API access to the account, you can also modify IP whitelist of control panel via API from your end:
REST API - [UpdateContact](https://docs.openprovider.com/doc/reseller-customer.swagger#operation/UpdateContact) ('*rcp\_client\_ip\_list*' option can be used to modify RCP IP restriction)
Example:
```
curl -L -X PUT 'https://api.openprovider.eu/v1beta/contacts/{CONTACT_ID_HERE}' \ -H 'Content-Type: application/json' \ -H 'Authorization: ••••••' \ -d '{ "rcp_client_ip_list": { "allow": ["IP_ADDRESS1_HERE","IP_ADDRESS2_HERE"] } }'
```
Replace {CONTACT\_ID\_HERE} with contact ID and IP\_ADDRESS with actual IP address.
**Note:** To disable IP whitelist, you can leave IP address field empty.
# Contact Openprovider Support
## **How to contact Openprovider**
### **For Commercial (Sales) questions**
If you have questions about prices, memberships, account details or any other commercial enquiry, you can reach out to our Sales department by [filling this form](https://www.openprovider.com/company/contact-us/sales-inquiries), or by filling [this contact form](https://share.hsforms.com/1q6eVexxOT4mmVmAMHUghiQ2j54e?__hstc=3456879.364d696dd0ec7b007c4132f37c39ed95.1634712067540.1637132290798.1637135407948.17&__hssc=3456879.1.1637135407948&__hsfp=1568834945) if you are interested in becoming a customer. If you are an existing customer and wants to talk to Account management, select one of the contact options under “**Account management**” section in the [Contact Form](https://www.openprovider.com/company/contact-us).
### **For Support questions**
Most cases are described in our extensive knowledge base: technical requirements, workarounds, tips, technical documentation, etc. We aim to ensure our customers can work independently and effectively through our knowledge base. Please do not hesitate to let us know if you spot any inaccurate or missing information, so that we can update the knowledge base accordingly!
If you encounter any technical issue, cannot find the relevant information in our knowledge base or the information in our knowledge base is not clear, then you can contact our Support department for further assistance.
#### **From Openprovider Website**
Please go to our [contact page](https://www.openprovider.com/company/contact-us/contact-support) and select the relevant option:
[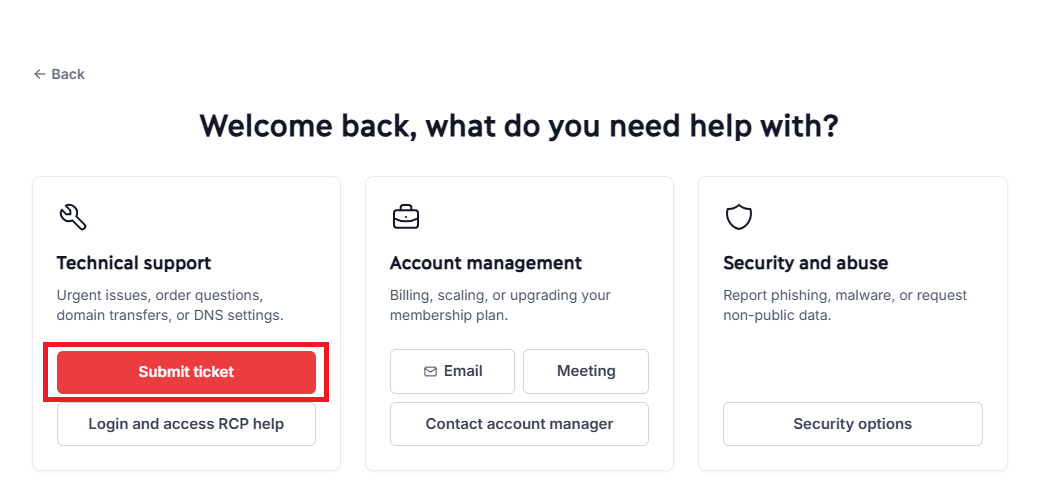](https://openprovider.help/uploads/images/gallery/2026-09/image.png)
**Important:**
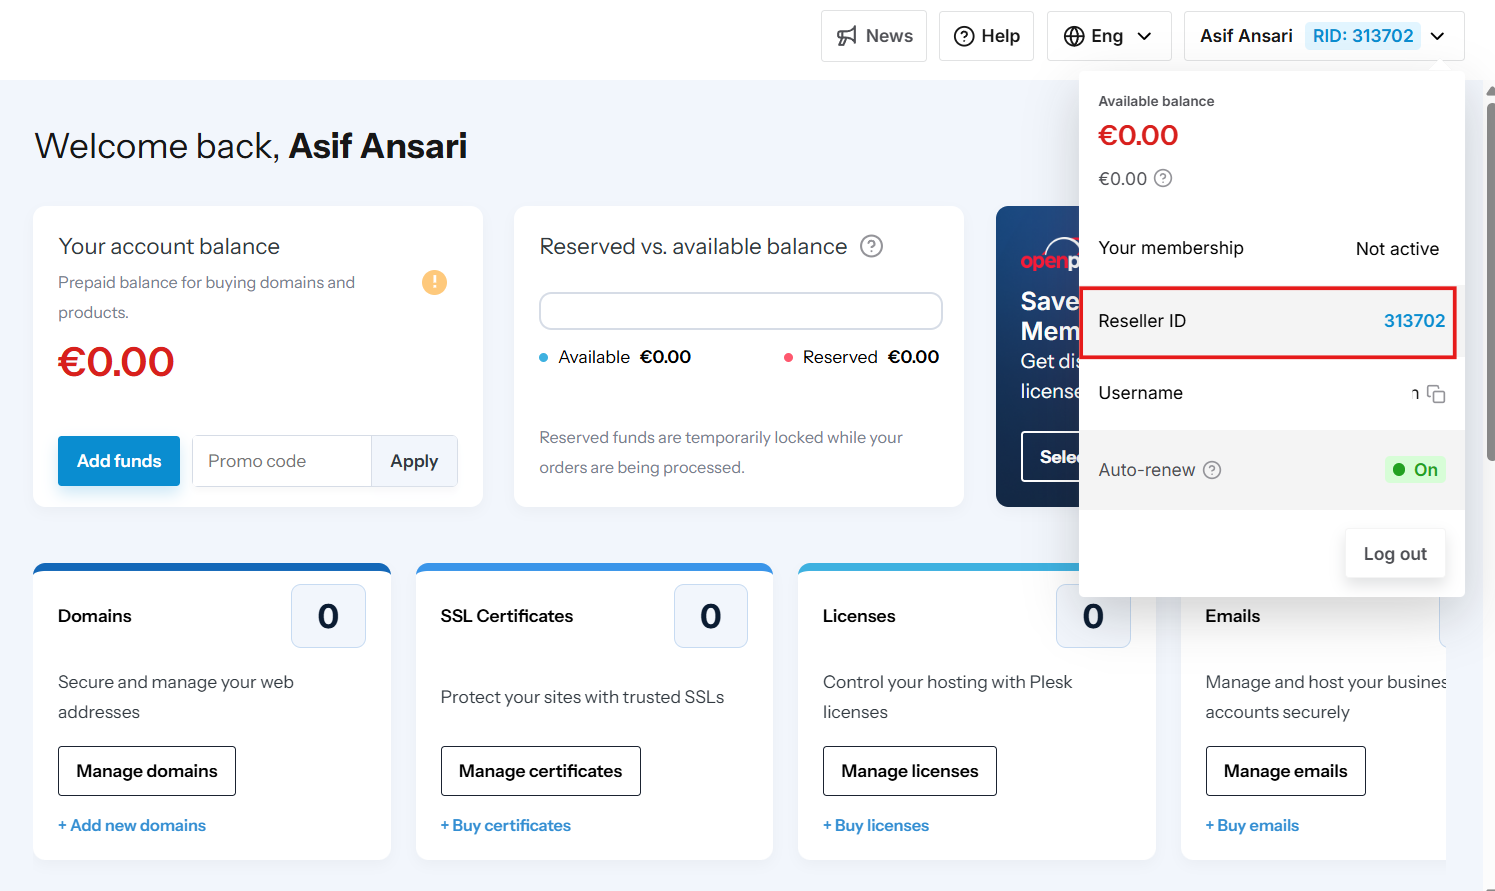
If you already are one of our customers (and therefore choose this option), you will need to contact us from an email address registered in your account and your **Reseller ID**.
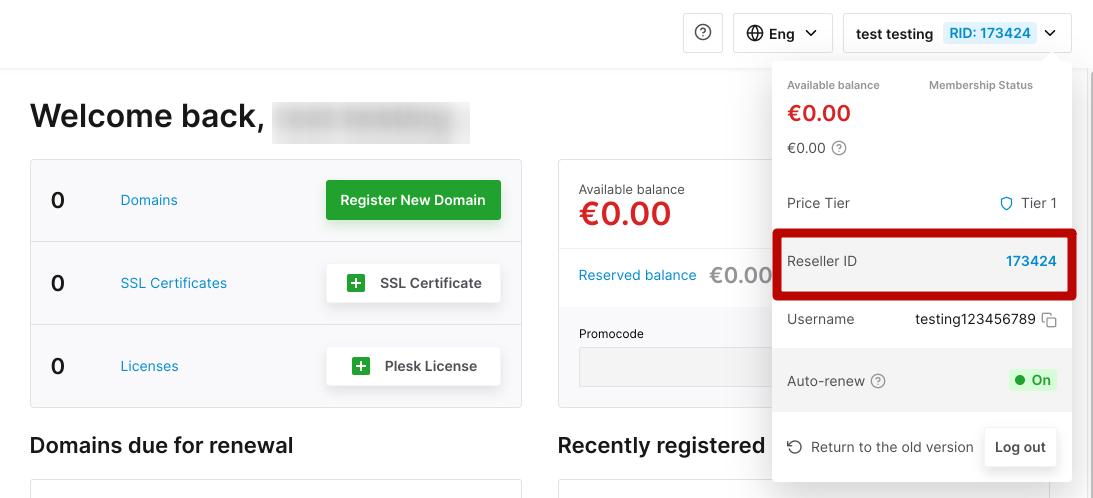
Your reseller ID can be found at the top-right-hand corner of your Openprovider control panel:
**Email support is now available, 24 hours a day, 7 days a week.**
**Tips** for an **effective** resolution of your issue:
- If you already have an open ticket, please reply to this ticket so that we keep all the communication in one place
- Be as descriptive as possible: what technical environment you’re using, error message, screenshot or screen recording, logs, API calls/responses, etc.
- Specify what your intended actions were: what you were trying to achieve through the actions causing the issue. This will help us potentially finding a workaround for you
- Mention any knowledge base article you have used and why it did not help (unclear, incomplete, outdated, etc.)
### **Languages supported and working hours**
We currently support the following languages:
Our working hours are the following ones:
- English : 24/7
- Dutch : Monday to Friday, 10 AM to 9 PM CET
- Spanish : Monday to Friday, 10 AM to 5 PM CET
- Hindi/Marathi : Monday to Friday, 6.30 AM to 1.30 PM CET
### **Service Level Agreement**
Openprovider strive to maintain the following service level agreements:
Tickets will be answered within one working day or 4 business hours. Follow-ups on the same request will be answered within 16 business hours\*.
*\*These response times may vary when your ticket is escalated to our second-line support.*
### **Urgent issues**
For urgent issues, our existing customers have the option to contact us via 24/7 live chat available in [RCP](https://cp.openprovider.eu/) (Reseller Control Panel). 
### **Abuse**
Complaints about fraudulent web shops, phishing, and copyright violations will not be handled by Openprovider support department, but by the legal team.
Please read [this article](https://openprovider.help/books/domains/page/reporting-abuse) about how to submit an abuse complaint.
# Does Openprovider authorize user with SAML SSO?
## Question
Does Openprovider authorize end-users using SAML SSO?
## Answer
Not yet.
SAML SSO is a Security Assertion Markup Language Single Sign-On based on XML.
Technology allows the customer to use single authorization data to be authorized into different services and domains using only one entity of credentials.
Currently, Openprovider does not have such a feature implemented but that is planned for a future.
Also, there might be some useful features as a sign up / sign in using social networks account, etc.
Follow up our [newsletter](https://openprovider.com/whats-new/newsletter/) to stay in touch, or subscribe for a newsletter from [Home Page.](https://openprovider.com/)
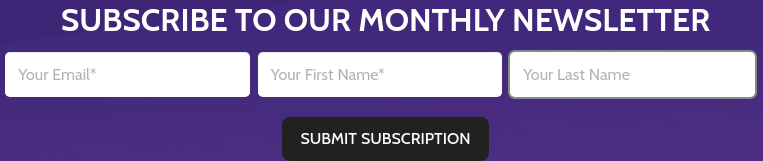
Also, technical updates are usually posted on our [Instagram](https://www.instagram.com/openprovider), [Twitter](http://twitter.com/openprovider), and [Facebook](https://www.facebook.com/openprovider) that's why the subscription is recommended.
# How can I retrieve my username and password?
## Question
How to request a password reset?
## Answer
If you have forgotten / lost your password, you can request a password reset by using the online form
[Lost your password?](https://cp.openprovider.eu/password-retrieval.php)
**Note**: If you have added IP restriction (IP whitelist) in your account for RCP (Reseller Control Panel), you should access the password reset link from one of the whitelisted IP addresses. If the password reset link is getting redirected to sign in page, please refer to [this article](https://openprovider.help/link/6422#bkmrk-password-reset-link-).
*Forgotten the username?*
Have you tried your e-mail address?
If your email address does not work or in case the username is lost or forgotten, please create a ticket to contact us from [here](https://openprovider.com/contact-support/).
# How can a reseller change the password of the account?
## Question
How to change the password in the control panel?
## Answer
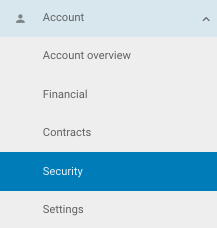
To change the password log in to the reseller account dashboard, then navigate to the **Account** tab at the bottom left corner of the page and click on the **Security** link.
Once the page is loaded there are two tabs, one is Password and other is Two Factor Authentication.
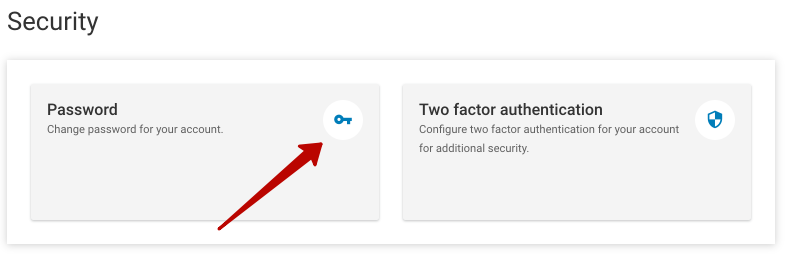
Click on the Password tab and set your desired password.
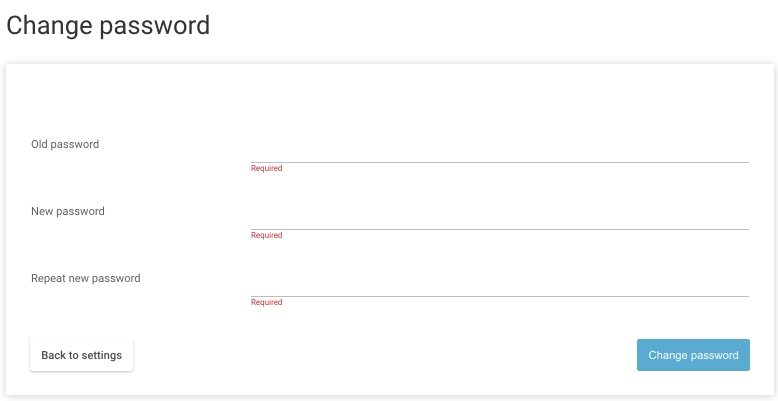
Once the new password is filled in click on 'Change Password' on the bottom-right to save the modification.
# How to change account username?
## Question
How do I change an account username of a contact person?
## Answer
Username change is not supported in Openprovider ecosystem due to the backward compatibility between its various systems (RCP, SSL Panel, Single DNS Panel, etc).
This policy also applies to the allowed number of admin contacts in ones reseller account. There can only exist one admin account and its username cannot be changed.
The emailaddress of an Admin contact can be adjusted, but the username of the Admin contact itself can not be changed.
# How to change company details in the resellers account?
## Question
How can the reseller change the company details in his account?
## Answer
The reseller can configure the account by navigating to **[Account](https://cp.openprovider.eu/account/dashboard.php)** in the control panel on the left side.
Once there the reseller can see the company details in of the account by clicking **[View](https://cp.openprovider.eu/account/account-overview.php)** and if modification is needed click on **[Edit company data](https://cp.openprovider.eu/account/account-edit.php).**
The company details from this overview will be used on the monthly invoice. It is not possible to change these details on the invoice once generated.
The support or sales team will not change the account details via email or phone requests due to security reasons.
# How to connect domain hosted in Openprovider with Shopify ?
#### **This article describes the process of connecting the domain hosted in Openprovider with Shopify!**

If you are hosting a domain in Openprovider, there are just a few steps to follow that will let you connect your domain with Shopify. First step would be to change DNS records for your domain. To do so:
1. Log in to the Reseller Control Panel and navigate to Domains Overview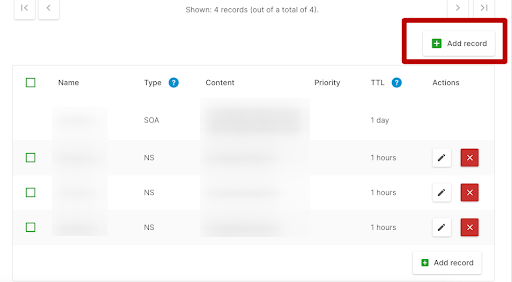2. Select the domain you want to connect with Shopify:3. Navigate to the section with the DNS settings and change the following records: a. Point the A record to the Shopify IP address **23.227.38.65**. b. You can keep the Host Name empty. c. Delete any other A records on the domain if there are any present.
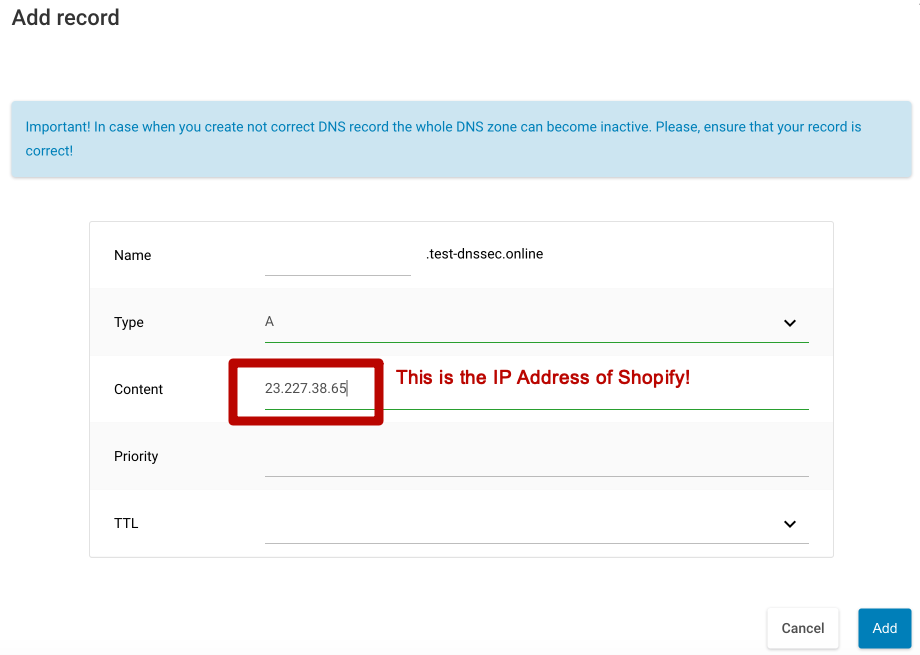
4. Point the CNAME record with the name www to ***shops.myshopify.com***.
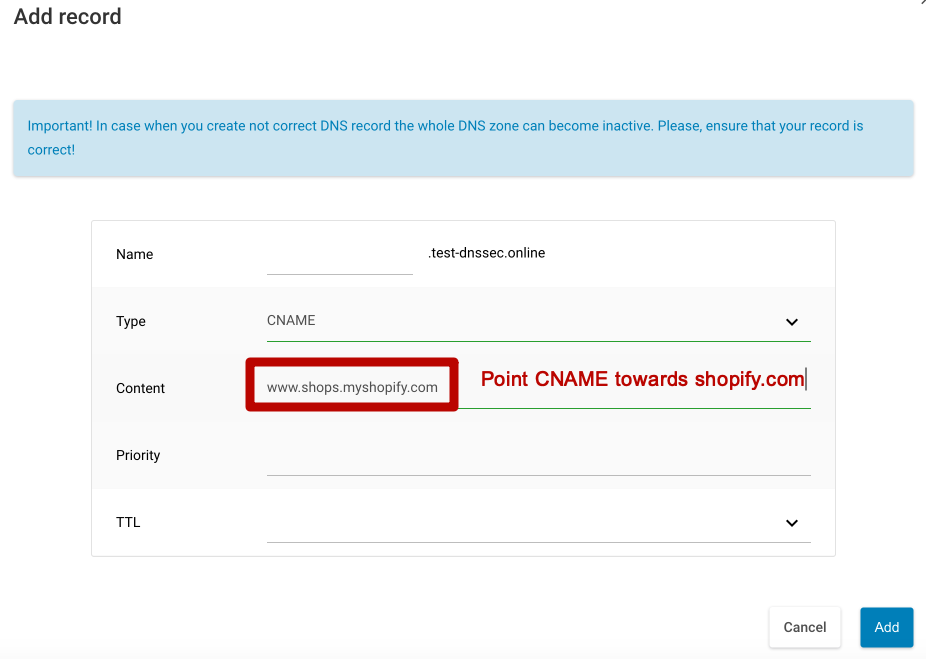
**NOTE**: You don't need to change the TTL number in your DNS settings. Use the default value.Second step is to actually connect the domain to Shopify. To do that please:1. From your Shopify admin, go to Settings > [Domains](https://www.shopify.com/admin/settings/domains).2. Click Connect existing domain.3. Enter your domain, such as *mydomain.com*, and then click Next.4. To confirm that your domain is connected to your Shopify store, click Verify connection.
**NOTE**: It might take up to 48 hours for your domain to be verified.
After it's verified, your domain is listed in the THIRD-PARTY DOMAINS section of the Domains page with the status **Connected**.
# How to delete default contact handle in RCP
## Question
How to delete a default customer handle?
## Answer
When trying to delete a default customer handle the following error occurs
```
Cannot delete a customer that assigned as default handle(s).
```
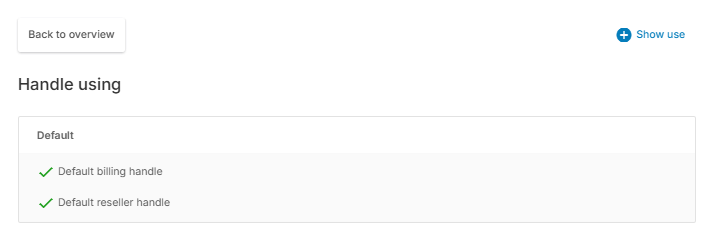
One may check if the handle is used as a default one by clicking on **"Show use"** button in [handle details](https://cp.openprovider.eu/web/action/index#/customer/overview?utm_source=KB-Article&utm_medium=kb&utm_campaign=KB) section or by navigating [here](https://cp.openprovider.eu/account/config-billing-handle.php).
You can make a change from Account > Settings > Default domain contacts
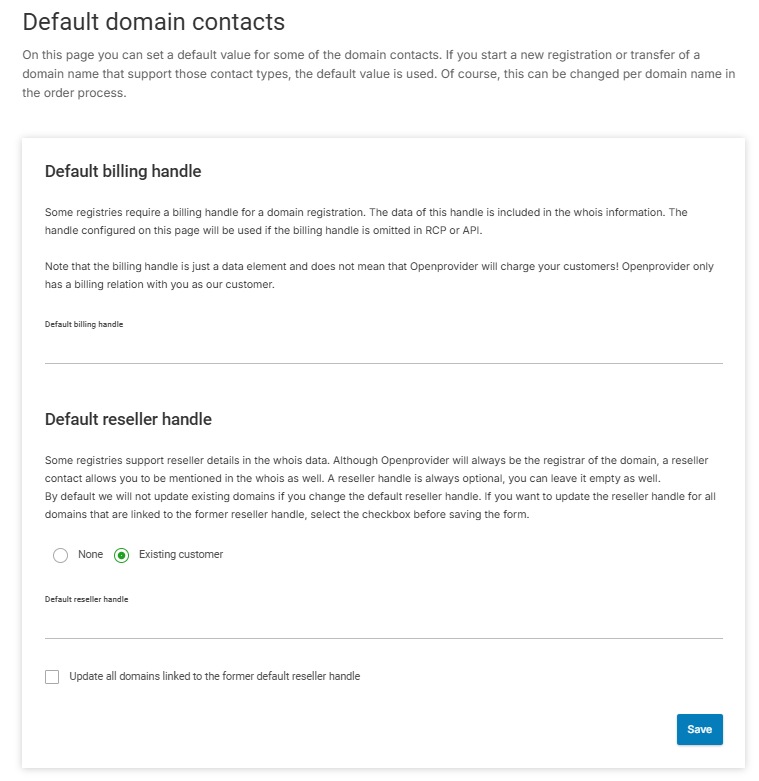
Reseller accounts at Openprovider use default handles by design, they are mandatory and should exist for every account at all times.
In order to have the exact default handle deleted, one needs to re-assign the default handle to any handle registered within one's account. Once done, proceed to deletion.
Please navigate to [this page](https://cp.openprovider.eu/account/config-billing-handle.php) to re-assign the default handle.
# How to enable API access
## Symptom
I am not able to connect to the API
## Cause
\- API access for users is not enabled in the control panel by default. This needs to be activated per user from the RCP (Reseller Control Panel).
\- IP whitelist or blacklist is blocking the connection - causing error "Acces Denied"
## Resolution
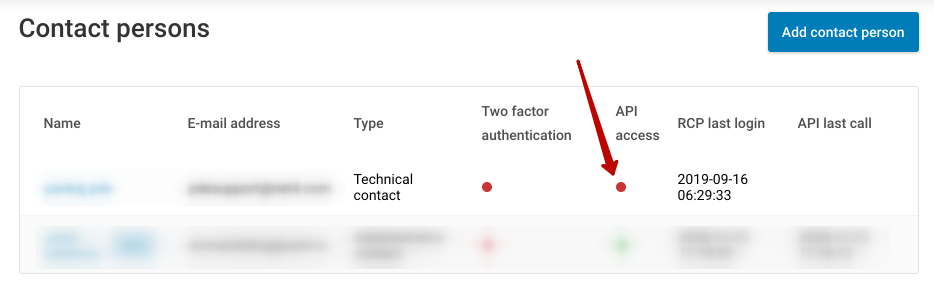
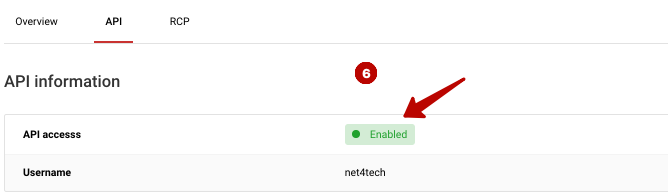
1: Log into RCP (Reseller Control Panel). Navigate to **Account** >> **Account Overview** or click the [link](https://cp.openprovider.eu/account/dashboard.php) (for Sandbox, click this [link](https://cp.sandbox.openprovider.nl/account/dashboard.php)). Check whether "**API access**" is enabled (Green dot if enabled and Red if disabled).
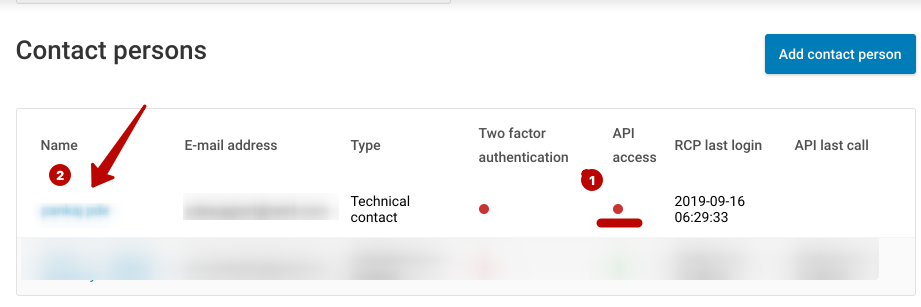
2: If the API access is "Disabled" as shown in the screenshot above, click on the username
3: Click on "Edit"
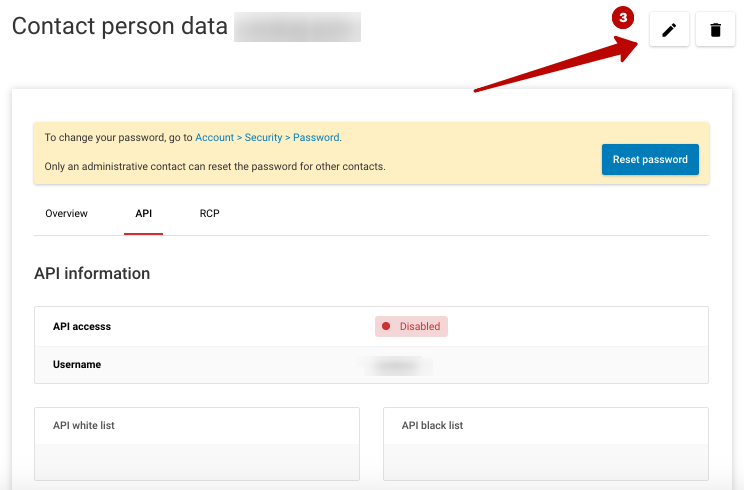
4: Click on the checkbox "API access Enabled"

5: Click on "Update contact"
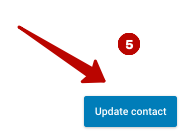
6: API Access is now enabled for this username!
7: Check if any IP whitelisting or blacklisting is entered.
Please remove the IP addresses until the connection with the API has been established successfully before adding the IP addresses.
More information about IP whitelisting and blacklisting can be read [here](https://openprovider.help/books/quick-start/page/how-to-secure-your-openprovider-account).
# How to find my hosting provider
## Question
I am a registrant / domain owner. How do I find my hosting provider?
## Answer
Openprovider does not directly deal with end customer and we do not offer any hosting or email services. So we do not have login credentials, ftp details or access to content on the site itself.
In case you are an end customer / registrant (domain owner) and would like to change details for your domain, website or request a transfer code, we advise you to contact your hosting provider. This is the company who can help you with these requests.
We can not provide reseller details from our database to endusers, due the our terms & conditions. Besides, there might be a an other layer between our reseller and your hosting provider or contact person. Due to both reasons, we ask you to locate your contact person or hosting company via the following leads:
\- Check the monthly or yearly invoices for your domain or hosting services. This will be your hosting provider or contact person.
\- Check the nameservers of your domain via the whois. (ns1.namehostingprovider.nl)
It might contain the name of the hosting provider and gives you a clue who your hosting provider is.
\- In case of a .nl domain-> check the whois via [this link](https://www.sidn.nl/) and check the results of the "reseller" or "admin contact" of the domain. This will be your hosting provider or contact person.
\- In case of a .be domain -> check the whois via [this link](https://www.dnsbelgium.be/en) and check the results of the "Onsite" contact of the domain. This will be your hosting provider or contact person.
\- In case of a .eu domain-> check the whois via [this link](https://eurid.eu/en/my-eu/) , section "WHOIS" and check the results of the "On-site" or "Technical" contact of the domain. This will be your hosting provider or contact person.
\- In case of a gtld, like .com, .net, .org etc -> Use the contact form [via this link](https://contact-form.registrar.eu/?domainName=enterdomain.com&purpose=owner) , enter the domain name and select which contact you would like to reach out to.
In case your hosting provider does not respond to you, please refer to [this article](https://openprovider.help/books/domains/page/escalation-procedure-token-request-of-a-domain-registrant) where we explain the "escalation procedure" in order to retrieve your Authorization code (transfer code) for your domain.
In case you are the legal owner of the domain and you can not remember or retrieve information from your hosting provider anymore, you can use the form "***Domain owners***" on the following page:
[https://www.openprovider.com/company/contact-us](https://www.openprovider.com/company/contact-us)
# How to secure your Openprovider Account ?
With the continuously increasing economic importance of domain names and our other goods, it is critical that no one but the approved entities have access to their management. This article lists Openprovider's different security layers and gives you information about how to use them.
[1. Username and Password](#bkmrk-1.-username-and-pass-1)
[2. User accounts](#bkmrk-2.-user-accounts-1)
[3. Password hashes](#bkmrk-3.-password-hashes-1)
[4. IP whitelisting and blacklisting](#bkmrk-4.-ip-whitelisting-a-1)
[5. Two-factor authentication](#bkmrk-5.-two-factor-authen-1)
[Troubleshooting](#bkmrk-troubleshooting-1)
### 1. Username and Password
The most fundamental method of user control and authentication of credentials is this. There is almost no system in the world that works without a combination of username/password and it still provides a basic level of security by choosing the right password (and password management/rotation scheme!).
If that's what you prefer, the Openprovider control panel and API are only accessible through a username/password combination. Upon account or contact creation, you set your own username and password and can change your password at any time via our control panel by editing your [contact details](https://cp.openprovider.eu/account/dashboard.php).
### 2. User accounts
In each company, individuals come and go. Some way of managing users makes life easier and safer! Create every employee's personal account. If someone leaves, just delete his or her personal account and access has been withdrawn.
Via the [Openprovider Control Panel](https://cp.openprovider.eu/account/dashboard.php), user accounts can be created and controlled.
### 3. Password hashes
It's pretty safe to log in to the Openprovider control panel with your password: a protected connection and the password covered by bullets, stars or whatever other character your browser uses.
The use of the API is different: you need to state a username and password somewhere in the file, preferably in plain text. As the control panel uses the same user keys as the API, the password can be identified and signed into the control panel by those with access to the API file.
Your API secret, the so-called API hashing, should be hidden to prevent this from occurring. You use a hashed version of it to authenticate your API session, rather than your plain text password. Find this hash of passwords in your [contact details](https://cp.openprovider.eu/account/dashboard.php) (Click the "edit" button on user detail page to see the reset option).
**IMPORTANT**: Refer to [this documentation](https://doc.openprovider.eu/API_Module_Authentication) for using password hashes in [XML API](https://doc.openprovider.eu/Main_Page) requests.
If you are using [REST API](https://docs.openprovider.com/doc/all), you can use bearer token in your requests instead of password hash. For generating bearer tokens, use your API username and password. Refer to the [documentation](https://docs.openprovider.com/doc/all#tag/descAuthentication) for example request. Please note that password hashes are not supported with REST API.
### 4. IP whitelisting and blacklisting
Most clients log in from only a selected series of locations to the Openprovider control panel: office, house, or from a VPN connection. API access is even much more limited: the API connection is maintained by only one server.
You may opt to restrict API or control panel access to only a couple of IP addresses with this experience. An error message may be received from those attempting to communicate from another IP address. This whitelisting can be described and handled through the [contact details page](https://cp.openprovider.eu/account/dashboard.php).
Blacklisting is the reverse of whitelisting: allowing access from any IP address but one or a few.
Whitelisting and blacklisting are specified at the user level (a separate set of IP addresses may be allocated to each user) and the access level (API or control panel). It supports both IPv4 and IPv6, as are the IP ranges.
Getting the error "***Access Denied***" when trying to log in?
In that case you are trying to log in from a non-authorized IP address.
If you have issues logging into control panel (RCP), check out [this article](https://openprovider.help/books/quick-start/page/can-not-log-in-the-control-panel).
### 5. Two-factor authentication
IP whitelisting may not be possible if you are traveling a lot and do not have a VPN connection. In this case, by allowing two-factor authentication, you can introduce a second level of security: signing in does not only require a username and password (something you know), but also a unique code created by a personal computer (something you have).
The two-factor authentication (commonly referred to as 2FA) configuration is completed via the [special settings page](https://cp.openprovider.eu/web/action/index#/account/security/overview) within a minute. Per device, two-factor authentication can be configured.
**Note :**
**Cisco Duo Mobile does not fully support standard TOTP and causes frequent login mismatches, so please use a compliant authenticator app (e.g., Google Authenticator, Microsoft Authenticator, Authy) instead.**
### Time to investigate !
It's time to review your current account to appreciate the many ways in which Openprovider lets you keep your account secure. For your particular case, are the login credentials still secure enough? Review the tools listed in this article and set your account's correct security level !!!
###
Troubleshooting
In case you have locked yourself out of your control panel, please review [this article](https://openprovider.help/books/quick-start/page/can-not-log-in-the-control-panel) to get access again.
# How to subscribe to Openprovider Newsletter?
## Question
How can one subscribe to Openprovider's Newsletter voluntarily?
## Answer
In order to subscribe to Openprovider's Newsletter, go to our [blog](https://www.openprovider.com/blog) and click on any post. Navigate to the end of the post and you will find the subscribe option.
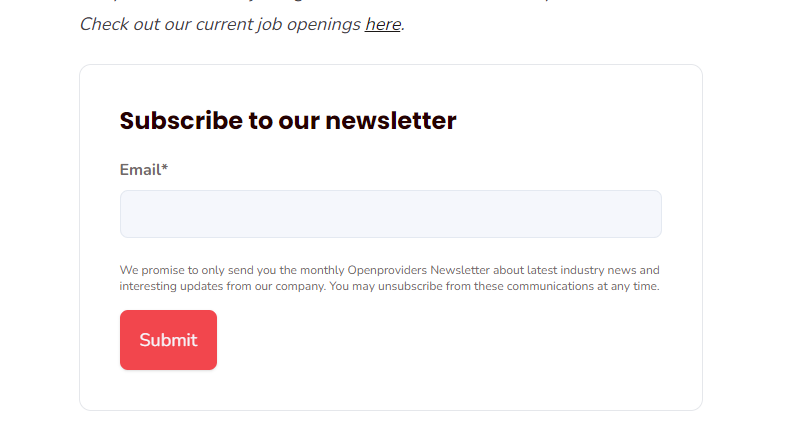
Once there, be sure to leave your actual contact details and then press **Submit Subscription** button.
# Obligations for resellers
## Question:
What are the obligations to become a reseller of Openprovider?
## Answer:
As a reseller of Openprovider, one is bound to the regulations that ICANN defined for “resellers” in [ICANN agreement](https://www.icann.org/resources/pages/approved-with-specs-2013-09-17-en).
As ICANN governs the generic extensions (gTLDs) only, this may only apply to a subset of one's domain portfolio, but remember that many other registries have similar requirements. What are those ICANN-mandated obligations?
- A **registration agreement** is required for each domain registration, containing the domain name, name of the domain holder and the order date, plus a number of pre-defined clauses. An example of such agreement can be found [here](https://doc.openprovider.eu/Registration_Agreement). The language of this agreement is free to choose, as long as the required contents is included. Openprovider may request a copy of this agreement.
- This **registration agreement** must be stored until at least 2 years after the ending of the contract with the registrant.
- The reseller is always required to **implement a formal decision** about a domain name, for example a WIPO decision or a court order, and to cooperate in a legal case involving one or more of his domain names.
- The reseller is always required to **provide the authorization code** of a domain to the domain holder and **unlock** a domain name within 5 calendar days. There are a few grounds for blocking (reject) an outgoing domain transfer (see the transfer policy, [section A3.7](https://www.icann.org/resources/pages/transfer-policy-2016-06-01-en#I.A.3.7)), but those do not lift the requirements of providing the authorization code or unlocking the domain.
- The reseller must inform their customers about the **Deletion and Auto-Renewal Policy**.
- The reseller's website must contain a link to the [**Registrants' Benefits and Responsibilities**](https://www.icann.org/resources/pages/benefits-2013-09-16-en).
- The reseller must **identify the registrar** upon the domain holder's request.
- The reseller must **not present itself as ICANN-accredited** organisation.
A more formal list of these obligations is listed in the [ICANN agreement](https://www.icann.org/resources/pages/approved-with-specs-2013-09-17-en#3.12), section 3.12. Of course, all other obligations from article 4 (Resellers) of our [Terms and Conditions](https://www.openprovider.co.uk/terms-conditions) and the rest of these Terms and Conditions apply at any moment.
# Openprovider Upcoming Renewals going to Spam
There is a possibility that upcoming domain renewal notifications from Openprovider may be marked as spam in reseller mail systems.
These renewal emails are sent from dom-mgt@openprovider.nl and are properly authenticated with SPF and DKIM. The messages include a list of domain names scheduled for renewal in the coming days.
However, if this list contains domain names that are blacklisted or includes multiple unrelated URLs, especially those using high-risk TLDs (such as `.online`, `.tips`, etc.), spam filters may interpret the message as resembling phishing or domain-parking spam. As a result, the email may receive a high spam score and end up in the spam folder.
### Resolution:
To prevent these legitimate renewal notifications from being filtered as spam, resellers are advised to whitelist the following:
- Email address: dom-mgt@openprovider.nl
- (Optional) Domain: openprovider.nl
This ensures renewal reminders are delivered to the inbox without disruption.
# Openprovider and GDPR
## Question
Is Openprovider GDPR compliant?
## Answer
On May 25, 2018, the [General Data Protection Regulation](http://eur-lex.europa.eu/legal-content/EN/TXT/?uri=uriserv%3AOJ.L_.2016.119.01.0001.01.ENG&toc=OJ%3AL%3A2016%3A119%3ATOC) or GDPR, became effective.
This regulation was created to protect the personal data of private individuals within the European Union.What can a reseller expect from Openprovider with respect to the GDPR?
This article contains information about the following topics:
- [Data processing agreement](https://openprovider.help/link/6856#bkmrk-data-processing-agre-1)
- [Data collection by Openprovider](https://openprovider.help/link/6856#bkmrk-data-collection)
- [Changes to whois](#bkmrk-whois)
- [Changes to gTLD transfers](#bkmrk-gtld-transfers)
### Data processing agreement
Openprovider has created a data processing agreement which clearly defines which data we collect for what purpose and defines your (being the controller) and our (being the processor) responsibilities with respect to personal data of the data subject. This agreement is additional to the general Terms and Conditions, and you can accept the agreement from your control panel. If the reseller has already accepted it, it can be found here in the [Contracts section](https://cp.openprovider.eu/documentation/contracts.php) of the control panel.
### Data collection
Data collection will not require technical changes on the reseller's side in short term. Openprovider collects two types of data:
- **Data that Openprovider uses by itself**: the data that Openprovider collects about the reseller, our customer, is required for the performance of the service: creating the reseller account, sending invoices, newsletters, ... Of course, resellers can unsubscribe from our newsletters at any moment, but please know that this is our primary means of communication for important updates to Openprovider products, services, terms, and prices. If a reseller accidentally unsubscribes, a re-subscription can be made through the Openprovider [homepage](https://www.openprovider.com/).
- **Data collected for product delivery**: the data that Openprovider collects about *your* customers (the domain contacts and the contacts of other products and services) will not notably change. Almost all providers will keep requiring full contact data for operational and legal purposes, though these data are not shared publicly anymore. However, some registries do not require all contact types anymore with a domain registration:
- **NIC AT (.at)** removes the administrative contact.
- **DENIC (.de)** removes the administrative and technical contacts.
- **Ficora (.fi)** removes the administrative contact and does not allow private individuals to use the technical contact anymore.
- **NIC LT (.lt) will remove the technical contact; it also adds a requirement for the company registration number (for legal entities).**
- **IIS (.nu and.se)** no longer require a VAT number; the corporate identity number or personal identification number remain required.
- **NASK (.pl)** removes the technical contact. Additionally, the current optional “reason for registration” has been removed.
- In general, it’s good practice to stop using personal e-mail addresses for administrative and technical contacts for domain names. Openprovider advises relying on **role-based e-mail addresses** like support@ or webmaster@.
Openprovider is investigating how to fine-tune Openprovider's data collection and retention: data elements that are not used at all may be removed; data elements that are used for specific extensions only will be removed as soon as no such domains are linked to that contact anymore. Unused contacts in Openprovider will be removed with a notification.
In all cases, Openprovider system (control panel and API) will be fully backwards compatible; Openprovider do not force changes from the reseller side.
### Whois
For the Openprovider product *domain registration*, the reseller will face the biggest changes in the whois. Most European registries already show a limited set of data in their whois registers because of current privacy laws, and Openprovider will see these data being minimized even further. In many cases, no personal data will be shown at all.
For generic extensions (gTLDs), the registrar community is working together with ICANN and the European DPAs on a solution that meets both the requirements of GDPR and ICANN policies.
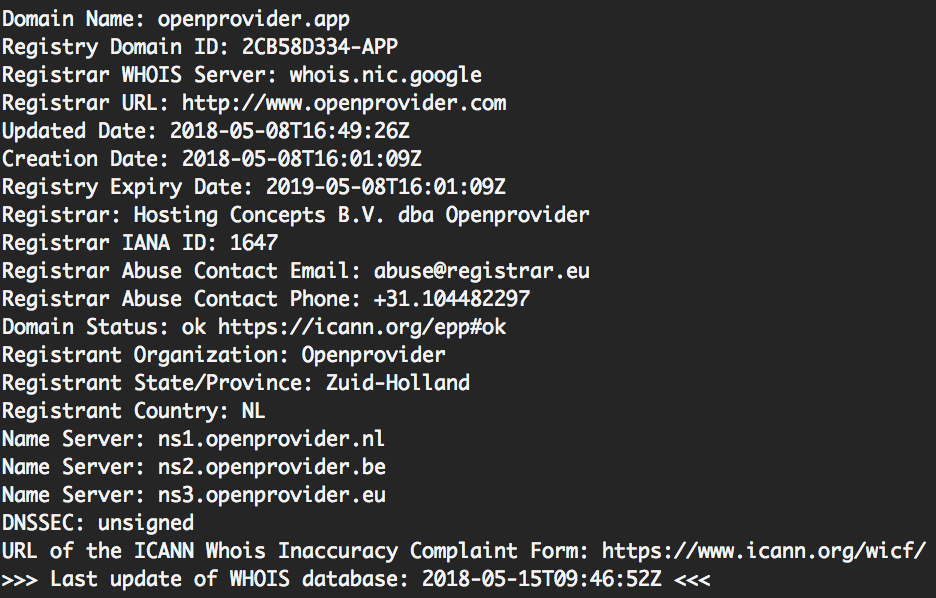
The final solution will be full implementation of the new [RDAP protocol](https://www.icann.org/rdap), but in the short term, the whois is changed according to ICANN's [interim model](https://www.icann.org/en/system/files/files/proposed-interim-model-gdpr-compliance-summary-description-28feb18-en.pdf). This model allows registries and registrars to hide all personal data from the whois, except for the organization name, the state and country (for legal purposes) and a replacement for the e-mail address (either an anonymized e-mail address of a web form), though some registries may skip this. Access to full whois data is possible only for selected purposes and only through an accreditation process (for example, law enforcement organizations).
An example of the new whois output is:
### Contacting a domain holder
Of course, those changes have effect as well if you wish to contact the domain holder of a domain not running at Openprovider. Depending on the registry, there may be three options:
- An anonymized e-mail address is published; the reseller can still send an e-mail, and the registry or registrar will forward it to the real e-mail address of the domain contact.
- Instead of an e-mail address, a link to a web form is published. The registry or registrar will send the message to the domain contact.
- This is the model that Openprovider implements.
- In some cases, there may not be any contact method for the domain holder. In that case, search the website published on this domain name for contact details or address the registrar of the domain name.
### gTLD transfers
The transfer policy changes proposed by the Registrar Stakeholder Group were adopted by ICANN.
The requirement to send an e-mail to the owner and/or administrative contact (the so-called "Form of Authorization" or "FOA") can no longer be enforced, as for the above-mentioned whois limitations: even if an e-mail address is listed in the whois, it might be a dummy address that does not receive any e-mail at all.
Therefore, the gTLD transfers will now be initiated directly at the registry, skipping the required e-mail approval by the domain contact. This will reduce the transfer time to a maximum of five days. Please note that each registry and registrar defines its own policy. For some domains, an FOA may still be required.
A big change compared to the current policy, is that the losing registrar may reject a transfer within five days if he gets no affirmative response from the domain holder. In the current policy, refusal of an outgoing transfer by the losing registrar is only possible in a few very strictly defined cases. We do not know yet if any registrar will implement an "auto-reject" policy, but it may be wise to inform your customers that they should not ignore any transfer e-mails.
**GDPR in other languages**
For searchability options, those are a few of the local terms for GDPR used in other languages:
- Dutch: AVG / Algemene Verordening Gegevensbescherming
- French: RGPD / Règlement général sur la protection des données
- German: DSGVO / Datenschutz-Grundverordnung
- Spanish: RGPD / Reglamento general de protección de datos
# Openprovider is ISO 27001 certified

We are proud to announce that Openprovider **has successfully achieved ISO 27001 certification**. This certification is an important step towards our commitment to achieving maximum security for our employees and customers.
ISO 27001 is an internationally recognized standard for secure information management. An ISO 27001 certification is awarded to companies that comply with the requirements of this standard and have demonstrated a commitment to protecting their information assets.
The certification process involved a rigorous audit of our information security management system performed by an independent third-party auditor. The auditor assessed our security policies, procedures, and controls against the ISO 27001 standard’s requirements. We received the certification only after demonstrating compliance with all of the standard’s requirements.
As part of our certification, we have implemented stringent security measures, including risk assessment, data encryption, and access control. These security measures protect sensitive customer data from unauthorized access, disclosure, or alteration.
At Openprovider, we take data and information security seriously, and we will continue to work to provide maximum security to our customers and their respective clients. With us, your domain registration details, personal information, and transaction data are in safe hands. We implement strict policies and procedures and follow best practices to ensure your data and information are private, secure, and protected. The certificates can be checked below.
- [ISO 27001:2022](https://storage.googleapis.com/op-email-asset/footer/ISO-27001-2022-certificate.pdf)
# Renewal and expiration reminders
## Question
How often are renewal reminder send by email?
## Answer
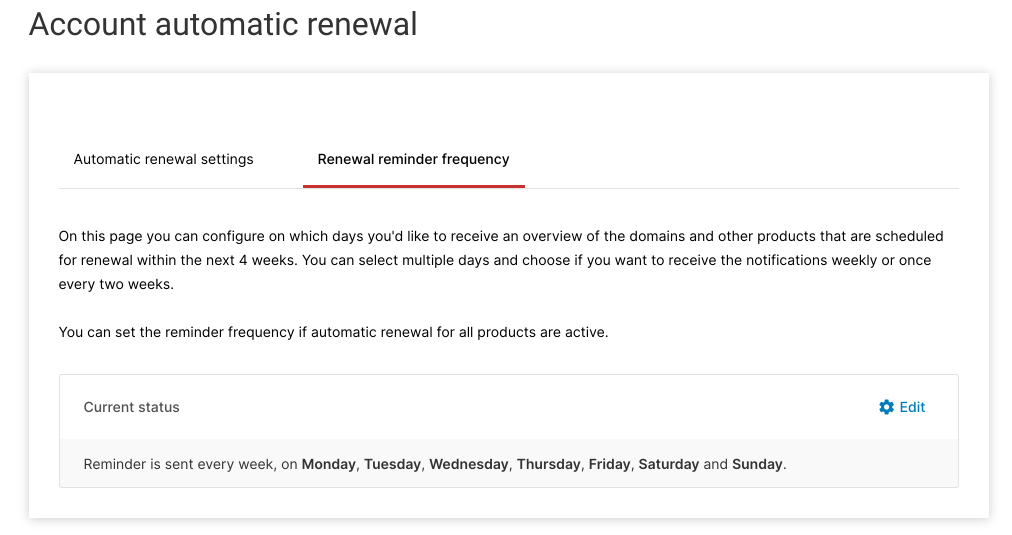
By default Openprovider will send you a message daily if one of the resellers products is going to be renewed or expires within the coming 28 days.
**Note**: Our system timezone is set to **CET** (Central European Time). During summer months, it automatically shifts to **CEST (UTC+2)** because of daylight saving time.
- The dates of already created, transferred, or renewed domains or products remain unchanged, regardless of summer time changes.
- However, the summer time change applies to any new domain registrations, renewals, transfers, or products added during that period.
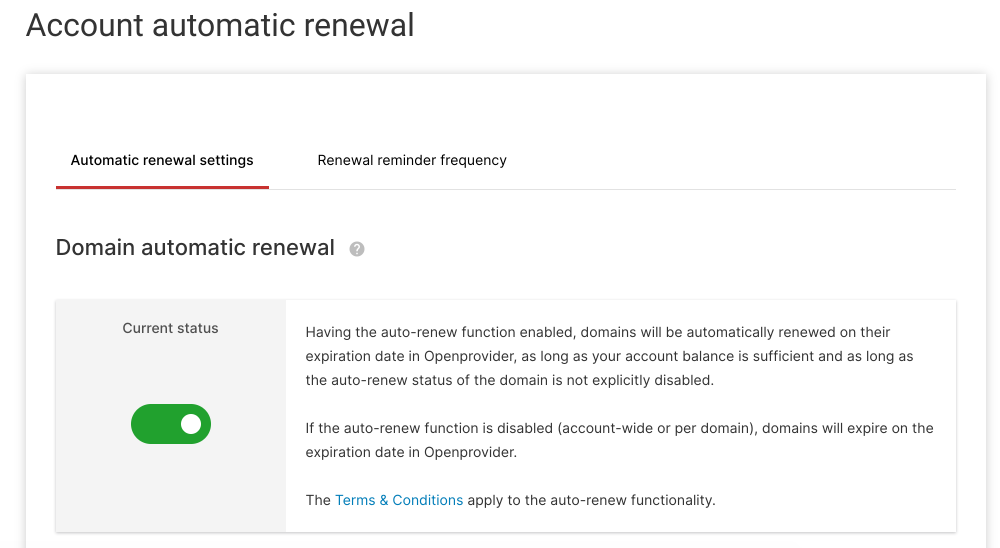
The reseller can change this frequency by going to [this](https://cp.openprovider.eu/account/config-autorenew.php) page and selecting how often and on which days you want the expiration reminders.
Or via the menu **Account > Settings > Auto-renew**
The expiration reminders will be sent to the administrative contact in the resellers account.
# Renewal policies in Openprovider
## Question
How does domain renewal/expiration system work in Openprovider?
## Answer
For renewal or expiration of a domain name, the *expiration date in Openprovider* is the most important date. This date can be earlier than the registry's expiration date, for example if the registry requires Openprovider to order the renewal some time before the expiration date of a domain name or if the registry has a hard cut-off date instead of a *renewal grace period* like many ccTLDs. This difference is called "renewal date offset".
Each domain needs to be renewed before its "expiration date in Openprovider". Depending on the auto-renewal settings in your account (account-wide or per-domain), Openprovider implements the following policies:
- At any time within 4 weeks before the domain's expiration date in Openprovider, the reseller can explicitly renew the domain via the reseller control panel ([request queue renewals](https://cp.openprovider.eu/domain/queue-renewal.php)). For some extensions, including all gTLDs, this can even be done at any time, even before the last 4 weeks. As long as the account balance is sufficient, the renewal is ordered instantly.
- Domains not renewed explicitly, will be processed by our renewal and expiration scheduler:
- If **auto-renewal is disabled** (on [account level](https://cp.openprovider.eu/account/config-autorenew.php) or on domain level via *modify domain*), Openproviders system will cancel the domain registration on the expiration date in Openprovider.
- If **auto-renewal is enabled** (on [account level](https://cp.openprovider.eu/account/config-autorenew.php) or on domain level via *modify domain*) and the resellers account **balance is sufficient**, then the domain will be renewed on its expiration date in Openprovider for the minimum period available (in most cases 1 year).
- If **auto-renewal is enabled** (on [account level](https://cp.openprovider.eu/account/config-autorenew.php) or on domain level via *modify domain*) but the resellers account **balance is not sufficient**, then the domain registration will be canceled on the expiration date in Openprovider.
In most cases a deleted domain is restorable for a certain; reactivate the domain via the [restore queue](https://cp.openprovider.eu/domain/queue-restore.php) in the RCP. Additional costs may apply. Please note processed renewals cannot be canceled, no refunds are possible.
**Note:** Customers using API should work with the "renewal\_date" - which is the equivalent of "Expiration date" shown in your RCP domain details.
### Grace periods
Upon explicit renewal or auto-renewal of a domain name, Openprovider sends a *renew* order to the registry. At that moment Openprovider pays for an additional year and this additional year is added to the domain's registration period.
As a result, any renewals that were processed cannot be undone, whether it was a renewal for too many years or a renewal shortly before a transfer-out.
Some registries have policies for deletion of domains in the add grace period, the first days after registration of a new domain. Openprovider does by default not refund domain deletes during the grade periods. In exceptional cases (for example a high number of incorrect registrations or an expensive premium domain), contact our support department to see if we can find a solution for you.
### Deletion and expiration of frozen domain names
In exceptional cases, a registry may block (or freeze) a domain name and prohibit deletion or expiration of such a domain name. Mostly, this is due to pending court orders or other legal investigations. As defined in §11.10 of our [Terms and Conditions](https://openprovider.com/terms-conditions/), we reserve the right to charge for a renewal fee in case we cannot delete a domain or let it expire, even if the reseller's intention is not to renew the domain name.
## SSL certificates
SSL certificates need to be renewed: once the period is over, The reseller need to order a new certificate. Our advise is to start the new order at least 4 weeks before the current SSL certificate expires to prevent any interruption of the secured website. When starting the order within the last 90 days of the old SSL being active, the remaining period of the SSL certificate will be added to the new certificate (only within current active order).
Please note new order for the same domain is not renewal.
The reseller can also use the auto-renew option for SSL certificates. This makes sure that you renew your certificate in time. Openprovider system will automatically request the certificate with the original CSR.
[Read more about the auto-renew option for SSL certificates in the article](https://openprovider.help/books/ssl-certificates/page/automatic-renewal-for-ssl-certificates).
When the reseller forgot to renew the certificate and the new order takes longer because of validation, a quick solution is to order a domain validated (DV) certificate (EssentialSSL or similar). Such a certificate is available within a few minutes, allowing you to continue on a secure website without browser warnings. Once the real order is finished, just install that one and revoke the intermediate solution. If this is done within 30 days, The reseller will receive a full refund.
## Plesk licenses
Plesk licenses will always be renewed automatically as long as the reseller account balance is sufficient. If the account balance is insufficient, the license is terminated. Reactivation is not possible - the best and quickest solution is to order a new license and install that on your server.
There is no adjustable autorenewal setting for plesk licenses.
## Spamfilter bundles
A spamfilter bundle or filter is renewed automatically as long as the account balance is sufficient. If the reseller want to cancel a filter or subscription, the reseller has to delete it from the control panel.
You can find instructions [here](https://openprovider.help/books/spamexperts/page/spamexperts-cancellation-bundle-and-single-filters). There is no adjustable autorenewal setting for spamfilters.
If the account balance is insufficient for renewal, an [expiration procedure](https://openprovider.help/books/spamexperts/page/expiration-of-spamexperts-bundle) will be started that causes as little issues as possible.
## Notes
- The expiration and renewal dates in Openprovider are leading. If a reseller encounter any difference between the registry's dates and those of Openprovider, inform us immediately for further investigation. Openprovider is not responsible for any issues caused by such a difference.
# Reseller in whois
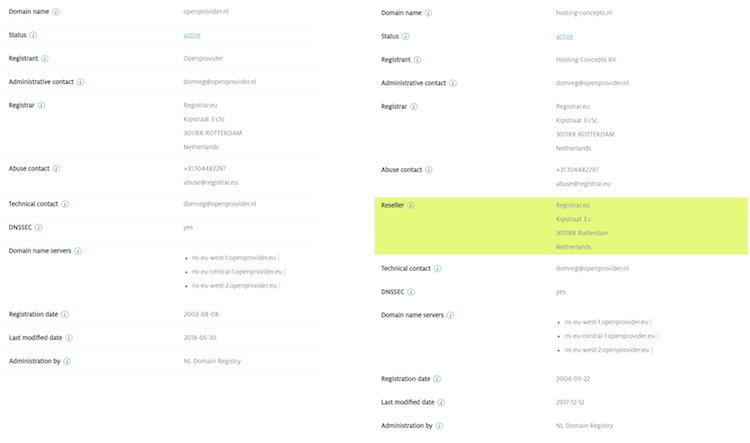
On a regular basis we receive the question from our customers if they can be shown as the reseller in the whois, to better serve their customers: someone wanting to know something about the domain can then contact the reseller directly and not have to go via Openprovider. This is possible for .nl domain names!
*Some other extensions also support reseller data in the whois, but are not yet supported by Openprovider: .eu, .uk, .com, .net and .hk. If you are interested, please send us a feature request!*
## Whois w**i**th and without reseller
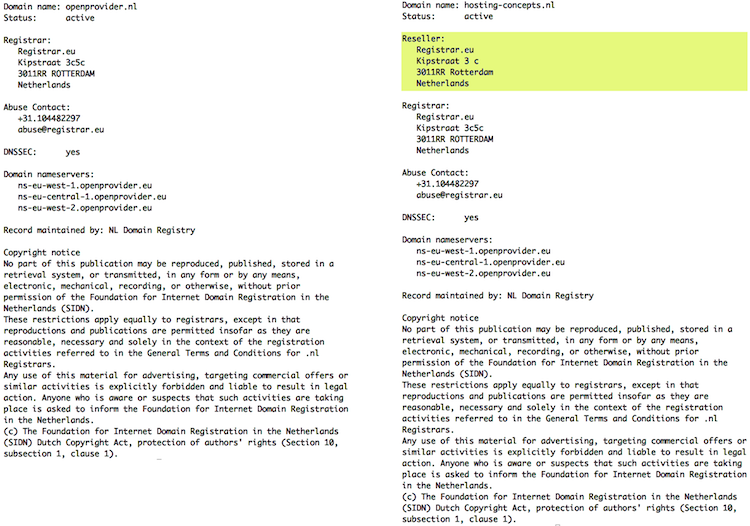
In the screenshots below you can see how a reseller is shown in the whois. The top image shows what it looks like through the website of SIDN, the bottom image what is looks like in whois command-line query. The reseller is always shown before the registrar. In this example, we chose "Registrar.eu" to be the reseller, but this can be any name you want, for example your own company name or your customer's company name.
**Via SIDN-website**
****
****Via command line****
********
## Reseller in registry e-mails
SIDN sends a number of e-mails to domain contacts, for example after transferring or deleting a domain name. The reseller name is mentioned in those e-mails as well, for example:
- Subject: 1017 Transfer of domain name #domainname# now processed
- Dear registrant,
You are receiving this message because you are the administrative contact for a domain name.
The domain name #domeinnaam# has now been transferred to #new-registrar#. **\#new-registrar# is a service provider that works with the reseller #new-reseller.**
## Setting the reseller contact
By default, no reseller information is included in the domain. You can change this in two ways:
### **Per domain**
Upon registration, transfer or modification of a .nl domain, you are able to place one of your customers in your Openprovider account as the reseller. This may differ for each domain:
- If you **operate** **with only end users**, you can use your own contact details. Anyone requesting the whois data from one of your domains, you will see your data.
- If you **work with resellers**, you may record their contact details. Anyone requesting the whois data from one of your domains can the see the data of the reseller.
Adding or changing a reseller can be done either through your Openprovider account or through the [API](http://doc.openprovider.eu).
### For your whole account
It is possible to also change the reseller settings in your whole account. You can do this through your menu *Account > Settings > Default domain contacts*. Here you can choose a standard reseller and use this information for all your domains. A simple change can thus also be completed easily. .
# Resellers verification process
There are various situations where, for security reasons, it is essential to validate certain data before proceeding with an action. This validation process not only protects the user's interests but also safeguards the system's integrity, reducing the risk of errors or unauthorized access. While it may seem like an extra step, prioritizing security is crucial to avoiding bigger issues down the line.
**IMPORTANT:** All shared documents will be handled with the utmost care to ensure their security and confidentiality. They will be utilized exclusively for the specific purpose for which they were provided, in strict adherence to the protocols and standards outlined in our ISO certification. This approach underscores our commitment to maintaining compliance and safeguarding sensitive information.
## **Documents accepted for data verification**
### **Individual verification**
Acceptable identification documents vary by country. A scanned passport is always preferred to verify identity and is required in some cases. In [this article](https://openprovider.help/books/quick-start/page/acceptable-verification-documents-by-country) you can see the documents accepted for data verification in each country.
### **Company verification**
The exact type of document varies depending on the country and the type of legal entity, but Openprovider typically accepts a copy of one of the following documents:
- Articles of Association
- Charter/Bylaws
- Certificate of Incorporation
- Nonprofit Organization Charter
The list of accepted documents may vary depending on the country and type of entity. You can find more details of documents accepted per country in [this article](https://openprovider.help/books/quick-start/page/acceptable-verification-documents-by-country).
### **Address verification**
These are the acceptable ways to verify an address:
- Utility bill of last 6 months
- Bank statement or mobile phone invoice of last 6 months
- Government-issued letter
- Residence certificate
### **Phone verification**
In some cases, we need to perform telephone verification to ensure that the data is accurate and valid. This step helps confirm that the provided contact information corresponds to the actual user and avoids any potential discrepancies. For this phone validation we will need:
- Copy of ID
- We will call on the phone number on file and ask you to verify the account details (confirm the request, ask to confirm the address on records for the account)
## **Common Requirements for documents**
- The format must be no more than one step removed from the original document:
- Document copies and scans must be in PDF format and taken directly from the original document; they can’t be processed, converted, or embedded in other files
- A picture of a physical document must be the original, unprocessed picture in JPEG or PNG format
- Screenshots aren’t acceptable
- Photos and scans of the Photo IDs must be in color
- Images must not be low-quality
- Identity and legal entity documents must not be expired
- Documents must be readable and in a valid upload file format
- Documents must not be cropped or missing pages with crucial information, and all borders must be visible
- If the country of residence differs from the country of the account, a passport is required for identity verification
## **Situations where data must be verified**
**A reseller wants to disable the 2FA (admin contact or other)**
- Ticket must be sent by the user (email address) that wants to disable the 2FA
- Copy of ID
- Selfie holding the ID
- Selfie holding a paper written: “I want to disable the 2FA. Today is \[date of today\]”
**A reseller wants to add, remove or modify IP whitelist**
- If ticket is sent by the admin user: no more proof is needed
- If ticket is not sent by the admin user:
- Copy of ID
- Selfie holding the ID
- Selfie holding a paper written: “I want to update the IP list of RID \[RID\]. Today is \[date of today\]”
**A reseller wants to reset the password but he is not receiving the email or he is not able to reset it from his end**
- Ticket must be sent by the user (email address) that wants to reset the password
- Copy of ID of the user
- Selfie holding the ID
- Selfie holding a paper written: “I want to reset the password. Today is \[date of today\]”
**A reseller wants to know which is his username**
- Ticket must be sent by the user (email address) that wants to reset
- No more verification is needed.
**A reseller lost access to his email and wants to change it (used for RCP)**
- Ticket must be sent by the admin of the account
- Copy of ID
- Selfie holding the ID
- Selfie holding a paper written: “I want to update the email of RID \[RID\]. Today is \[date of today\]
## **Acceptable verification documents by country**
See the following [list of documents that Openprovider accepts](https://openprovider.help/books/quick-start/page/acceptable-verification-documents-by-country) as proof of identity and entity for some of the countries the Openprovider supports. Please, if you are trying to validate data from a country that you can not find here, contact the support team on [support@openprovider.com](mailto:support@openprovider.com).
# Two-factor authentication (2FA)
[**How to set up 2FA**](#bkmrk-how-to-set-up-2fa-1)
[**Backup codes**](#bkmrk-backup-codes-1)
[**What to do when you have lost your device or app and have no backup codes stored.**](#bkmrk-what-to-do-when-you--1)
[**User with API or WHMCS environment connected**](#bkmrk-user-with-api-or-whm-1)
[**What to do when multiple employees use the same credentials or do not own a mobile phone?**](#bkmrk-what-to-do-when-mult-1)
Two-factor authentication (2FA) adds an extra layer of security by requiring both a password and a second verification method (like a phone or authentication app) to access an account.
While we’ve offered two-factor authentication (2FA) for years, it will become mandatory for all accounts starting October 28th 2025 to ensure stronger protection against unauthorized access.
## **How to set up 2FA**
You can set up Two-factor authentication via your control panel, section [Account > Security > Two-factor authentication](https://cp.openprovider.eu/dashboard/account/two-factor-authentication). You will be setting up the Two-factor authentication for the user you are currently logged in as.
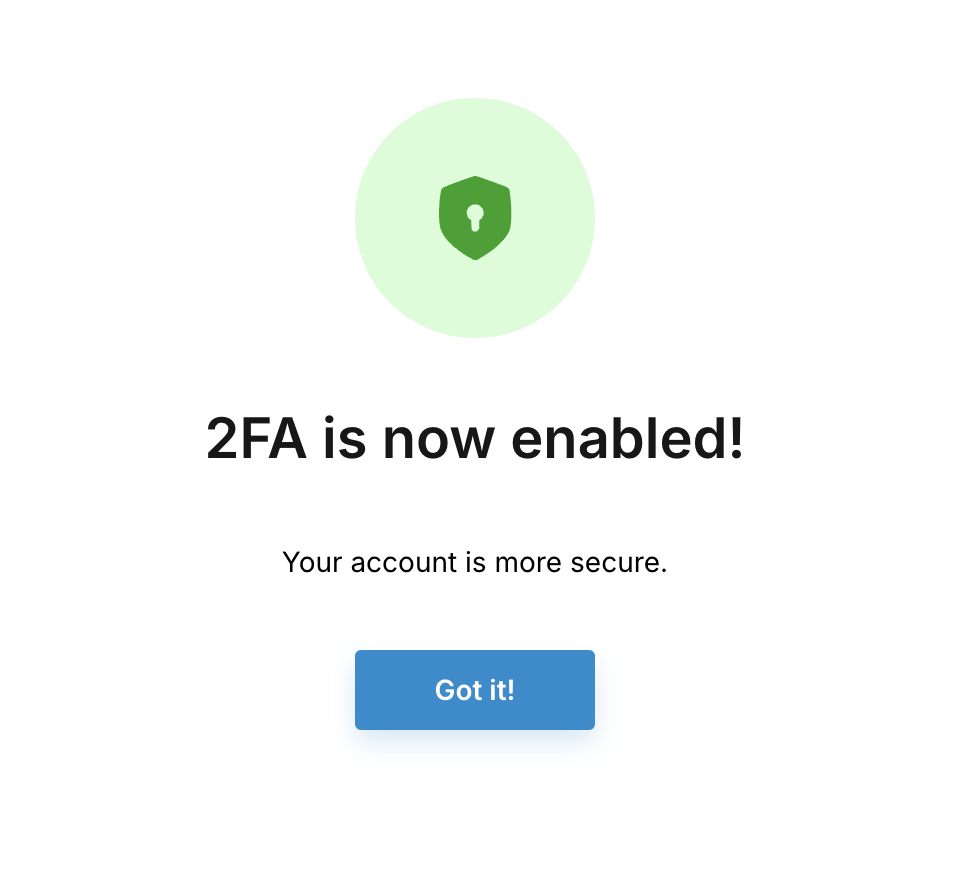
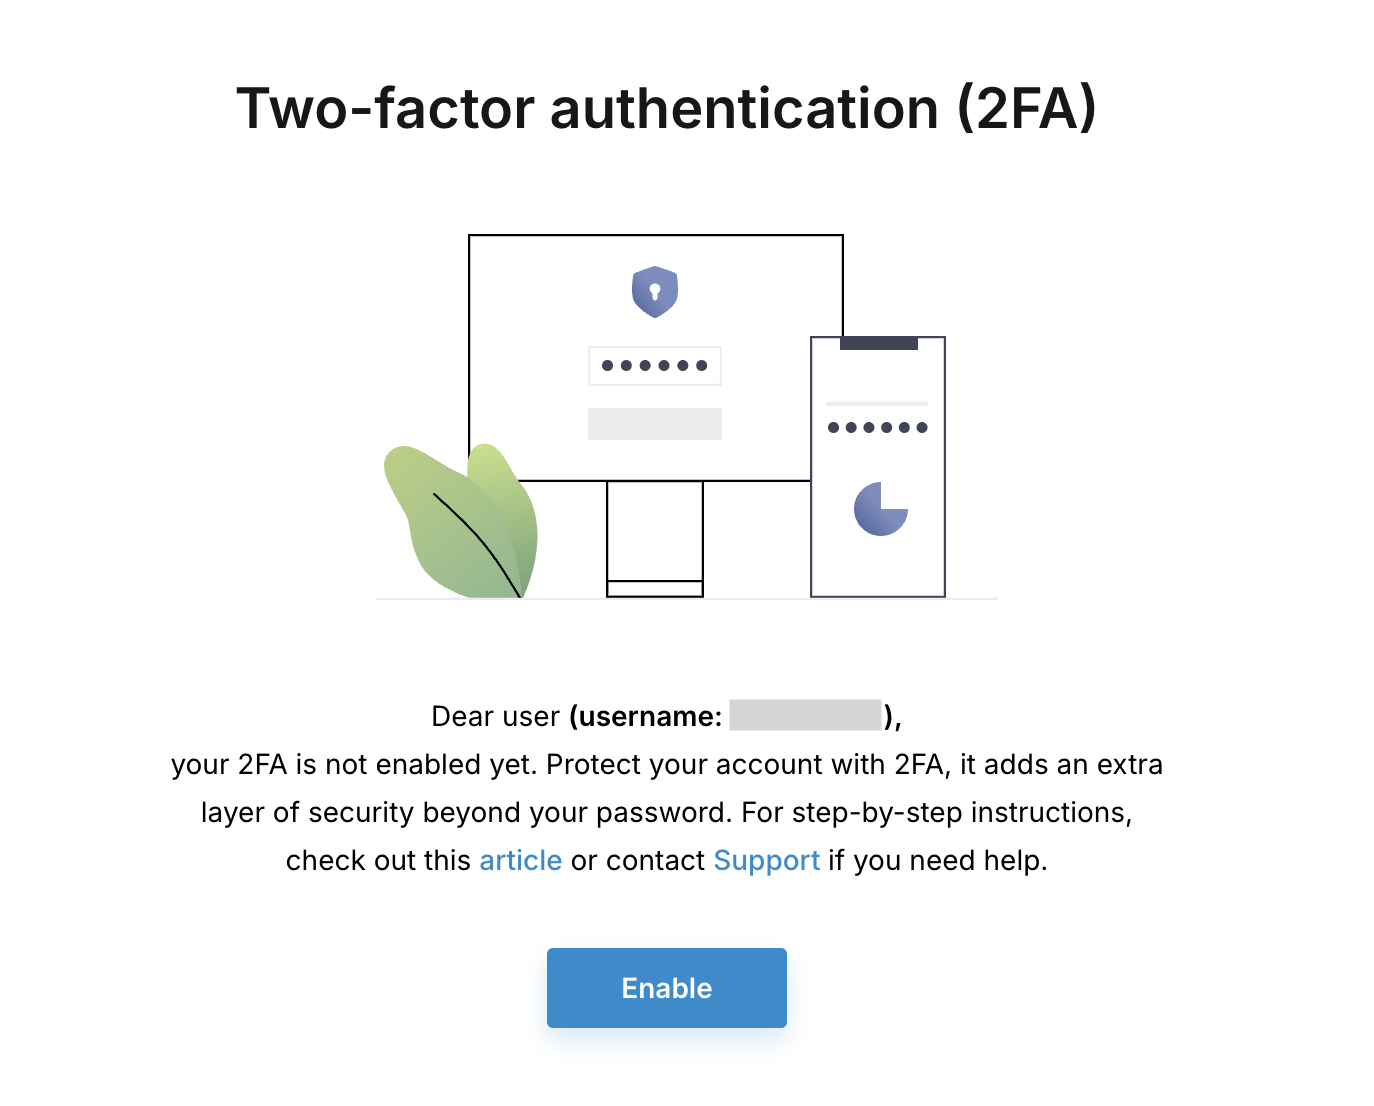Just follow the steps on the screen to set up Two-factor authentication. Scan the QR code using an authentication app like Google Authenticator, Authy, Microsoft Authenticator. If you don't have one, download it from the App Store or Google Play.
## **Backup codes**
Once you have successfully set up the 2FA, backup codes will be shown.
**Important**: These codes are only shown **once!**
You will need these backup codes in case you have lost your 2FA configuration or device and want to log in. Without the 2FA code or the backup code, you can not directly log in to your account anymore.
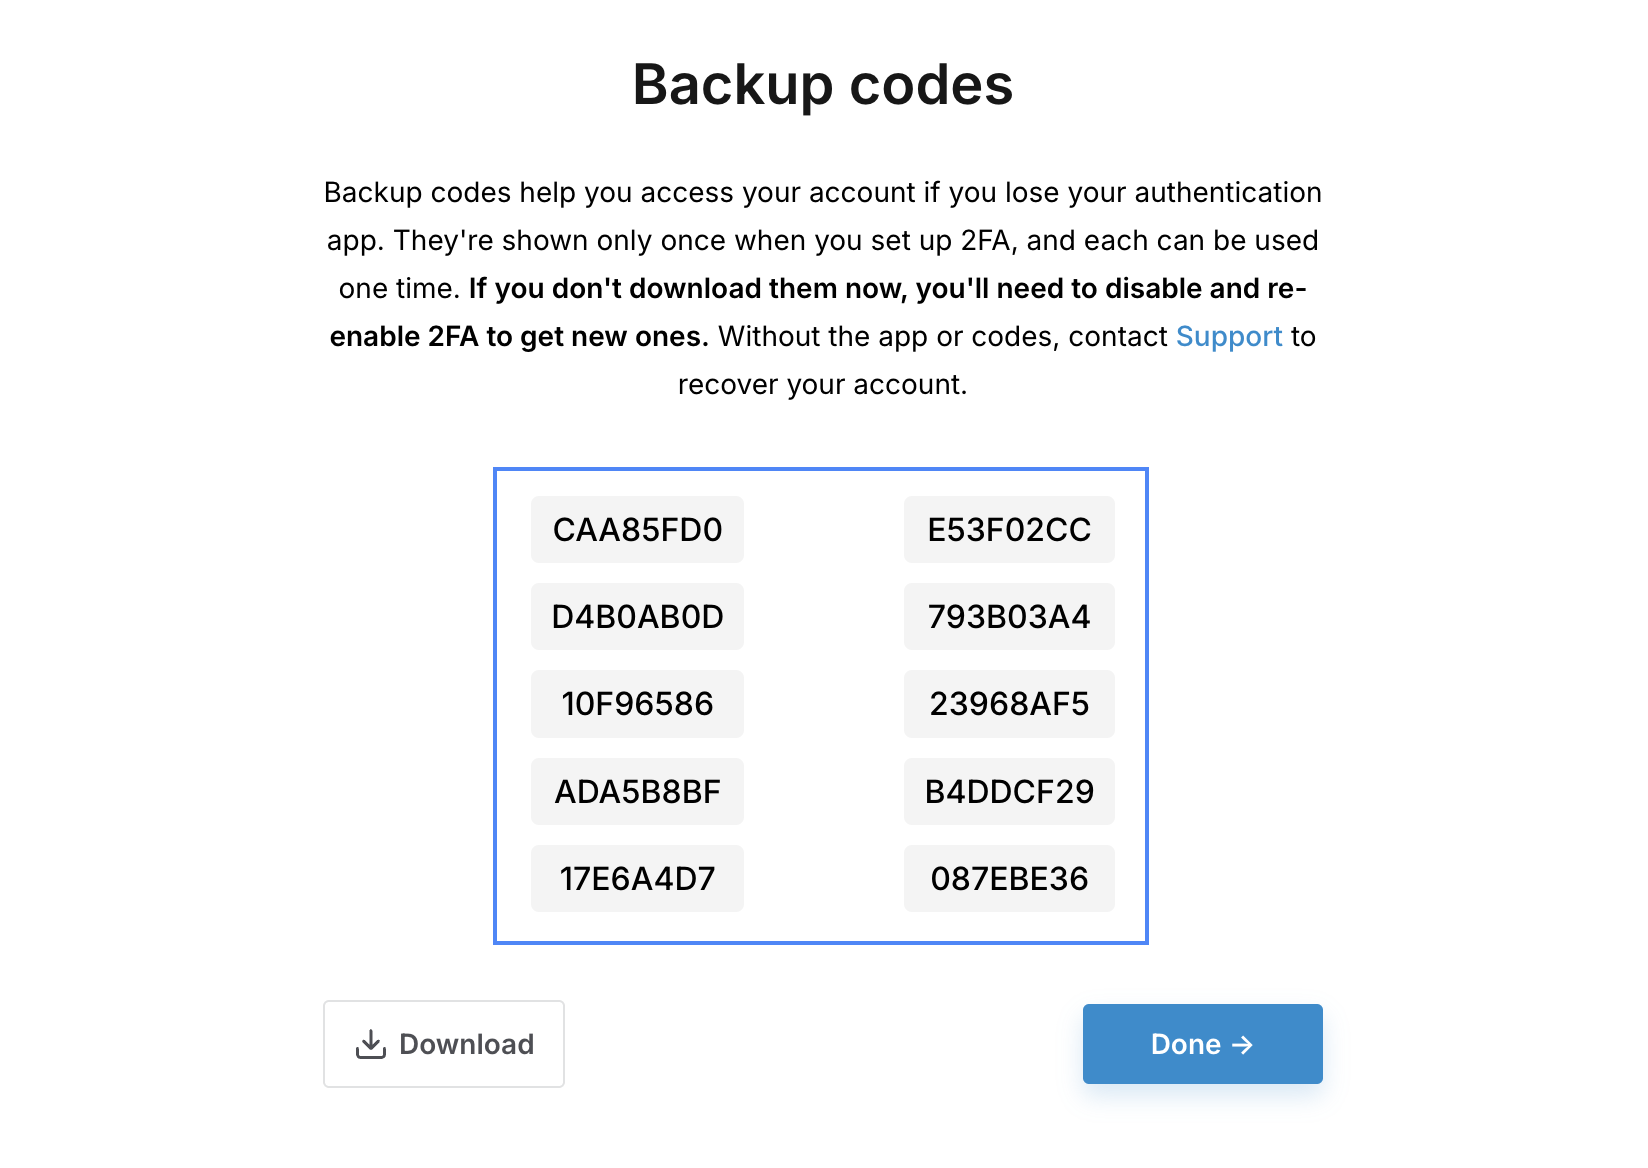Click on download to download the list of codes.
## **What to do when you have lost your device or app and have no backup codes stored.**
Please contact the **admin user** of your account.
They can file an email to support department from their registered e-mail address, requesting a code reset. Please note that this will be manually reviewed and verified and might take a few hours before processed. Therefore we recommend to store your backup codes in a convenient and safe place in order to avoid any interruptions so your activities can continue smoothly.
## **User with API or WHMCS environment connected**
2FA will only be asked when you access the control panel via the website interface (RCP). It will not cause any connection issues when you use the same user for your API or API based environment like WHMCS etc.
## **What to do when multiple employees use the same credentials or do not own a mobile phone?**
We would recommend that every employee has his own user account and credentials. This will increase the security and will help identify specific user actions. [New users can be added](https://openprovider.help/books/quick-start/page/how-to-adjust-a-user-or-create-a-new-user-for-the-account) via the Control Panel by the Admin user.
In case a user does not have a mobile phone or multiple employees share a set of credentials, we would recommend to use a password manager (for example "Bitwarden"), which can help manage the 2FA code, which can be accessed by multiple employees from different locations.
# When does Openprovider contact the end user?
## Question
In which cases will Openprovider contact the domain owner bypassing the reseller?
## Answer
Normally, Openprovider will only be in touch with the reseller. But there are cases when Openprovider is forced to contact the end user (domain owner), for example the domain holder (registrant) of a domain name. This article lists the cases in which Openprovider has to do so. This article does not list the cases in which the *registry* gets in touch with the domain holder.
- **Incoming transfer of a gTLD** (e.g. .com, .net, .guru, .amsterdam, including the ccTLDs .tv, .cc and .us): as for ICANN regulation, Openprovider must collect the approval for the transfer and sends an e-mail to the domain holder and to the administrative contact. This e-mail can be partly personalized, as described [here](https://openprovider.help/books/domains/page/customize-transfer-confirmation-e-mails-template-foa). *Note: if, as a result of the GDPR, the whois contains no or an invalid e-mail address, this e-mail is not sent.*
- **Outgoing transfer of a gTLD** (e.g. .com, .net, .guru, .amsterdam, including the ccTLDs .tv, .cc and .us): as for ICANN regulation, Openprovider must inform the domain holder and to the administrative contact. This e-mail can be partly personalized, as described [here](https://openprovider.help/books/domains/page/customize-transfer-confirmation-e-mails-template-foa).
- **E-mail verification**, applicable to gTLDs (e.g. .com, .net, .guru, .amsterdam, including the ccTLDs .tv, .cc and .us): as for ICANN regulation, if a not-yet-verified e-mail address is used as owner contact for a gTLD registration or update, Openprovider must verify that this e-mail address is actually in use. For this purpose, Openprovider sends an e-mail to the domain holder. This e-mail can be completely personalized, as described [here](https://openprovider.help/books/domains/page/customise-contact-verification-page-for-gtlds). E-mail verification is triggered at the following moments:
- If a gTLD is registered and the owner contact's e-mail address is not already verified and no verification is in progress already
- If a gTLD registration is assigned a new owner and the owner contact's e-mail address is not already verified and no verification is in progress already.
- If the e-mail address of a contact handle that is used as owner contact of a gTLD registration is changed and this e-mail address is not already verified and no verification is in progress already
- If evidence reaches us that a previously verified e-mail address is no longer in use, for example if we receive a bounce on this e-mail address
- *Note: an e-mail address only needs to be verified once by Openprovider. If the e-mail address is in use at two different handles in the resellers account, verification will be required only once. This is not limited to one reseller: if the e-mail address is already verified at another reseller, no new verification is required.*
- *Note: e-mail verification is required on registrar level. In case the reseller has a domain with another registrar, two different verifications can be required. Even within Openprovider that can happen, in the rare case that we register a gTLD at another registrar.*
- **WDRP notifications** (Whois Data Reminder Policy), applicable to gTLDs (e.g. .com, .net, .guru, .amsterdam, but also to ccTLDs like .se, .nu, .tv, .cc and .us): as for ICANN regulation, once a year (shortly after the domain's renewal date) Openprovider sends a summary of the registration data of each domain to the domain's owner contact. This e-mail further contains the note that any updates must be announced to reseller domain provider and incorrect registration data may result in loss of the domain name. This e-mail can be personalized, as described [here](https://openprovider.help/books/openprovider-internal-agents-only/page/customize-whois-data-reminder-e-mails-to-end-users-wdrp).
- **ERRP notifications** (Expired Registration Recovery Policy), applicable to gTLDs (e.g. .com, .net, .guru, .amsterdam, including the ccTLDs .tv, .cc and .us): as for ICANN regulation, Openprovider sends a notification of upcoming expiration date of each domain to the domain's owner contact. Unless the domain is renewed before, this e-mail is sent 30 days before the domain's expiration date, 7 days before the domain's expiration date and after expiration of the domain. This e-mail can be personalized, as described [here](https://openprovider.help/books/domains/page/customize-renewal-expiration-reminder-e-mails-to-end-users-errp).
- (optional) **Abuse and complaint notifications**: When Openprovider receive a complaint or abuse message for one of the domains in the portfolio of the reseller, Openprovider will inform the reseller about this. Upon request (contact our support team), we can also inform the domain holder directly. This allows for faster responses. The e-mail that we send can be personalized.
As explained in the Terms & Conditions, Openprovider may also contact the domain's owner contact in case of complaints, abuse or questions from the domain holder in case the reseller fails to respond or act timely.
# Where to find the reseller ID
#### Question
Where to find the reseller ID?
## Answer
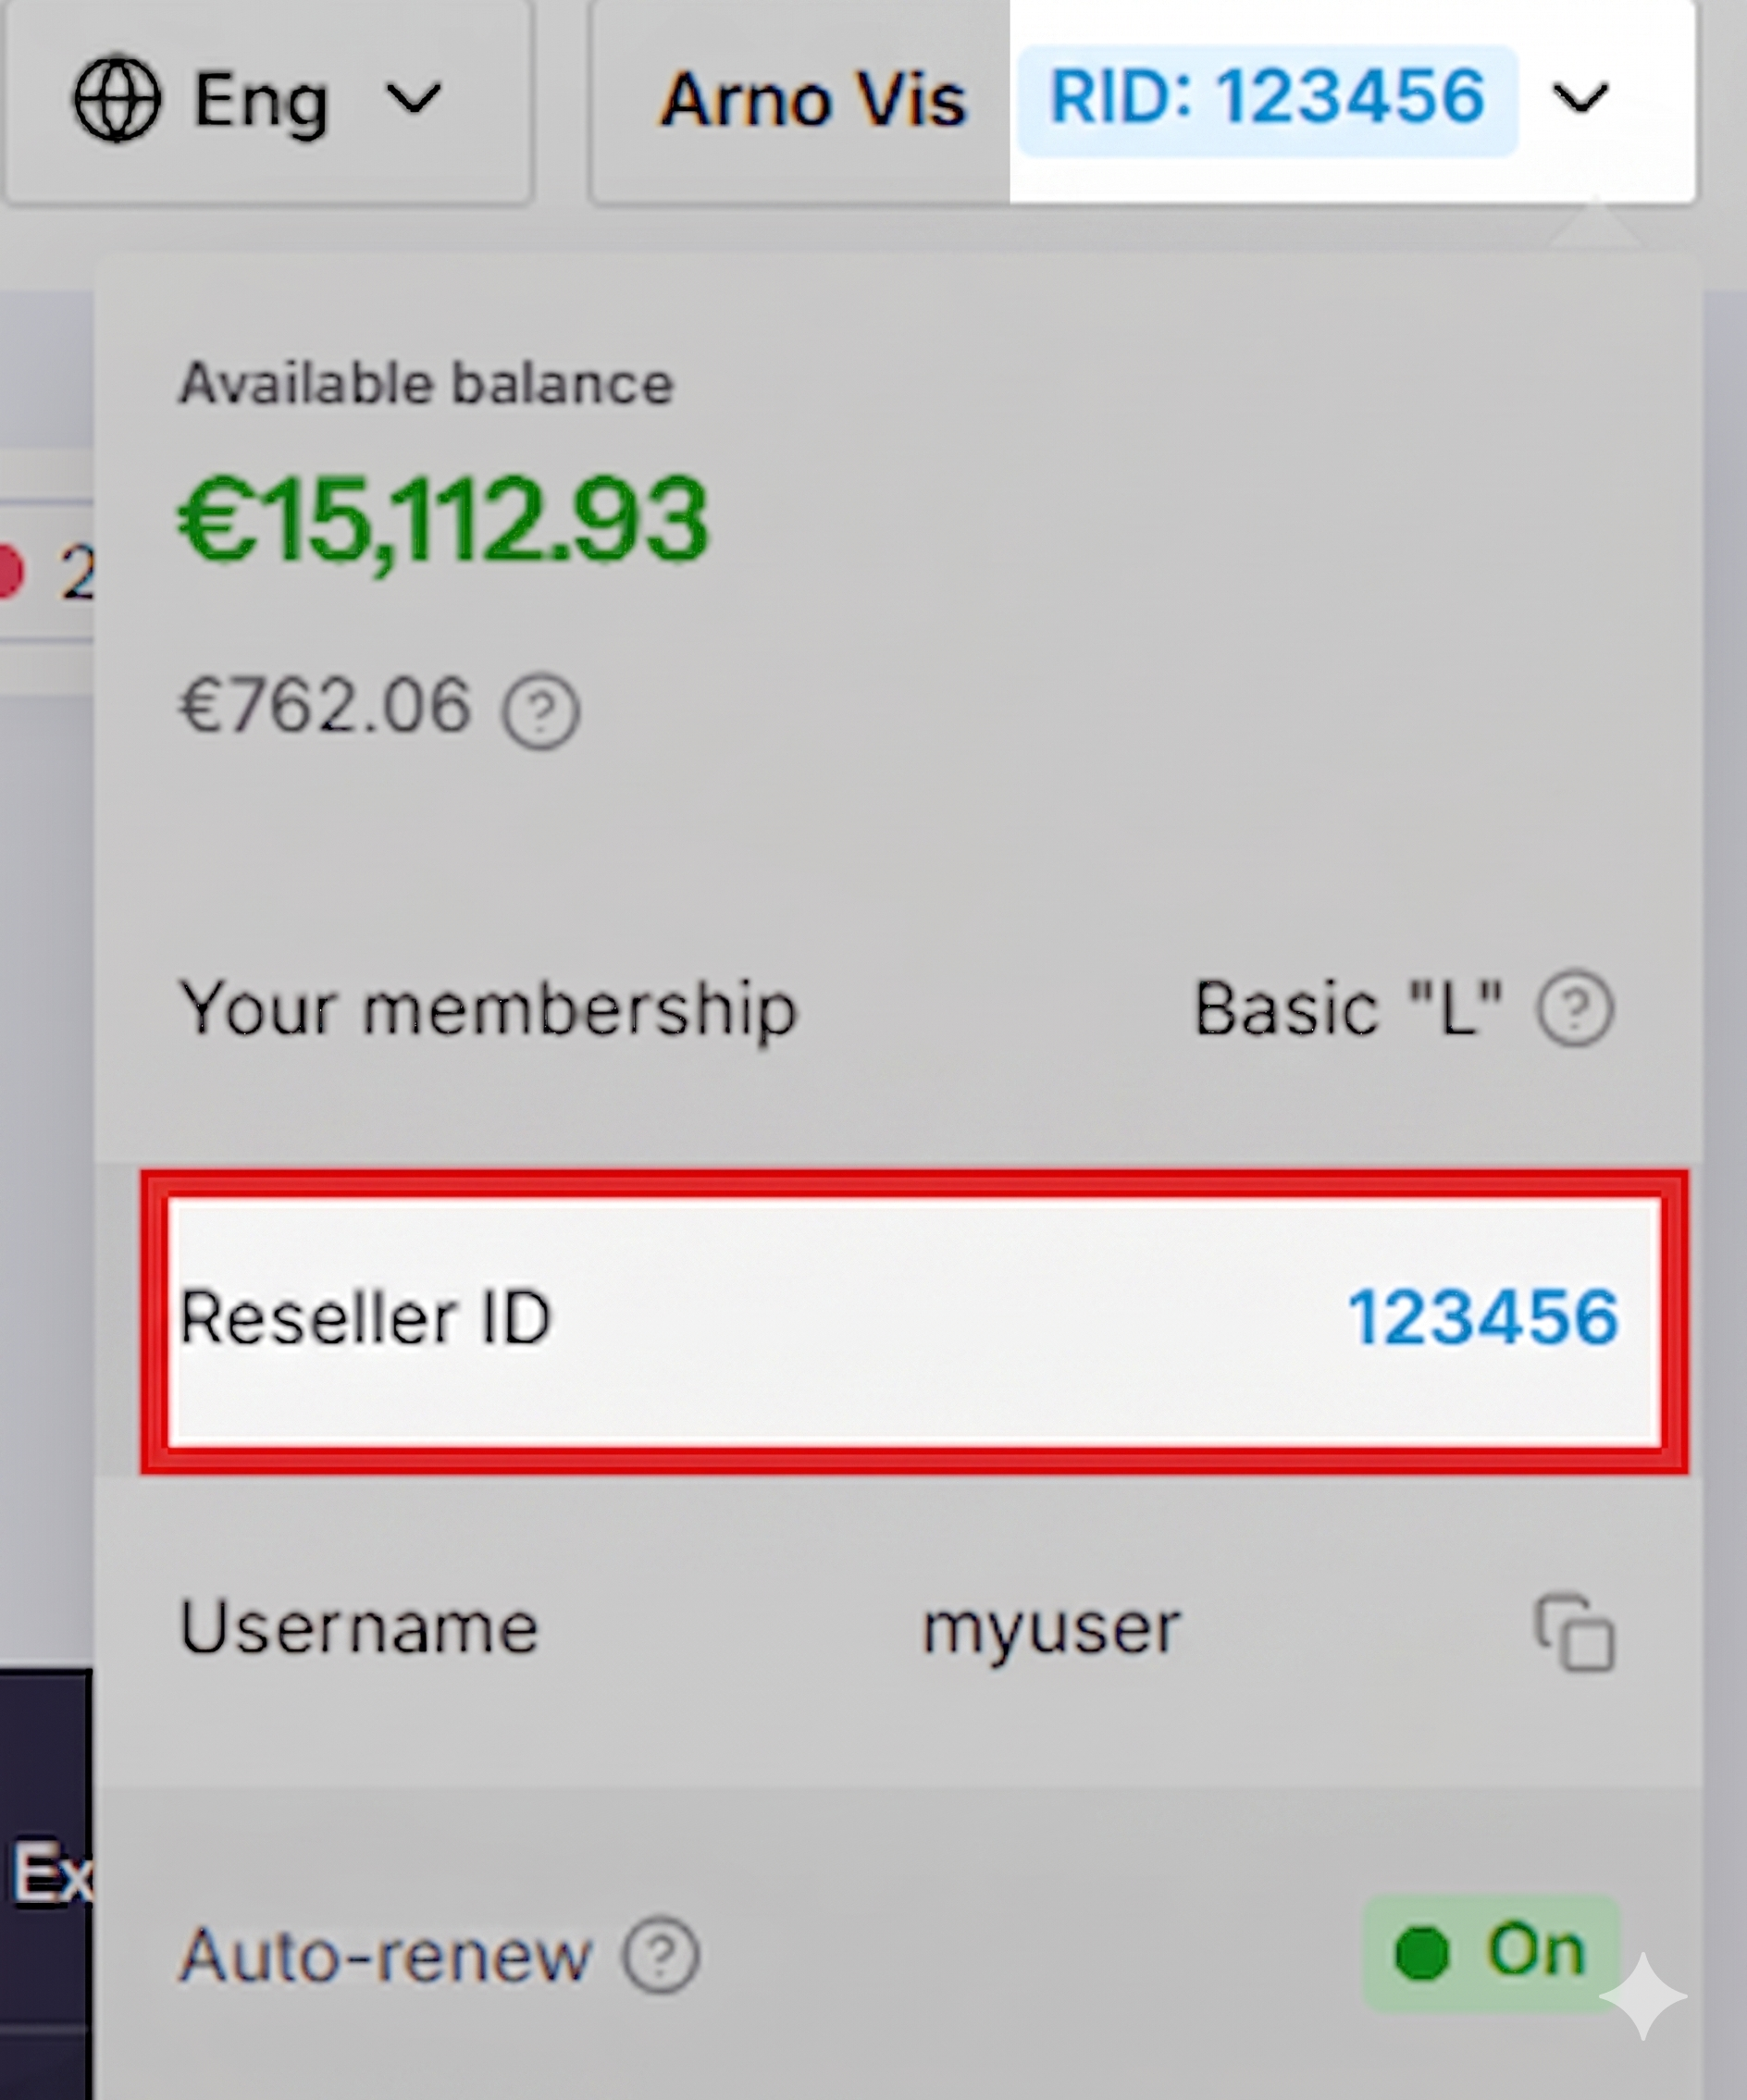
Reseller ID can be found by logging on to the [control panel](https://cp.openprovider.eu) and clicking on the right top corner, as is shown in this screenshot:
# Whoops - an error has occurred!
## I have received the error - "an error has occurred!"
Whoops! It seems your request could not be handled successfully.
In some cases, we are able to add a little explanation as to why the request was unsuccessful.
For example: "Company registration number missing" or "Admin contact must be a company"
But in some cases, our system is unfortunately not able to directly show the reason for the failed request and how to resolve this directly in the error message that you see in the control panel or API.
What to do then?
In 99% of the cases, the reason why a request failed, is due to missing data or an invalid request.
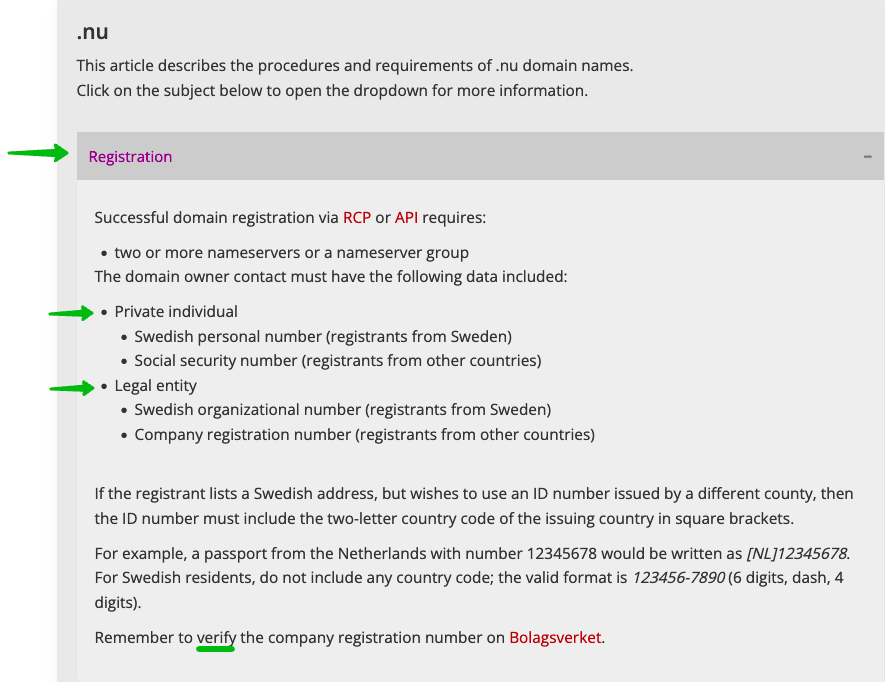
In this knowledge base, you can search for the "tld" (extension) of the domain you are trying to request. **In the section "registration" you can find in most cases a list of requirements. Please check if the requirements which are mentioned there are met.**
Example .NU:
As you can see, there is a list of requirements and sometimes even some links where you can verify the data you are using.
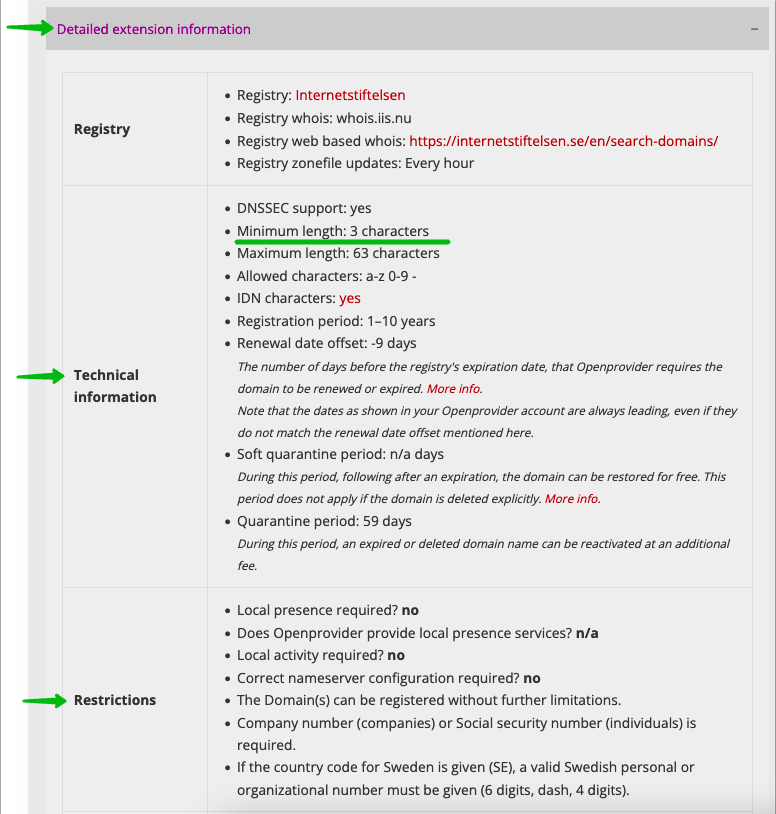
Also the "detailed extension information" can shed light on the problem as it contains some extra (technical) information.
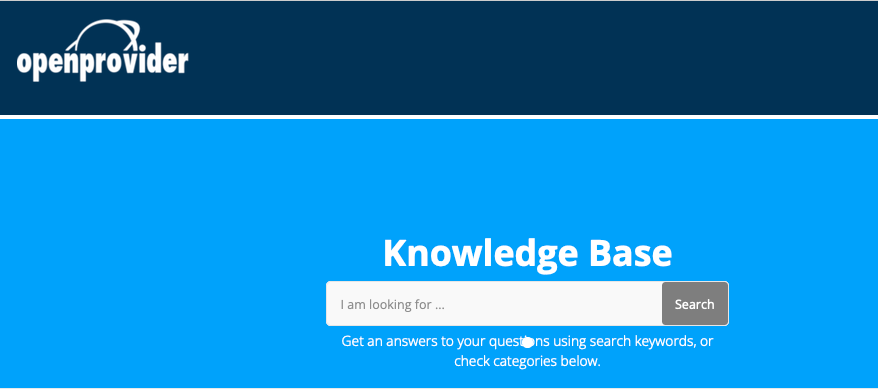
To find answer to your problem, please locate the "tld article" (extension article) via the homepage [openprovider.help](https://support.openprovider.eu/hc/en-us/sections/360005841014-Documentation-per-TLD) and check the requirements.
If you are unable to figure out what is wrong even after cross-checking the registration data, please reach out to us at [Contact Support](https://www.openprovider.com/company/contact-us/contact-support).
# 🇪🇸 Contactar con soporte
**Cómo contactar con Openprovider**
---
### **Para consultas comerciales (Ventas)**
Si tienes preguntas sobre precios, membresías, detalles de la cuenta o cualquier otra consulta comercial, puedes ponerte en contacto con nuestro departamento de Ventas seleccionando la opción **“Sales”** en el [**Formulario de Contacto de Soporte**](https://www.openprovider.com/company/contact-us/contact-support) si ya eres revendedor, o rellenando [**este formulario de contacto**](https://share.hsforms.com/1q6eVexxOT4mmVmAMHUghiQ2j54e?__hstc=3456879.364d696dd0ec7b007c4132f37c39ed95.1634712067540.1637132290798.1637135407948.17&__hssc=3456879.1.1637135407948&__hsfp=1568834945) si estás interesado en convertirte en revendedor.
---
### **Para consultas de soporte**
La mayoría de los casos están descritos en nuestra amplia **base de conocimientos**: requisitos técnicos, soluciones alternativas, consejos, documentación técnica, etc. Nuestro objetivo es que nuestros clientes puedan trabajar de forma independiente y eficaz a través de la base de conocimientos. No dudes en avisarnos si detectas información incorrecta o que falta, para que podamos actualizarla adecuadamente.
Si encuentras algún problema técnico, no puedes localizar la información relevante en nuestra base de conocimientos o la información no es clara, puedes contactar con nuestro departamento de Soporte para recibir ayuda adicional.
---
### **Desde el panel de control de Openprovider**
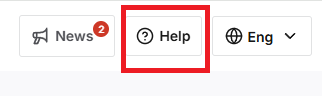
En la esquina superior derecha, haz clic en el botón **Help**.
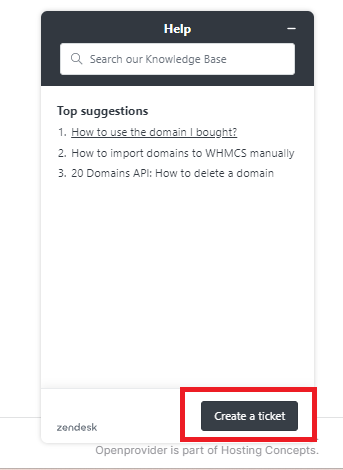
Se abrirá un widget web con la opción **Create a ticket** en la esquina inferior derecha.
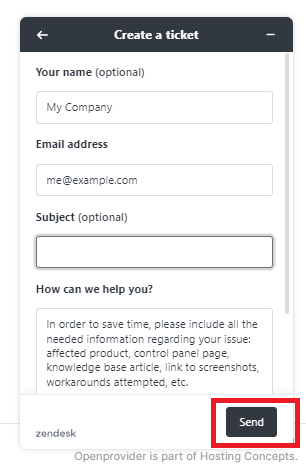
Rellena los campos y haz clic en el botón **Send** para crear una solicitud de soporte.
---
### **Desde el sitio web de Openprovider**
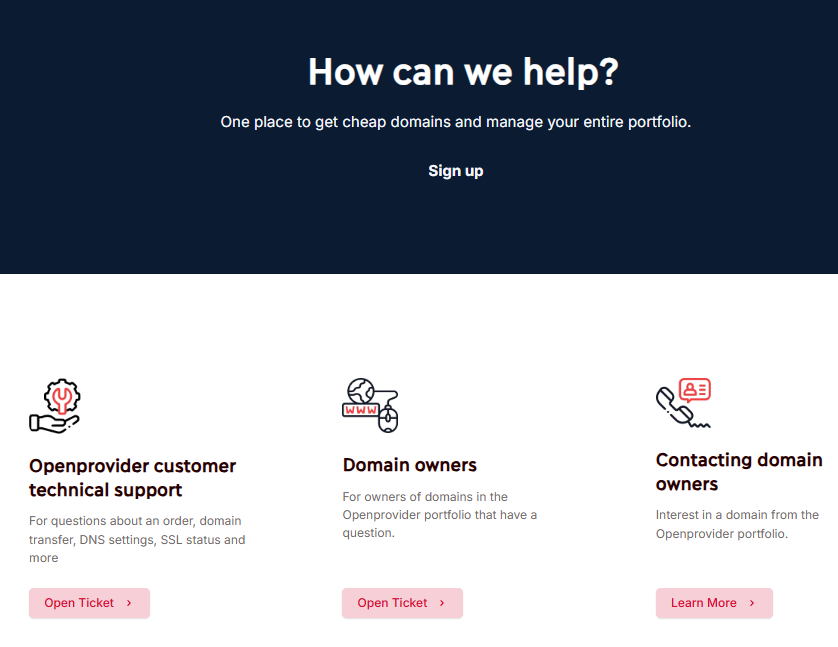
Accede a nuestra [**página de contacto**](https://www.openprovider.com/company/contact-us/contact-support) y selecciona la opción correspondiente.
---
### **Importante**
Si ya eres uno de nuestros clientes (y por lo tanto eliges esta opción), deberás contactarnos desde una dirección de correo electrónico registrada en tu cuenta e indicar tu **ID de revendedor**.
Tu ID de revendedor se puede encontrar en la esquina superior derecha de tu panel de control de Openprovider.
Utilizamos el sistema de tickets de **Zendesk** para gestionar las consultas entrantes y te responderemos desde allí.
El soporte por correo electrónico está disponible **24 horas al día, 7 días a la semana**.
---
### **Consejos para una resolución eficaz de tu incidencia**
- Si ya tienes un ticket abierto, responde a ese mismo ticket para mantener toda la comunicación en un único lugar.
- Sé lo más descriptivo posible: entorno técnico que utilizas, mensaje de error, capturas de pantalla o grabaciones, registros, llamadas/respuestas de la API, etc.
- Especifica cuál era tu objetivo: qué estabas intentando lograr con las acciones que provocaron el problema. Esto nos ayudará a encontrar una posible solución alternativa.
- Menciona cualquier artículo de la base de conocimientos que hayas utilizado y por qué no te resultó útil (poco claro, incompleto, desactualizado, etc.).
---
### **Idiomas disponibles y horario de atención**
Actualmente ofrecemos soporte en los siguientes idiomas:
**Horario de atención:**
- **Inglés:** 24/7
- **Neerlandés:** de lunes a viernes, de 10:00 a 21:00 CET
- **Español / Catalá:** de lunes a viernes, de 10:00 a 17:00 CET
- **Hindi/Marathi:** de lunes a viernes, de 6:30 a 13:30 CET
---
### **Acuerdo de Nivel de Servicio (SLA)**
Openprovider se esfuerza por mantener los siguientes niveles de servicio:
Los tickets se responderán en un plazo de **un día laborable o 4 horas hábiles**. Las respuestas de seguimiento sobre la misma solicitud se atenderán en un plazo de **16 horas hábiles**\*.
\*Estos tiempos de respuesta pueden variar cuando el ticket se escale a nuestro soporte de segundo nivel.
---
### **Incidencias urgentes**
Para incidencias urgentes, nuestros clientes actuales tienen la opción de contactarnos por teléfono en determinados horarios. **Importante:** deberás tener a mano tu ID de revendedor y, si procede, el número de ticket.
**Números de teléfono y disponibilidad\*:**
- **Línea neerlandesa:** (+31) 10 808 0747 – De lunes a jueves de 10:00 a 17:00 CET – Viernes de 13:00 a 17:00 CET
- **Línea española:** (+34) 902 84 83 19 / (+34) 911 98 58 67 – De lunes a jueves de 10:00 a 17:00 CET – Viernes de 13:00 a 17:00 CET
- **Línea india:** (+91) 22 5032 3346 – De lunes a jueves de 10:00 a 17:30 IST – Viernes de 10:00 a 13:00 IST
- **Número internacional (en inglés):** (+31) 10 808 0815 – De lunes a jueves de 6:00 a 17:00 CET – Viernes de 13:00 a 17:00 CET
\*Ten en cuenta que nuestro canal principal de contacto es el sistema de tickets. Los horarios telefónicos indicados son solo orientativos: debido a reuniones y formaciones, algunas o todas las líneas pueden no estar disponibles temporalmente.
---
### **Fraudes (phishing, trademark, cybersquatting etc..)**
Las denuncias sobre tiendas web fraudulentas, phishing y violaciones de derechos de autor no serán gestionadas por el departamento de soporte de Openprovider, sino por el equipo legal.
Por favor, lee este [artículo](https://openprovider.help/books/domains/page/reporting-abuse) sobre **cómo presentar una denuncia por abuso**.
---