# Customise contact verification page for gTLDs
Openprovider allows you to customize the e-mails that we send whenever we start [contact verification](https://openprovider.help/books/domains/page/registrant-email-verification-icann-contact-validation). One of the customization elements is the confirmation page. By setting up your own confirmation page, you can redirect your customers directly from the verification e-mail to your own portal.
***NB***: *customization is not limited to just one template: you can use the multi-language and multi-tag features that Openprovider supports. More information about setting up your customers to use the right template and language can be found elsewhere in our* [knowledge base](https://openprovider.help/books/domains/page/working-with-tags-tagging-customers)*.*
## Configuration
First of all, [configure](https://cp.openprovider.eu/account/config-registrant-verification-branding.php) your customer verification branding and include a *Confirmation link* to your own website. This confirmation link can be anything, as long as you include the two most important variables:
- *%%email%%* is the e-mail address to be verified
- **%%authCode%%* is a security code to prevent abuse*
Two examples of a valid URL would then be:
```
https://www.example.com/contact-verification/confirm.php?email=%%email%%&authCode=%%authCode%%
https://verify.example.com/%%email%%/%%authCode%%/
```
## Handling verification responses
Basically, your script should call the callback script of Openprovider with the right variables: *email, authCode* and *approval.* The *approval* variable should contain *yes* or *no*:
```
https://cp.openprovider.eu/misc.php/email/emailVerificationCallback/?email=%%email%%&authCode=%%authCode%%&approve=%%approval%%
```
There are many ways to accomplish this, one of the approaches is written in an example PHP script below. This script displays a very basic form and asks for an approval or reject. Having that answer, it calls the Openprovider server:
```
/* requires confirmation URL including
?email=%%email%%&authCode=%%authCode%%
*/
if (isset($_GET['approval']) && $_GET['email'] && $_GET['authCode']) {
$url = 'https://cp.openprovider.eu/misc.php/email/emailVerificationCallback/'
.'?email='.urlencode($_GET['email'])
.'&authCode='.$_GET['authCode']
.'&approve='.$_GET['approval'];
// This command requires allow_url_fopen to be enabled
$response = file_get_contents($url);
// Alternatively, use the PHP CURL functions
$ch = curl_init();
curl_setopt($ch, CURLOPT_URL, $url);
curl_setopt($ch, CURLOPT_RETURNTRANSFER, 1);
$response = curl_exec($ch);
curl_close ($ch);
// Output the response to the website visitor, or use this response in your own script for a better answer
echo $response;
exit;
}
else if ($_GET['submit']) {
echo 'Not all fields completed
';
}
?>
Verify e-mail address
```
There are four possible responses:
- If an approval is successfully processed, the response is: ```
status=Ok;
message= Email address has been verified.
```
- If a rejection is successfully processed, the response is: ```
status=Rejected;
message= Email address has not been verified.
```
- If the request is invalid (wrong email), the response is: ```
status=Error;
message= There is no such email address in our system.
```
- If the request is invalid (wrong authCode), the response is: ```
status=Error;
message= AuthCode is wrong for this operation.
```
- If an other error occurred, the response is: ```
status=Error;
message= Bad input data.
```
## Configure SPF Record
For example, your domain is example.com.
Set a **TXT** (SPF) record for **example.com** to:
```
v=spf1 include:mail.registrar.eu ?all
```
Set the **CNAME** record for `default._domainkey.example.com` to:
```
dkim.registrar.eu
```
## E-mail authentication
Don't forget to authenticate your domain with Openprovider to send emails that appear to come directly from your domain, instead of from our servers.
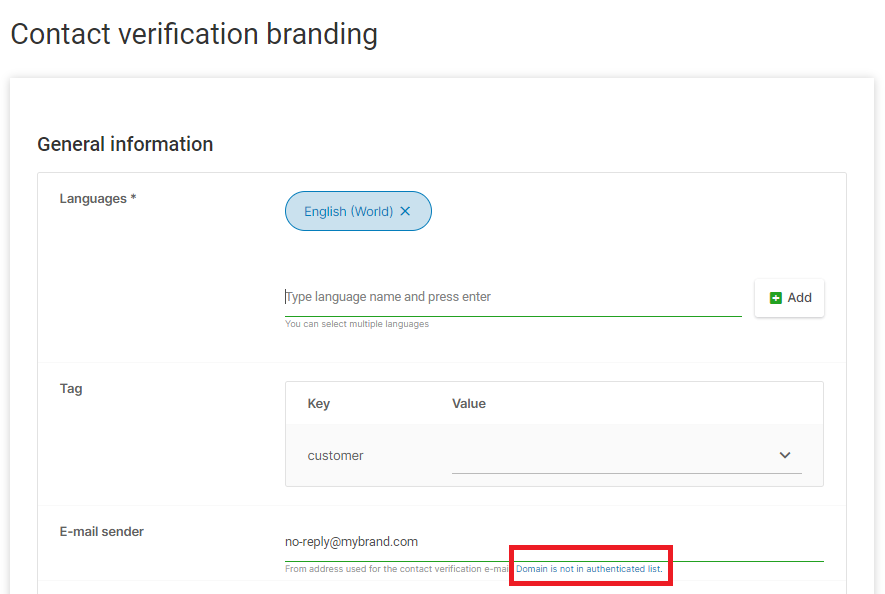
You will be prompted to perform this procedure from the [Contact verification branding](https://cp.openprovider.eu/web/action/index#/email-template/ive?utm_source=KB-Article&utm_medium=kb&utm_campaign=KB) page as shown in the image above, however, if forgotten, please follow the instructions:
- Navigate to **Account > Settings > E-mail authentication** page in RCP.
- Click on **Add domain** and add your **example.com** domain.
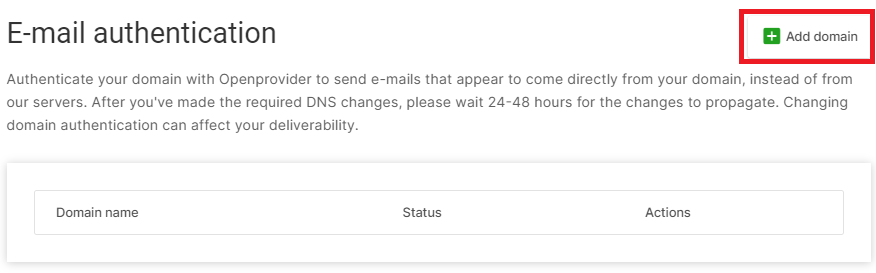
Click on the **Authenticate** button once you have added the domain.
If you would like to use a custom DKIM identifier, please refer to [How to use non 'default' DKIM identifier](https://openprovider.help/books/dns/page/how-to-use-non-default-dkim-identifier).