# WHMCS
# "Invalid suffix field!" when trying to create a contact handle
## Symptoms
When trying to register a domain or when creating a domain handle, the following error is being thrown:
```
Invalid suffix field!
```
## Cause
*"Address line 2"* of WHMCS contact information tends to be mapped to the *"Suffix"* field of the [createCustomerRequest](https://doc.openprovider.eu/API_Module_Customer_createCustomerRequest) API call.Openprovider API validates the suffix field and does not allow the comma character (,) in it.
## Resolution
This is a software issue of older versions of the WHMCS Registrar module. Please update to the new version available [here](https://github.com/openprovider/Openprovider-WHMCS-domains/releases/latest).
Please suggest customer simplifying his Address Line 2 field, without the comma ",".
# How to add a VAT customer field in WHMCS
## Question
Some domain registries (e.g. DNS PT, ITNIC) require submitting a VAT number when registering domains under company contact handles. WHMCS doesn't include this data field by default, therefore domain registration may fail with the "**Invalid VAT number**" error.
How to provide a VAT number during domain registration?
## Answer
1. Please ensure `***openprovider\_additional\_fields()***` function has been correctly configured in the file **resources/domains/additionalfields.php** according to the instructions in [this article](https://openprovider.help/books/api-integrations/page/whmcs-domain-module-install-and-configure-openprovider-domain-registrar-module).
2. If the file`/resources/domains/additionalfields.php`then add the example version from [GitHub](https://github.com/openprovider/Openprovider-WHMCS-domains/blob/master/resources/domains/additionalfields.php).
3. Retry domain registration.
# How to import domains to WHMCS manually
## Question
How to synchronize a domain that has been created in RCP (Reseller Control Panel) with WHMCS?
## Answer
**NB**: *This article assumes the Openprovider domain registrar module has been already configured. Information about the installation can be found in [the repository](https://github.com/openprovider/Openprovider-WHMCS-domains).*
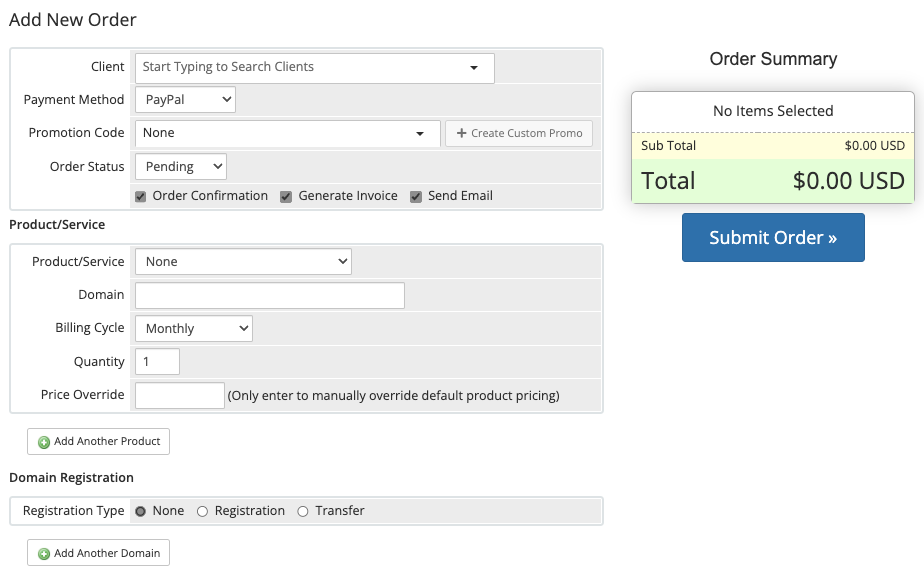
1. Login to the WHMCS Admin area and navigate to: **Orders > Add New Order.
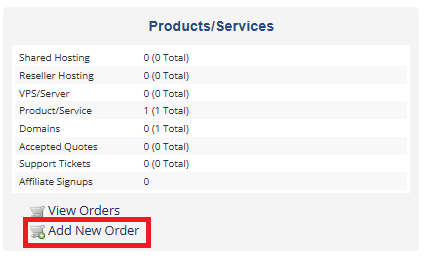
** Note: You can also click Add New Order in the client’s profile’s [Summary](https://docs.whmcs.com/clients/client-profile/summary-tab) tab.
2. Select the client (search name or select from drop down list). For steps to create a new client, see [Add a Client](https://docs.whmcs.com/clients/client-management-tutorials/add-a-client/).
3. Select a payment method.
4. Click **Create Custom Promo** and create a 100% non-recurring discount (this ensures neither the admin nor the client is going to be charged)
**NB**: Creating custom promotions requires the **Use Any Promotion Code on Order** and **Create/Edit Promotions** permissions (**Configuration** > **System Settings** > **Administrator Roles & Permissions**).
5. Set order status to '**Pending**'.
6. Deselect **Order Confirmation**, **Generate Invoice,** and **Send Email.**
7. Under **Domain Registration** click **Registration**/**Transfer** and fill in all the relevant fields.
**Important:** When ordering domains via the Admin Area, the system does not look up the domain’s availability or whether it is a premium domain. For premium domains, log in as the account owner and order them via the Client Area.
8. Click **Submit Order**.
9. Accept the order but don't assign it to a Registrar! This will result in billing charges.
10. Find the domain under the client you have assigned it to and select Openprovider as the registrar. Save the changes.
11. Run the domain sync cron\*\* to sync the Expiry Date automatically.
```
php -q /path-to/whmcs/crons/cron.php do -vvv --DomainStatusSync
```
\*\* **Note**: If you have hundreds of domains in your WHMCS installation, it is recommended that you manually update the Expiry and due dates in WHMCS for the imported domain as the WHMCS cron will only sync 50 domains during each run.
**Note:** WHMCS official documentation for adding/importing an existing domain can be found [here](https://docs.whmcs.com/Migration_Guide#Adding_Domains).
# Managing Domain Renewals in WHMCS with Openprovider
### Renewing Domains
If **Automatic renew on payment** is selected (which can be found in WHMCS admin area, **Setup > General settings > Domains**) and Openprovider is set as the auto registration provider, then the module will automatically register or renew the domain in Openprovider via API as soon as the client pays for domain renewal or registration.
When a domain expires in Openprovider, depending on the TLD, it can be put into **'Soft Quarantine'** state. While in that state, it can be restored for a normal renewal fee, but restoration needs to be requested with the **restoreDomainRequest** API command. The module automatically detects when the domain is in Soft Quarantine, and makes an appropriate API request. The module will not request renewal if the domain has already passed into **"Hard Quarantine"** and can only be restored for an additional fee.
---
### Auto Renew Configurations
**Important:** Default WHMCS workflow recommend switching “Off” auto-renewal in Openprovider and waiting for the client to pay for their domain renewal prior to performing any renewal action. This greatly reduces the chance of a domain being renewed twice unwittingly and incorrect domain statuses in WHMCS. Please explore WHMCS documentation thoroughly before deciding on the business logic to use in your workflow.
---
#### **Scenario 1 (WHMCS Recommended)**
Setting
Value
Openprovider Global Auto renew
Off
WHMCS Auto Registration
On
WHMCS Automatic renewal
On
**Process:**
- End-user receives an invoice based on the due date.
- If the invoice is paid before expiration, WHMCS automatically sends a renewal command to the module and the domain's registration period extends.
- If the invoice is not paid before the expiration date, the domain will expire or go into quarantine at the expiration date.
- If the grace period is supported for the given TLD and the invoice is paid after expiration, the module will send the appropriate command or commands to renew the domain.
- If the invoice is paid when the domain is in hard quarantine, or already deleted, the module will not take action.
---
#### **Scenario 2. Not recommended by WHMCS**
Setting
Value
Openprovider Global Auto renew
On
WHMCS Auto Registration
On
WHMCS Automatic renewal
Off
**Process:**
- The domain will be renewed at Openprovider on the expiration date, regardless of the invoice status (paid/unpaid).
- When the end-user pays an invoice to renew a domain, the WHMCS next due date will increment one year.
- No renewal commands are sent to Openprovider from WHMCS via the module.
**Important:** If a client doesn't pay the renewal invoice before expiry date, the domain's status in WHMCS will cycle from **Active → Grace → Redemption → Expired**, even though it was auto-renewed at Openprovider.
To trigger the updating of the domain status and expiry date, the invoice would need to be paid in WHMCS, the renewal command successfully sent to your registrar and successfully processed.
---
#### **Scenario 3. Not recommended!**
Setting
Value
Openprovider Global Auto renew
On
WHMCS Auto Registration
On
WHMCS Automatic renewal
On
**Process:**
- If the invoice is paid before expiration, WHMCS automatically sends a renewal command to the module and the domain's registration period extends.
- If the end-user misses payment due date, the domain will be renewed at Openprovider automatically.
- If the end-user pays the invoice after the due date, WHMCS will send another renewal command to the module.
---
If you have further questions or need help reviewing your WHMCS settings, feel free to [contact support](https://openprovider.eu).
# Recommended Settings for the WHMCS Domain Registrar Plugin
WHMCS is a great web hosting management and billing software with lots of options. To help you get the plugin up and running, this document describes some of the recommended settings that may vary depending on your requirement. Depending on how you and your client approach domains, you will need to configure the plugin in one way or another.
**1. Auto Renew on Payment**
**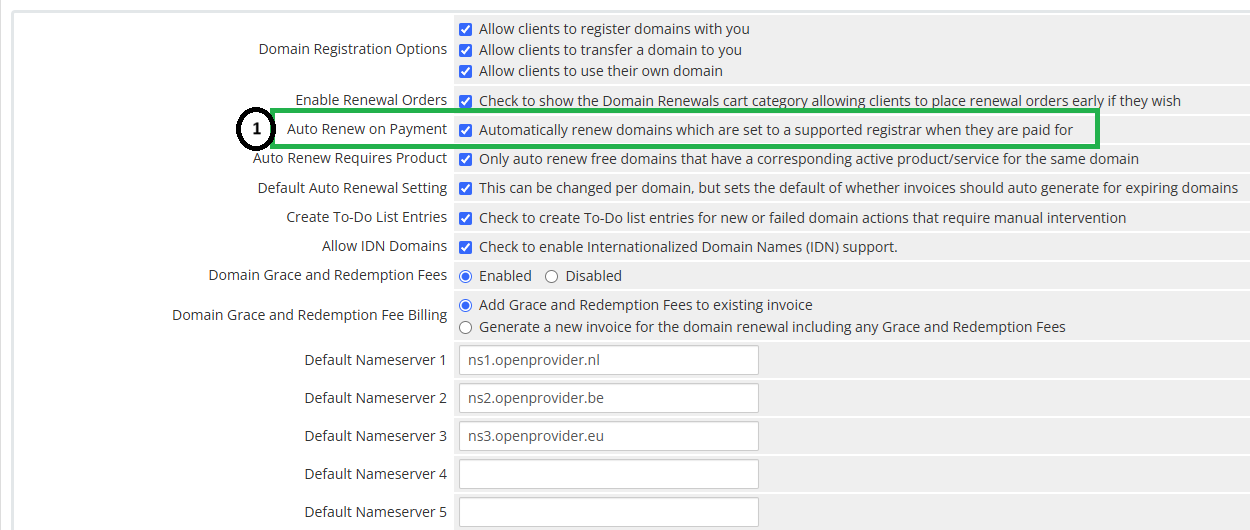**
You will find these settings by navigating to **Configuration** > **System Settings** > **General Settings** > **Domain** (tab) in your WHMCS admin panel.
When a domain is about to be renewed, WHMCS will send an invoice to your client. Once it is paid, WHMCS will renew the domain.
While it is recommended to turn on this option in WHMCS, it is important to disable [auto-renewal for domains in Openprovider](https://openprovider.help/books/domains/page/automatic-renewal-of-domains) to avoid double renewals. If you have the auto-renewal option enabled at Openprovider, domains will be renewed even if the client has not paid the invoice. Then, if the client pays the invoice after domain was auto-renewed in Openprovider, the domain will be renewed again.
To avoid such problems, we recommend switching “Off” [auto-renewal for domains in Openprovider](https://openprovider.help/books/domains/page/automatic-renewal-of-domains). Please refer to the module [documentation](https://github.com/openprovider/Openprovider-WHMCS-domains/blob/master/docs/auto_renew_logic.md) for more information.
For points **2** and **3**, you can find the settings by navigating to **Configuration** > **System Settings** > **Automation Settings > Domain Sync Settings**
**2. Domain Sync Enabled**
This setting will enable synchronization for domain expiry dates and statuses between Openprovider and your WHMCS. When a domain is registered via WHMCS, it will be automatically activated. If a domain is transferred, it will be marked as completed in your administration once the sync detects it.
By keeping this option enabled, you ensure that expiry dates of domains your clients can manage is up to date and that domains have the correct statuses.
We recommend enabling this setting.
**3. Sync Next Due Date**
Select this to set the domain’s **Next Due Date** value based on the expiry date. Then, enter the number of days before expiration to set the **Next Due Date** value. When you register or transfer a domain, you typically charge your client for one year starting from today. Then, the following year, the client will receive an invoice on the same day.
However, there are cases where the renewal date does not align exactly with one year. For example, if you transfer a .nl domain, the expiration date will often be different. If you have the **Sync Next Due Date** option enabled in your WHMCS, the invoice will not be sent until that date is reached.
We recommend enabling the **Sync Next Due Date** setting.
# WHMCS Domain Module - Install and configure Openprovider domain registrar module
In this article, you will find everything you need to install and configure the Openprovider module in WHMCS, so that you can automatically register extensions that also allow additional fields, such as .es domains, without manipulation.
## **WHMCS Domain Module**
The WHMCS module for Openprovider conveniently interacts with your Openprovider account, enabling you to simplify certain domain provisioning and management functions, such as enrollment, renewal, deletion, and contact information changes.
The module keeps the expiration dates of the domain and auto-renew settings aligned between the installation of your WHMCS and Openprovider account, meaning that the same domains are renewed every day.
In addition, the module allows you to search for domain availability using the Openprovider API, enhancing performance over the default domain availability check.
## Install and configure the Openprovider Module
### Installation using script \[Beta\]
- To install the Openprovider domain registrar module, run the following commands from WHMCS root directory as the hosting/website user (e.g., on a cPanel server, run it as the cPanel user under which the WHMCS website is hosted).
- **Note**: Depending on the permissions of the user running the script, you may need to use the sudo command (e.g., sudo /bin/bash -s)
```bash
curl -s https://raw.githubusercontent.com/openprovider/Openprovider-WHMCS-domains/refs/heads/master/scripts/install_openprovider.sh | /bin/bash -s
```
### Manual Installation
**Download the module package from:** [https://github.com/openprovider/Openprovider-WHMCS-domains/releases](https://github.com/openprovider/Openprovider-WHMCS-domains/releases)
**Copy files into the module directories**
- Upload the contents of `/modules/registrars/openprovider` from this repository to `/modules/registrars/openprovider`
- Upload the contents of `/includes/hooks/` to `/includes/hooks`
- If you do not have the file `/resources/domains/additionalfields.php` then add the example version from[ resources/domains/additionalfields.php](https://github.com/openprovider/Openprovider-WHMCS-domains/blob/master/resources/domains/additionalfields.php)
- Otherwise, add the following lines to the top of your `additionalfields.php` file. :
```auto
/modules/addons/openprovider` to `/modules/addons`
- Activate Openprovider addon from **Configuration** >> **System Settings** >> **Apps & Integrations** >> **Addon Modules**
- Configure access permission (click **Configure** button) for groups and **Save Changes.**

## Basic Configurations
- Navigate to **Configuration >> System Settings >> Domain Registrars** and activate Openprovider.
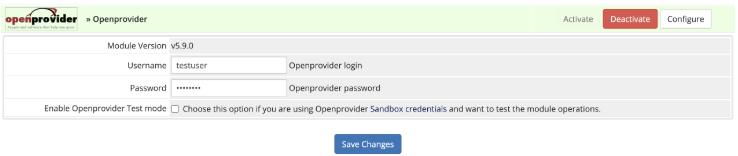1. Enter the credentials for an API user. [Ensure API access is enabled](https://openprovider.help/books/quick-start/page/how-to-enable-api-access) in the Openprovider Control Panel for the credentials you are using.
2. Click **Save.**
3. \[*This step is only required for module versions prior to 5.8.0*\]. Import TLD/domain prices via Openprovider API by running the **modules/registrars/openprovider/cron/DownloadTldPrices.php** script (either as a cron job or run the script from the terminal of the hosting server). Please refer to [Import and sync TLD prices from Openprovider](https://github.com/openprovider/Openprovider-WHMCS-domains/blob/master/docs/TLD_Pricing_sync_Utility.md) for detailed instructions.
4. Navigate to **Utilities** > **Registrar TLD Sync** to select TLDs to import prices, configure margin, Automatic Registration, etc. For more details, please refer to [Registrar TLD Sync](https://docs.whmcs.com/Registrar_TLD_Sync).
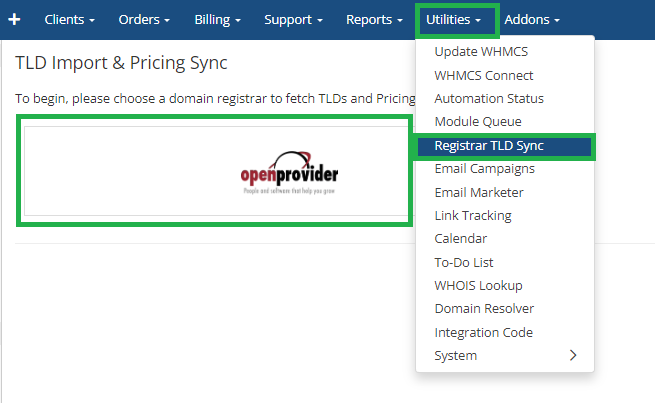
5. Navigate to **Configuration >> System Settings >> Domain Pricing** and select Openprovider as registrar for the TLD that you want to sell via Openprovider [](https://github.com/openprovider/OP-WHMCS7/blob/master/docs/img/select_TLD_registrar.png)
That's all you need to do to get started selling domains from Openprovider! Additional configurations can be found below.
## Advanced configurations
### Lookup provider and domain name spinning
- Click "change" to Choose Openprovider as the lookup provider [](https://github.com/openprovider/OP-WHMCS7/blob/master/docs/img/lookup_provider.png) [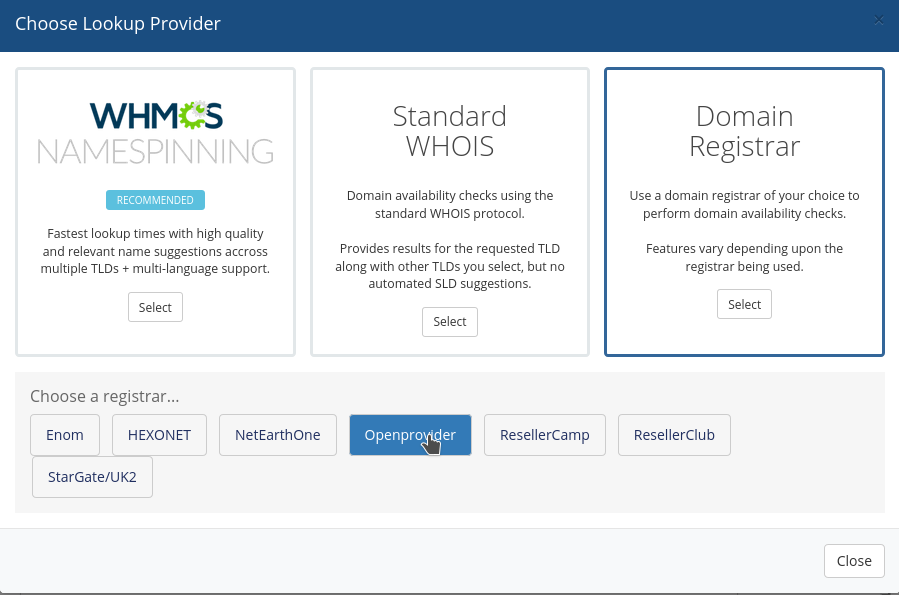](https://github.com/openprovider/OP-WHMCS7/blob/master/docs/img/lookup_provider2.png)
- Choose "configure" to select namespinning options
### [Enable premium domains](#bkmrk-enable-premium-domai)
First Make sure that the currency that you are using to pay Openprovider is configured in
**Configuration >> System Settings >> Currencies** (prior to WHMCS 8.0, Setup >> Payments >> Currencies) and click on Update Exchange Rate. Otherwise, WHMCS will not use the premium fee correctly, potentially meaning that your client will pay significantly less for the domain.
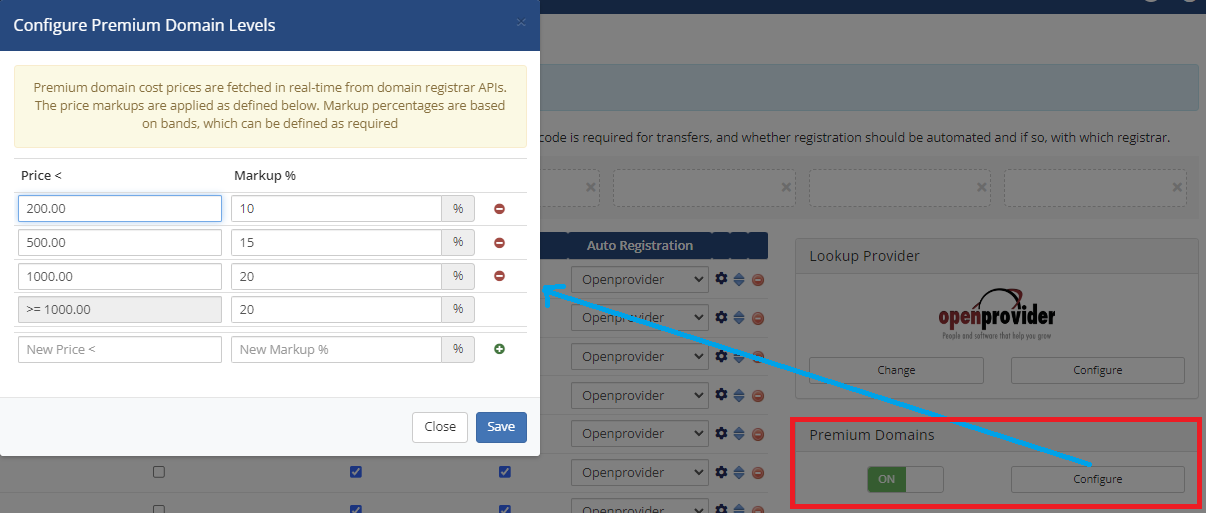
1. Navigate to **Configuration** >> **System Settings** >> **Domain Pricing**
2. Enable Support for premium domains
3. Configure premium pricing and margins
4. In the Advanced configuration file of the module (/modules/registrars/openprovider/configuration/advanced-module-configurations.php) find the parameter "**OpenproviderPremium**" and set it to **true**.
### Allow additional DNS records
If you plan on allowing your end users to edit their own DNS records, and want them to be able to create all record types supported by Openprovider, you can make some modifications to the WHMCS templates as described here:
- [Modify WHMCS templates to allow all DNS record types which Openprovider supports](https://github.com/openprovider/OP-WHMCS7/blob/master/docs/custom_DNS_management_options.md)
###
[Allow end users to edit DNSSEC records](#bkmrk-allow-end-users-to-e)
- Navigate to the **target client profile > Domains** select the desired domain and under **Management Tools** activate **"DNS Management".**
****
- The below option will appear in the domain details page of the chosen domain
[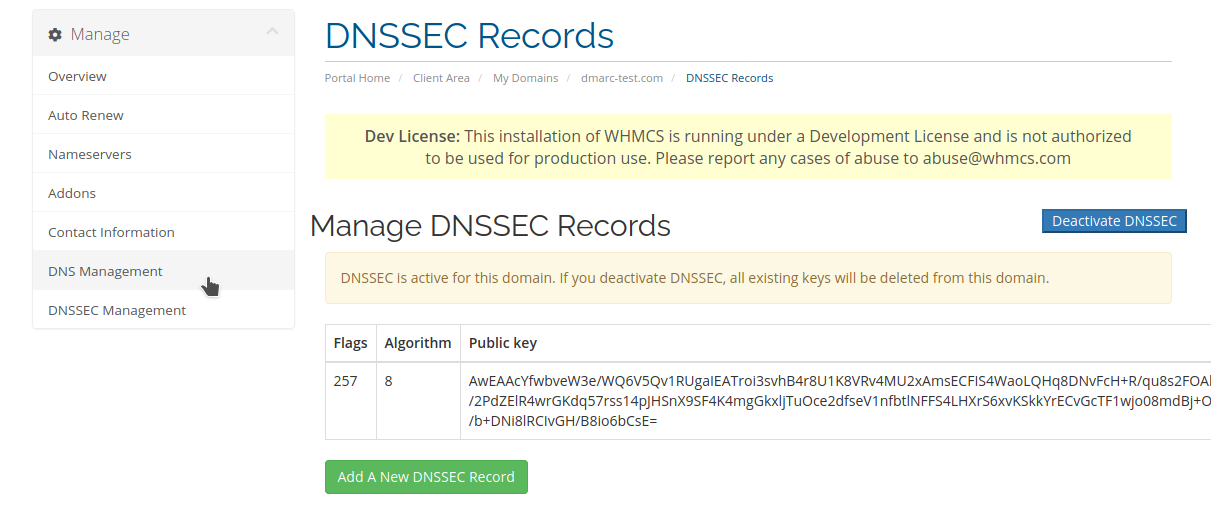](https://github.com/openprovider/OP-WHMCS7/blob/master/docs/img/DNSSEC%20management.png)
Notes:
- If you experience any difficulty accessing the DNSSEC page, please check if file '**dnssec.php**' exists in your WHMCS directory. If the file doesn't exist, please manually upload/copy the contents of <Module directory>/registrars/openprovider/custom-pages (dnssec.php file) to the top level of your WHMCS folder (i.e. <your WHMCS directory>/)
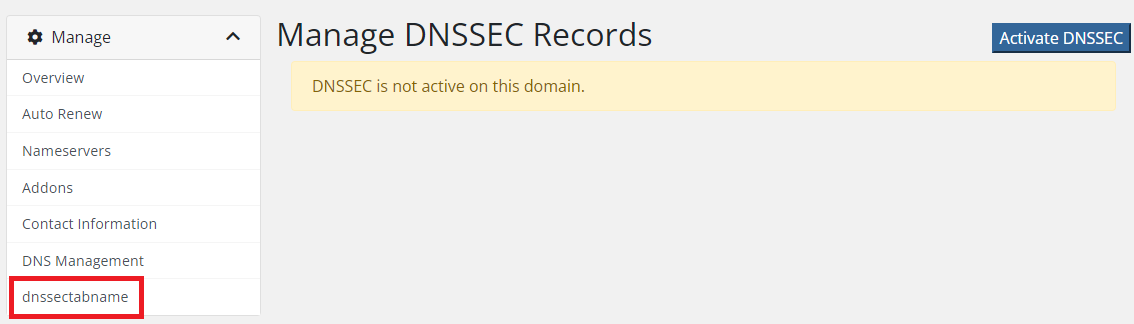
- If you see the menu option as "**dnssectabname**" as shown in the screenshot below, copy the folder `/lang/overrides` to `/lang/` folder.
###
[Configure TLDs which don't allow locking (.nl, .eu, .es, etc.)](#bkmrk-configure-tlds-which)
**Note**: **This manual change is only required in versions before 5.9.0.**
Not all TLDs allow domain locking, but WHMCS assumes that this option is available for all domains. As a result, end users will see a warning "**Domain Currently Unlocked!**" when they visit the domain details page.

You can hide this option with the following changes to your template files.
- Open `clientareadomaindetails.tpl` in the template you are using and replace
```auto
{if $lockstatus eq "unlocked"}
```
with
```auto
{$domainSplit = "."|explode:$domain}
{$domainTld = $domain|replace: $domainSplit.0 : ""}
{if $lockstatus eq "unlocked" && $domainTld != '.eu' && $domainTld != '.nl' && $domainTld != '.be' && $domainTld != '.es'}
```
###
[Configure tag management](#bkmrk-configure-tag-manage)
Set up tag management to send custom emails to the end users of your resellers.
- [Configuration instructions can be found here](https://github.com/openprovider/OP-WHMCS7/blob/master/docs/associate_tags_with_customers.md)
### \[DEPRECATED\] Configure the Openprovider cron sync
This feature is deprecated since version 5.3 of the Openprovider domain module, and is not recommended for versions WHMCS 8+. We suggest that you use the WHMCS native domain sync and do not use the Openprovider custom sync for WHMCS 8 and higher.
###
[Domain Renewals](#bkmrk-domain-renewals)
Various options exist for managing domain renewals. A detailed explanation of your options [can be found here.](https://github.com/openprovider/OP-WHMCS7/blob/master/docs/auto_renew_logic.md)
###
[Custom DNS Templates](#bkmrk-custom-dns-templates)
- Create a custom DNS template in the Openprovider control panel (**DNS management > Manage DNS templates**),
- Put the name of it [in the advanced configuration file](https://github.com/openprovider/OP-WHMCS7/blob/master/docs/advanced_configurations.md) and any domain created with the Openprovider nameservers will have a DNS zone automatically created on Openprovider nameservers according to your DNS template.
###
[Troubleshooting](#bkmrk-troubleshooting)
If domain operations from WHMCS are not working or showing errors or any connectivity issues with Openprovider or API errors, the first troubleshooting step should be to enable module logging, **reproduce the issue/error** and review the System Module Debug Log.
Navigate to **Configuration > System Logs > Module Log** (before WHMCS 8.0, **Utilities > Logs**) and you can find the raw API commands being sent and received by your WHMCS modules. The responses should contain additional information about the problem and how it can be solved.

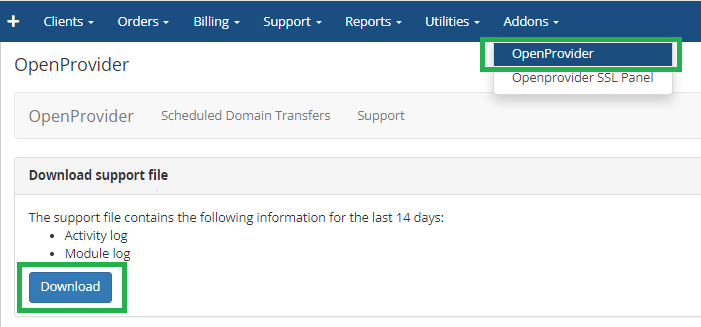
If you have the Openprovider addon installed and activated in your WHMCS, you should be able to download module and activity logs from **Addons >> Openprovider** >> click on the '**Download**' button (After enabling module logs and reproducing the issue).
For more details, please refer to WHMCS documentation: [Troubleshooting Module Problems](https://docs.whmcs.com/Troubleshooting_Module_Problems) and [System Logs](https://docs.whmcs.com/System_Logs)
Important: Only enable module logging for troubleshooting or testing purposes. At all other times, make certain that you set Module Logging to Off.
### [FAQ](#bkmrk-faq)
Common issues and solutions for them can be found [here](https://openprovider.help/books/api-integrations/page/whmcs-frequently-asked-questions).
# WHMCS Email Solution Module - Installation and configuration
**This article provides step-by-step guidance on integrating the Openprovider Email Solution module with WHMCS.**
**For quick navigation, the following topics are covered:**
- Uploading the Openprovider Email Solution files
- Configuring the Openprovider Email Solution server module
- Creating a product group and product
- Linking the product with the server module
### 1. How to upload the Openprovider - email solution files?
1. Download the module file from [here](https://github.com/openprovider/Openprovider-WHMCS-Email-solution).
2. Extract the downloaded module file.
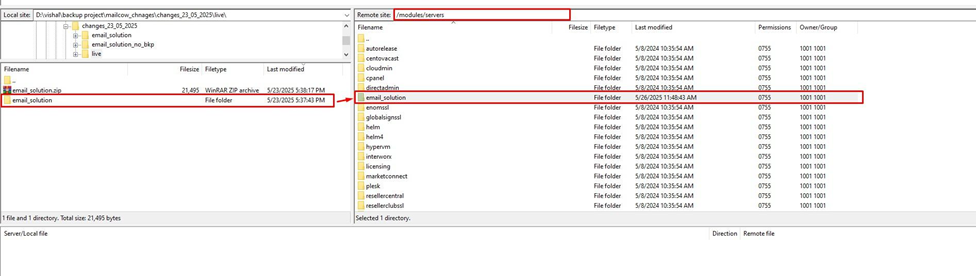
3. Inside your WHMCS installed directory, go to this path "**/modules/servers**" and upload the folder '**email\_solution**'.
### 2. How to configure the Openprovider - email solution server module?
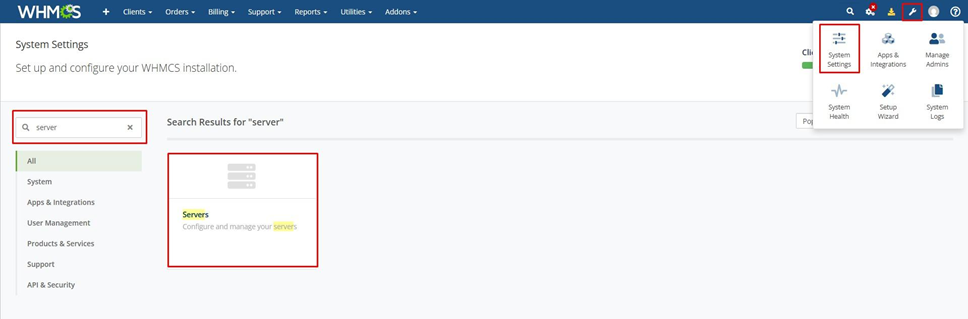
1. Go to **Configuration** >> **System Settings** >> **Servers**.
2. Click on **Add New Server** and then click the **Go to Advance Mode** button.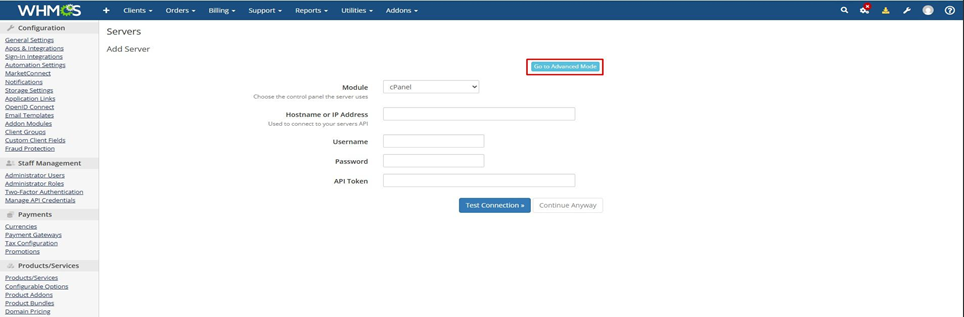
3\. Fill in a name of your choice (eg: Email Solution), API hostname (**api.openprovider.eu**), and select module **Openprovider - email solution,** and fill your API username and password, and click the **Save Changes** button. Please ensure the user you are using has API access enabled. If not, please enable API access for the user following instructions in [this article](https://openprovider.help/books/quick-start/page/how-to-enable-api-access).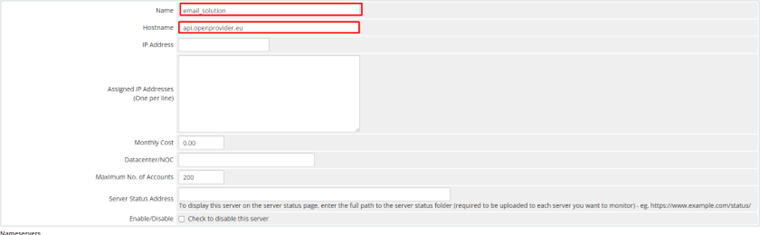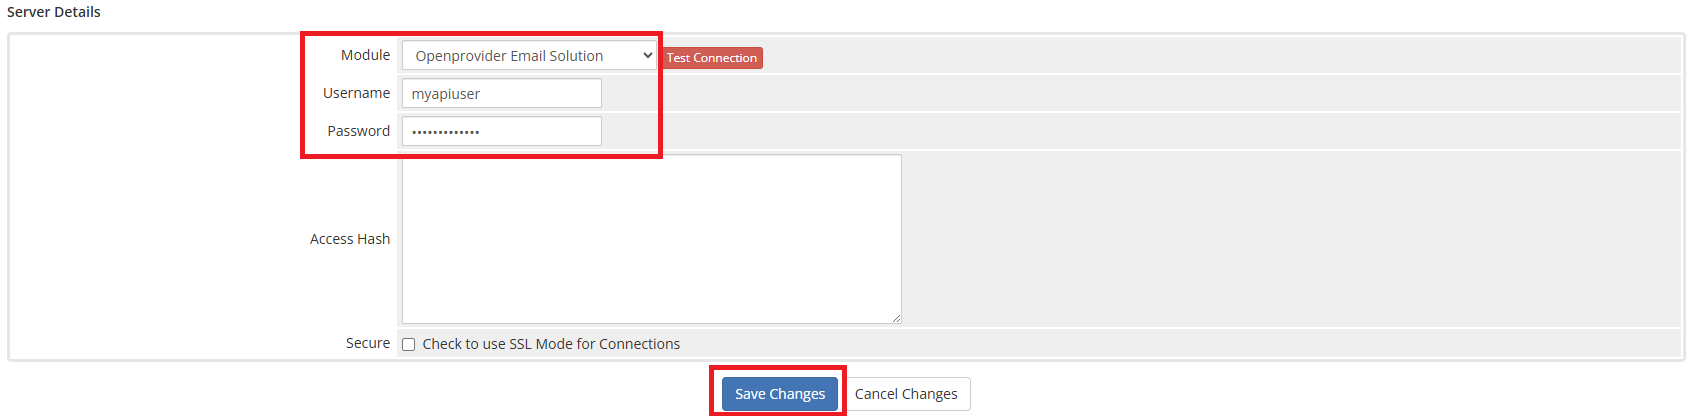4\. After Save click on edit button then click **Test connection.**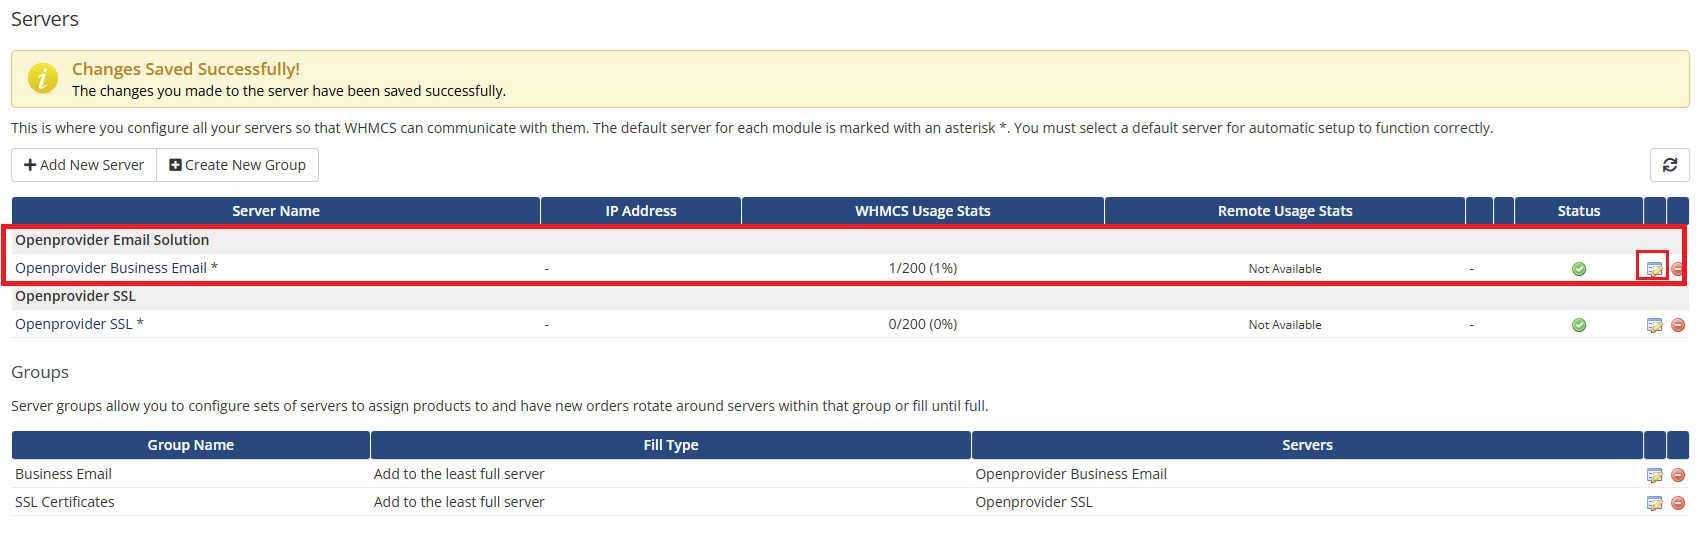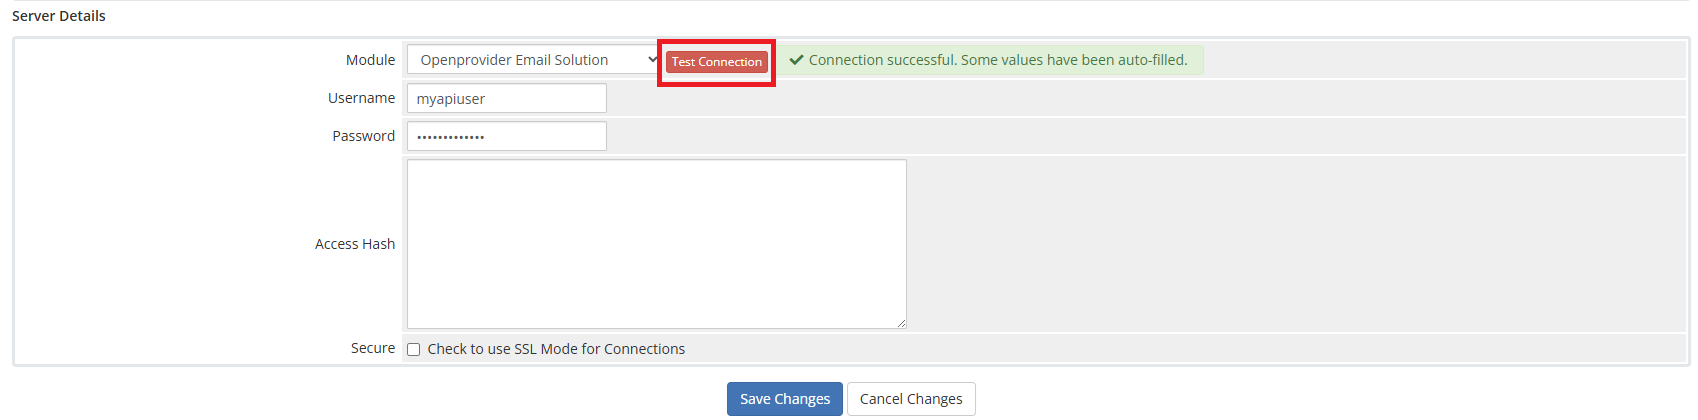5\. Now, create a new server group. Click on **Create New Group.**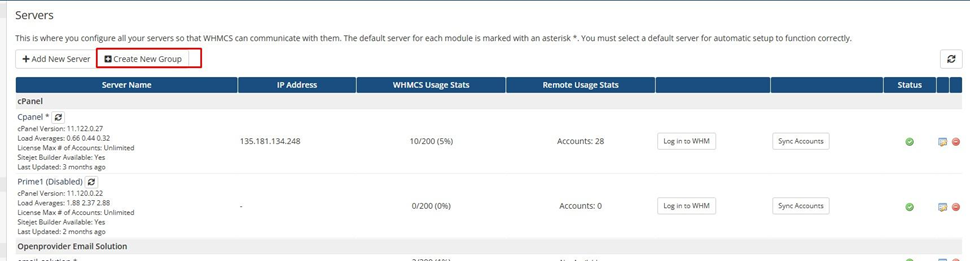6\. On the new page:
- In the **Name** field, enter the server group name.
- Select the desired server from the list.
- Click the **Add** button to include the selected server in the group.
Once all required servers are added, click the **Save** button to create the server group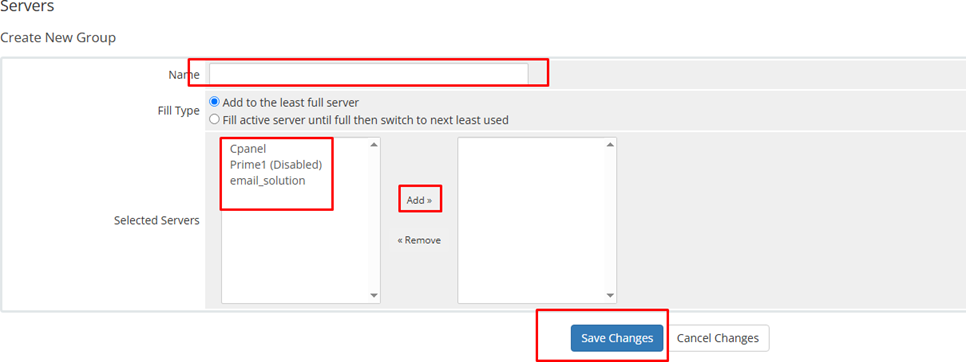### 3. How to create a product group and a product?
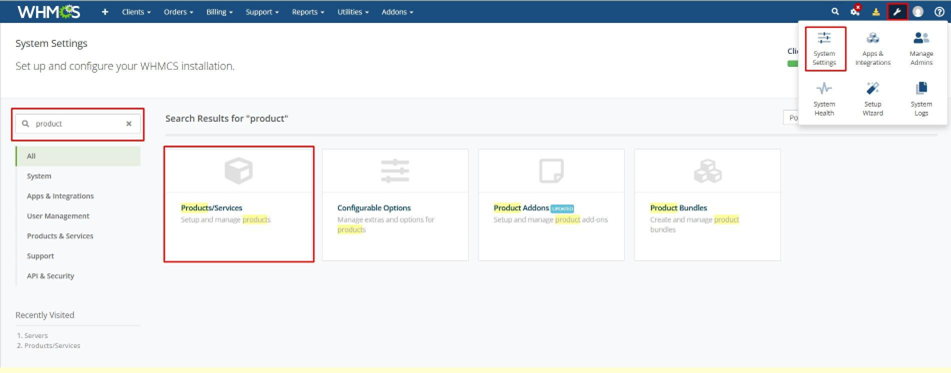
1. Go to **System Settings >> Find Product/Service** and click on it.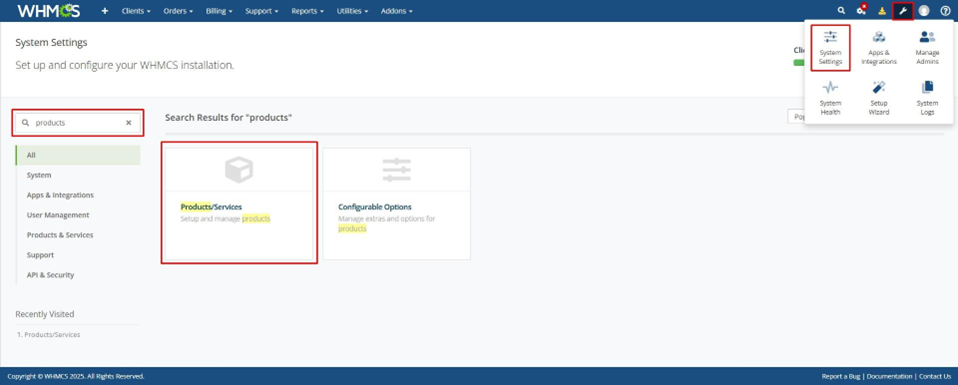2\. You will now be on the Products page. Click on the **Create a New Group** button. Enter the Product Group Name. You can also add a headline and tagline, select the Order Form and Payment Gateway, or choose to set the group as hidden. Once you've entered all the details, click **Save Changes**.
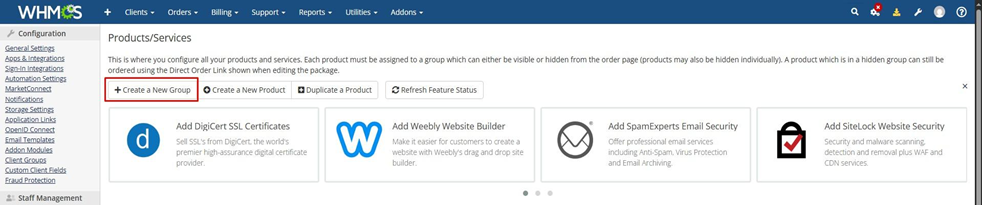
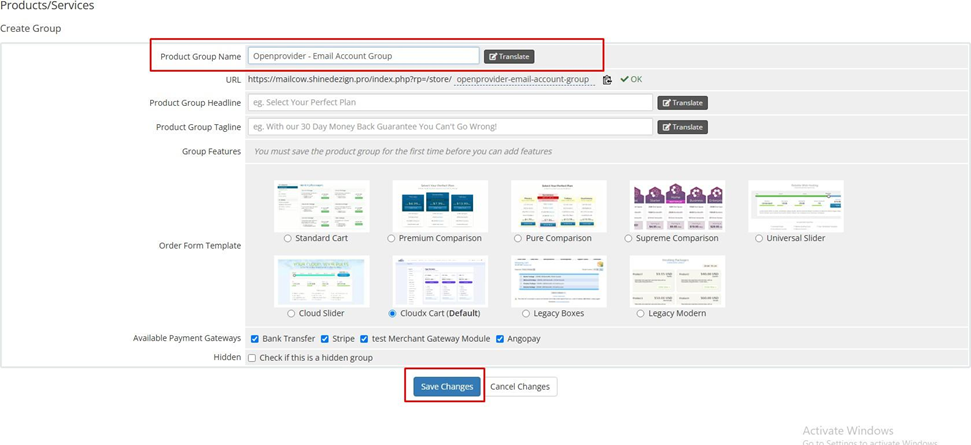
3\. Your product group has been created. Now, click on the **Back to Product List** button. You will see the newly created product group on the Products page. Next, click on the **Create a New Product** button.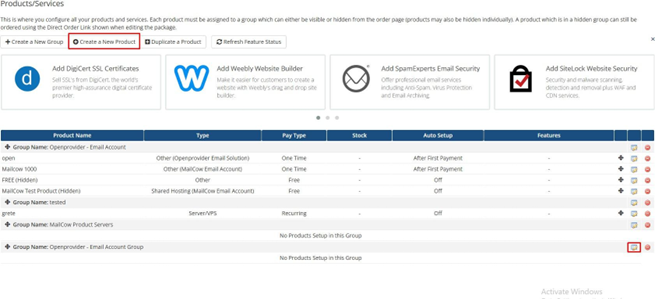
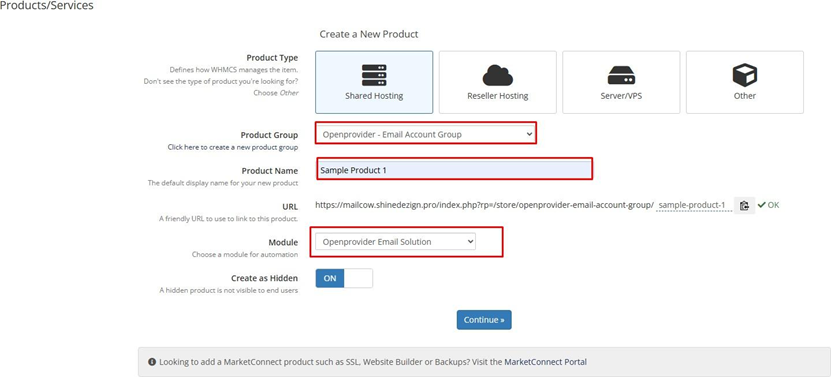
4\. Now you have to enter the details for the new product:
- **Product Type**: Select the product type.
- **Product Group**: Choose the desired product group for this product.
- **Product Name**: Enter the product name.
- **Module**: Select the server module (e.g., Openprovider - email solution).
- **Create as Hidden**: Check this option ONLY if you want to keep the product hidden.
After entering all the details, click on **Continue**.
5\. In the Product **'Details'** tab, enter the **tagline**, **short description**, and **full description** for the product. Then, go to the **Pricing** tab and set the product price (Free, One Time, or Recurring). Finally, click **Save Changes**.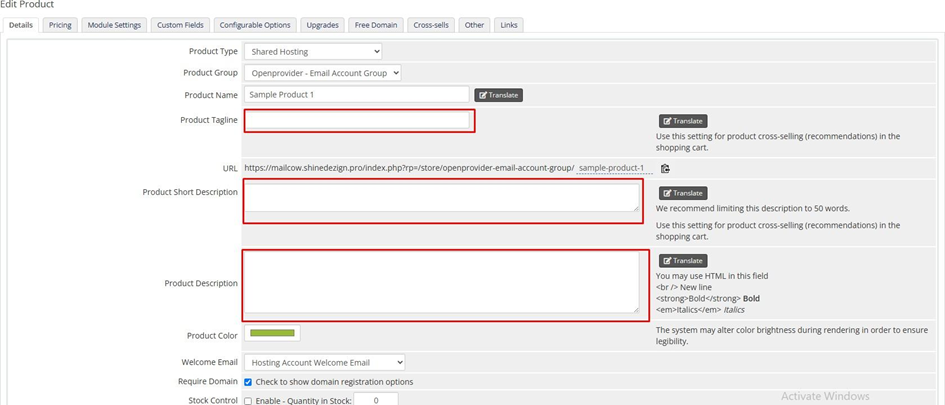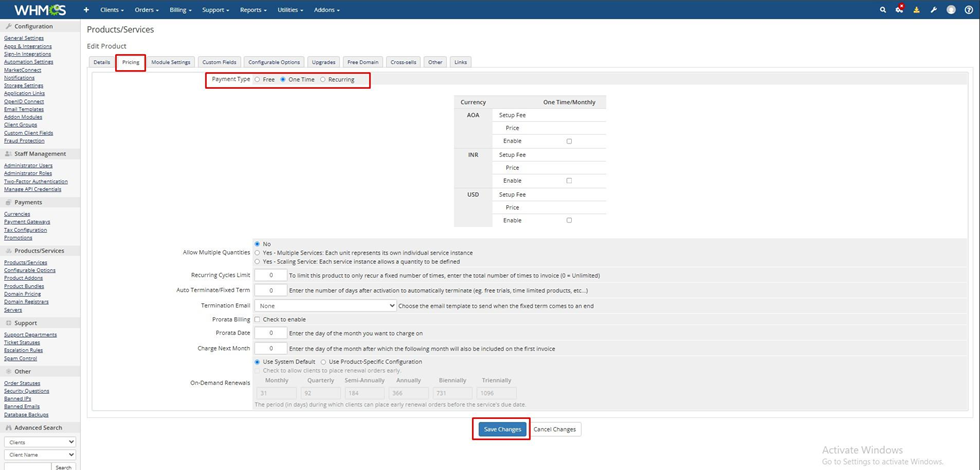
### 4. How to configure the product with the server module?
- Go to **Configuration** >> **System Settings >> Find product/service** and click on it.
****
- Edit the product and go to the module settings.
- Select the **Openprovider Email Solution** server module.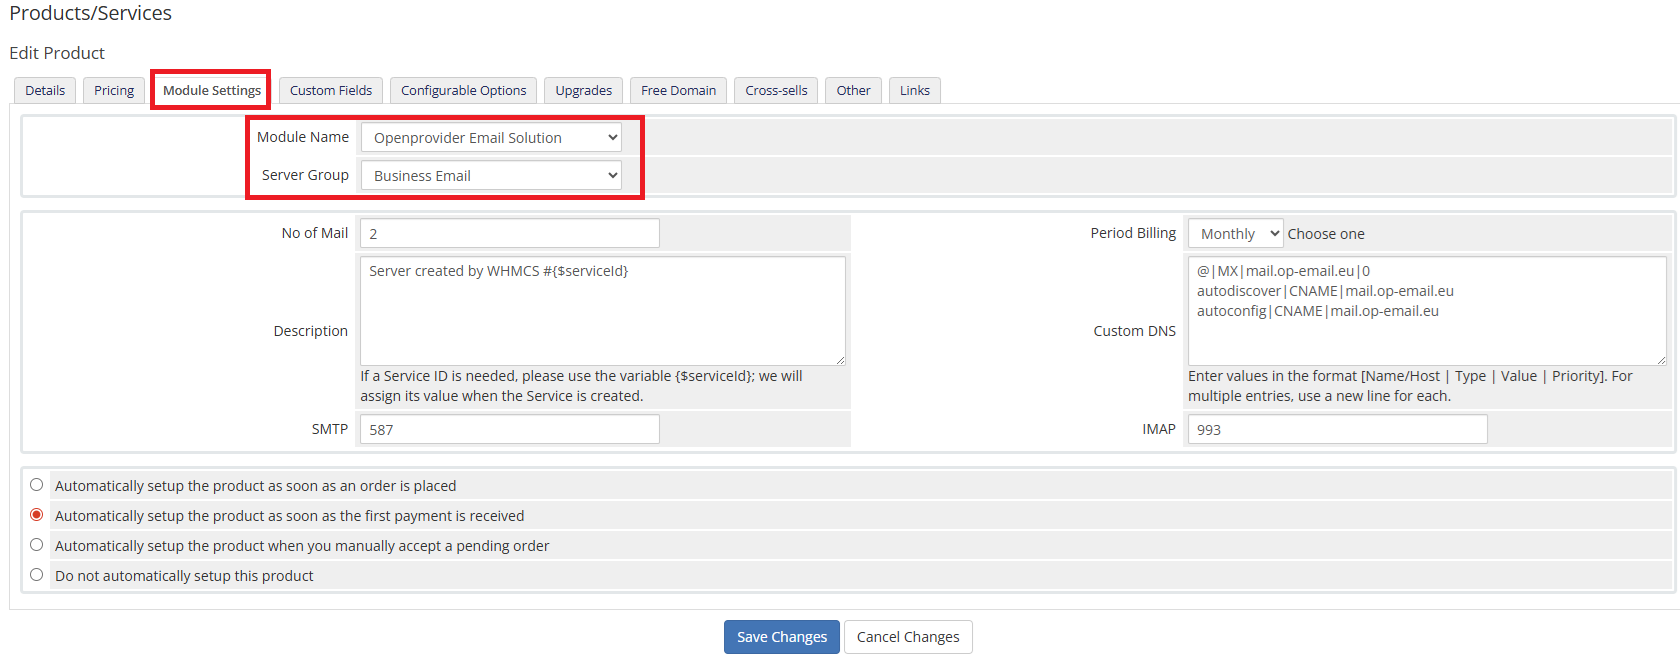- 3. In the module configuration options, you need to configure the module with the following settings:
- **No of Mail**: Enter the number of email accounts you want to offer per order.
- **Period Billing**: Select the billing period (monthly or yearly).
- **Description**: Enter the service description. If a Service ID is needed, use the variable
**{$serviceId} - its value will be assigned when the service is created.**
- **Custom DNS**: Enter the custom DNS values in the following format:
**\[Name/Host | Type | Value | Priority\]**Eg: @|MX|mail.op-email.eu|0And for multiple entries, use a new line for each.
- SMTP: Enter the SMTP port here - **587**
- IMAP: Enter the IMAP port here - **993**
**Note: Custom mail settings (DNS, SMTP, IMAP) will appear after checkout. Leave these as Default unless you are using a white-labeled mail server.**
4\. After filling all the configurable options, click on the **Save Changes** button.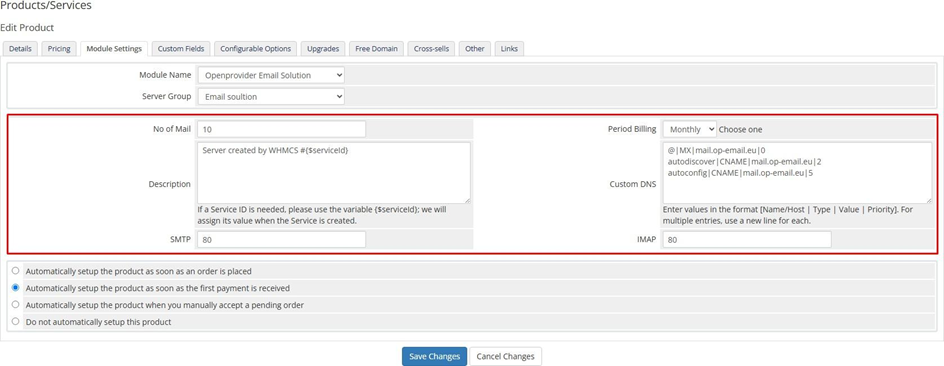
# WHMCS Frequently asked questions
## [1. Why am I getting an authentication error or not able to connect to API?](#bkmrk-1.-why-am-i-getting--2)
Check the following things, after changing your password in Openprovider:
- Ensure that API access is enabled on the account. You can find instructions to enable API access at [How to enable API access](https://openprovider.help/books/quick-start/page/how-to-enable-api-access)
- Ensure that the correct password is being entered into the module.
- Ensure that the password, and not the hash, is entered into the module.
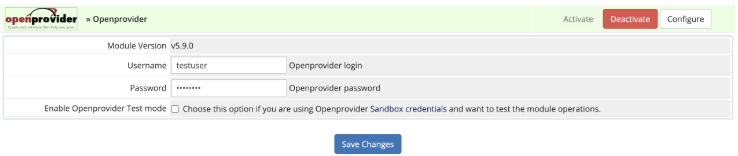
- Ensure that you see that the module authenticates after clicking "save" (see screenshot, Username, and Password are **not** marked in red with asterisks \*)
- Ensure that you have signed the "Processor Agreement" to be able to use Openprovider API and services. You can see all the contracts at **Openprovider Dashboard >> Account >> Contracts**
- Ensure that you haven't checked the option "Openprovider Test Mode" if you are not using CTE/Sandbox credentials (i.e. when using RCP credentials) and vice versa.
- If you are getting error **Access denied** (error code: 10005), this indicates that the IP address sending the API call is denied by your API whitelist or blacklist. It can happen that you whitelisted IPv4 address and requests are coming from IPv6 address of the server. You can check the public IP address of the server hosting your WHMCS instance by the following command (run it via SSH/terminal of your WHMCS server):
```auto
curl ifconfig.me
```
Then you can whitelist the IP you got from the command output.
## [2. I'm getting an error "Sync Not Supported by Registrar Module" ](#bkmrk-2.-i%27m-getting-an-er)
In order to sync domain statuses, renewal dates, WPP settings, and auto-renew settings between your Openprovider account and your WHMCS instance, you will need to set up the Openprovider cron job (**Openprovider cron sync is deprecated and not recommended for WHMCS versions 8+. Please use native WHMCS cron**), which is detailed in the [document.](https://github.com/openprovider/Openprovider-WHMCS-domains#deprecated-configure-the-openprovider-cron-sync)
## [3. Does the module support the default domain sync in WHMCS?](#bkmrk-3.-does-the-module-s)
Yes, native domain synchronisation is supported since version 3.3. Please ensure that "**syncUseNativeWHMCS**" is set to "true" in the file 'modules/registrars/openprovider/configuration/advanced-module-configurations.php' to use default domain sync and cron job is configured as per [WHMCS documentation](https://docs.whmcs.com/Crons). When enabled, WHMCS' native synchronization feature will be used to sync domain data.
**Note**: Please be aware that WHMCS native sync will only sync data of domains with statuses - **Pending Transfer**, **Pending Registration**, and **Active**. After a domain enters **Grace Period (Expired)** or **Expired** status, the WHMCS native sync won't sync data of such domains and the status will only be transitioned out by completing the Renew module command (Registrar Commands >> Renew).
## [4. How can I allow registering domains which require additional information, such as .es, .us, .travel, .ru, .se, .nu and so on?](#bkmrk-4.-how-can-i-allow-r)
The 2.3-beta release of the module introduced a function `openprovider_additional_fields`() function, which retrieves the list of required additional information for any given TLD from the Openprovider API.
If you do not have the file ` /resources/domains/additionalfields.php` then add the example version from [resources/domains/additionalfields.php](https://github.com/openprovider/Openprovider-WHMCS-domains/blob/master/resources/domains/additionalfields.php). Otherwise, add the following lines to the top of your `additionalfields.php` file :
```auto
/resources/domains/additionalfields.php` add the following line of array element definitions:
```auto
$com_idn_type = array (
'English' => 'ENG',
'Slovenian' => 'SLV',
'Russian' => 'RUS'
);
$additionaldomainfields[".com"][] = array(
"Name" => "idnScript",
'DisplayName'=> "IDN language",
"Type" => "dropdown",
'Options' => join ( $com_idn_type, ',' ),
"Default" => "English",
'Required' => true);
```
## [6. How can I add intendedUse for certain TLDs?](#bkmrk-6.-how-can-i-add-int)
Some TLDs require an "intended use" statement when registering. You can set this up for your customers quite easily by doing the following:
In the file `/resources/domains/additionalfields.php` add the following line of array element definitions:
```auto
$additionaldomainfields['.cat'][] = array(
'Name' => 'intendedUse',
'DisplayName' => 'Intended Use',
'Type' => 'text',
'Size' => '30',
'Required' => true
);
```
Now when the domain is being registered, there will be a text box where the customer can write a description, which the module will send to Openprovider via API.
## [7. How can I set up default name servers?](#bkmrk-7.-how-can-i-set-up-)
This can be found in the [WHMCS knowledge base](https://docs.whmcs.com/Domains_Configuration) for domain configurations.
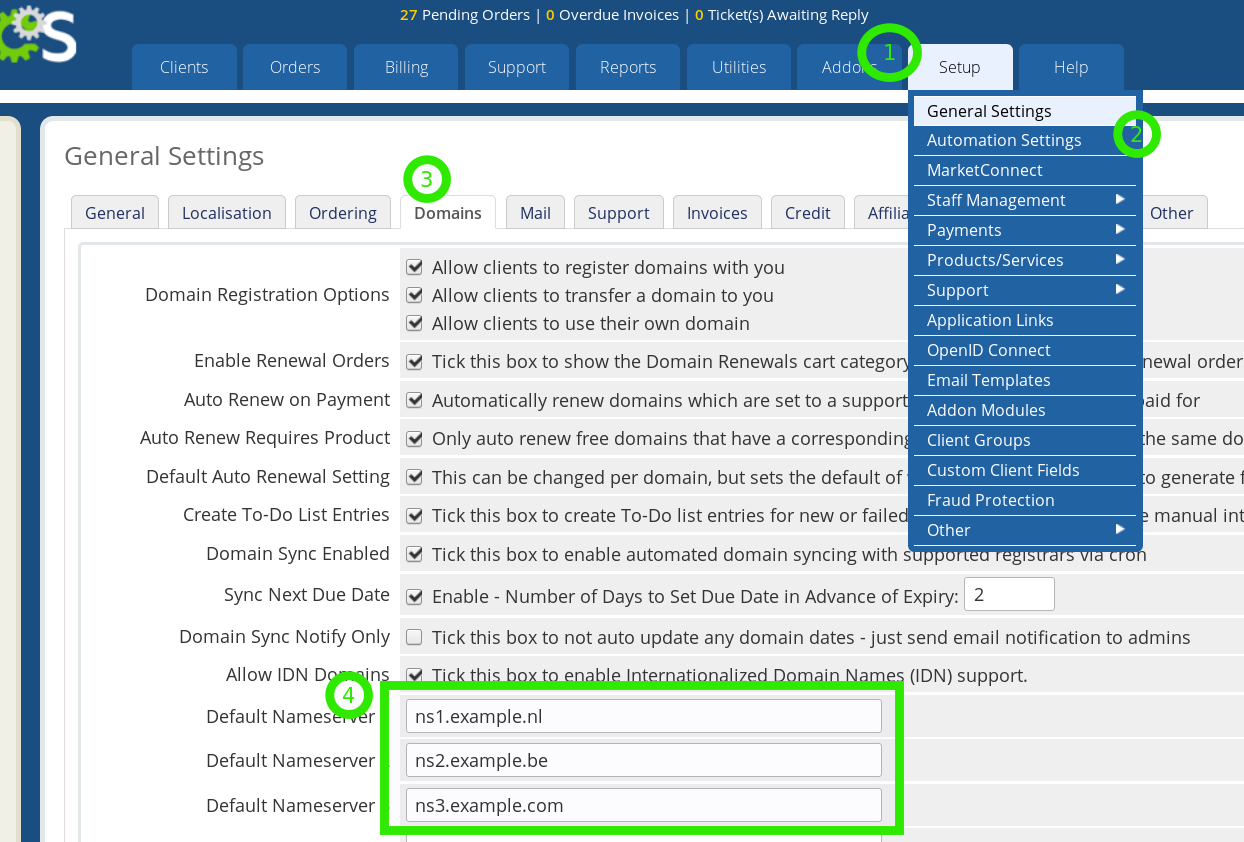
To set the default nameservers that WHMCS will use for domain only registrations ordered through the system, navigate to **Setup > General Settings > Domains tab**.
See attached screenshot (link at the bottom) to see how to do this.
## [8. How can I hard-code nameservers into the module?](#bkmrk-8.-how-can-i-hard-co)
If you using the "DNS management" plugin for WHMCS, this is most likely the issue. A previous version of the module had the Openprovider nameservers hard-coded to be used in the case that DNS management is selected. This has since been removed.
If you'd like to hard-code your nameservers into the module, to be used for register and transfer operations, you can modify the function `createNameserversArray` in the file `modules/registrars/openprovider/OpenProvider/API/APITools.php`
Add these variables:
```auto
$params['ns1'] =
$params['ns2'] =
$params['ns3'] =
$params['ns4'] = null;
$params['ns4'] = null;
```
and your domains will be created using the nameservers you've specified.
## [9. How to debug a "Blank Page/Oops, something went wrong and we couldn't process your request" error?](#bkmrk-9.-how-to-debug-a-%22b)
You may encounter this error while navigating or performing specific operations in WHMCS.

This is a generic WHMCS error message and doesn't reveal the actual issue. To view the actual error, please enable Display Errors following the instructions [here](https://help.whmcs.com/m/troubleshooting/l/678235-troubleshooting-a-blank-page-oops-error-message).
Example detailed error with Display Errors enabled:
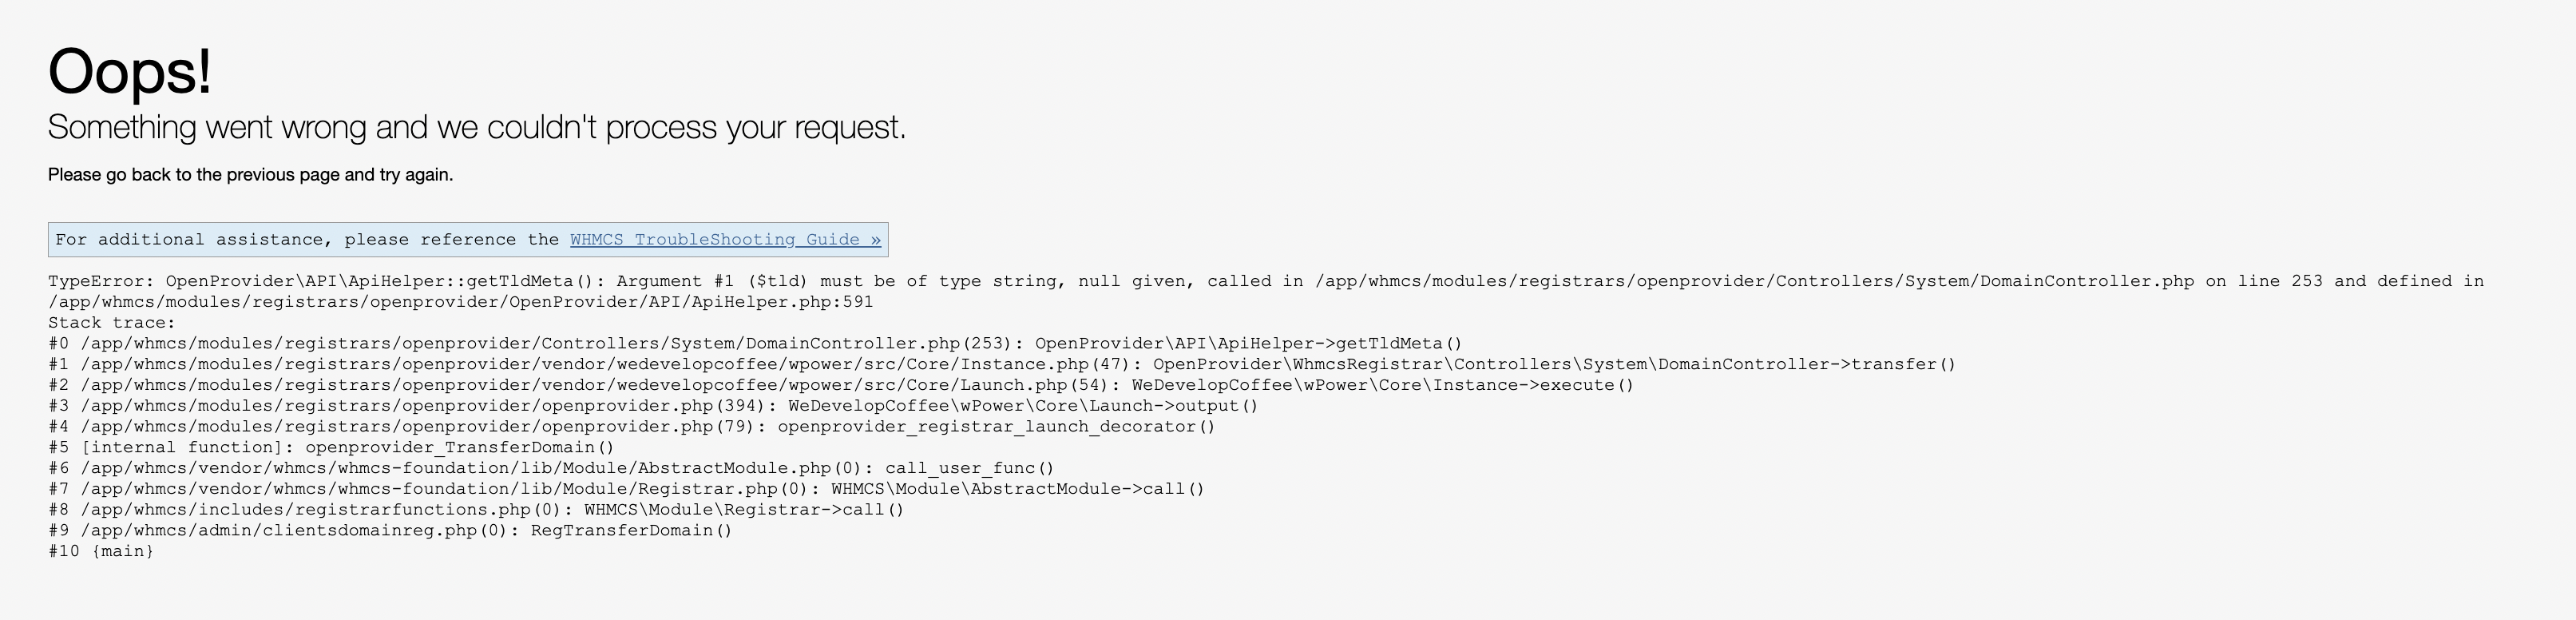
**IMPORTANT**: Once you are done, be sure to disable Display Errors or to remove the display\_errors flag option from configuration file.
Example error from PHP error log:
```auto
[Tue Feb 20 11:14:33.488187 2018] [:error] [pid 15335] [client
90.74.128.238:57986] [WHMCS Application] ERROR: exception
'Whoops\\Exception\\ErrorException' with message 'Class 'DOMDocument' not found' in /home/corpitse/public_html/clients/modules/registrars/openprovider/OpenProvider/API/Request.php:21
Stack trace: #0
/home/myuser/public_html/clients/vendor/whmcs/whmcs-foundation/lib/Utility/Error/Run.php(0):
WHMCS\\Utility\\Error\\Run->handleError(1, 'Class 'DOMDocum...',
'/home/corpitse/...', 21) #1 [internal function]:
WHMCS\\Utility\\Error\\Run->handleShutdown() #2 {main}
{"exception":"[object] (Whoops\\\\Exception\\\\ErrorException(code: 1):
Class 'DOMDocument' not found at /home/myuser/public_html/clients/modules/registrars/openprovider/OpenProvider/API/Request.php:21)"}
[], referer: https://mydomain.com/clients/admin/configregistrars.php
```
Based on this error, it appears that the DOM extension is not installed on your server. This extension is usually installed by default, so it may have simply been disabled by you or your hosting provider. If you're using CloudLinux, check to see if DOM is enabled.
Please see [http://php.net/manual/en/dom.installation.php](http://php.net/manual/en/dom.installation.php) for more information
## [10. I want to run the cron job from the web, and not from the command line](#bkmrk-10.-i-want-to-run-th)
**Important : Openprovider domain sync cron is deprecated since version 5.3 of the Openprovider domain module, and is not recommended for WHMCS 8+ versions. We suggest that you use the WHMCS native domain sync and do not use the Openprovider custom sync for WHMCS 8 and higher.**
From the file `/modules/registrars/openprovider/cron/DomainSync.php` comment out the following:
```auto
if((!isset($_SESSION['adminid']) && $_SESSION['adminid'] == false) && !is_cli())
{
exit('ACCESS DENIED. CONFIGURE CLI CRON.');
}
```
This will allow you to run the file from a public folder.
## [11. Updating registrant details via WHMCS fails](#bkmrk-11.-updating-registr)
Reseller is trying to update registrant details via WHMCS having international phone number input interface and automatic formatting option enabled.
Request:
```auto
Array
(
[postValues] =>
YHWHMCS****************whmcs-2.2.8De Beste B.V.J.VJosVerkerkMBoddens Hosangweg642481 LAWoubruggeZuid-HollandNL+31+31.3188010120010008@my.yourhost.nlNL904610-NL
)
```
Response:
```auto
Array
(
[curlResponse] =>
133Invalid telephone region code number!
[curlErrNo] => 0
[errorMessage] =>
```
The option can be toggled in WHMCS Admin Dashboard > **Configuration** > **System Settings** > **General Settings > Localisation** (tab).

The option changes the appearance of the phone number input box from one having pre-formatted configuration like:

to a simple empty text field.
Having this option enabled results in wrong number formatting and thus the registrant details update fails.
To workaround just disable the option and specify the phone number in a format like +XXX.XXXXXXX having dot (.) symbol included as a delimiter.
## [12. Error: "You have not signed the latest version of the contract for registering this domain"](https://openprovider.help/books/api-integrations/page/whmcs-frequently-asked-questions)
The error indicates that you must sign TLD contracts before ordering domains. You can find TLD contracts at: [https://cp.openprovider.eu/documentation/contracts.php](https://cp.openprovider.eu/documentation/contracts.php) and please sign the contract for the TLD for which you got error (for example, if you got the error while trying to register yourdomain.com, sign the .com contract)
## [13. The cron for downloading the TLD prices was not run yet.](#bkmrk-13.-the-cron-for-dow)
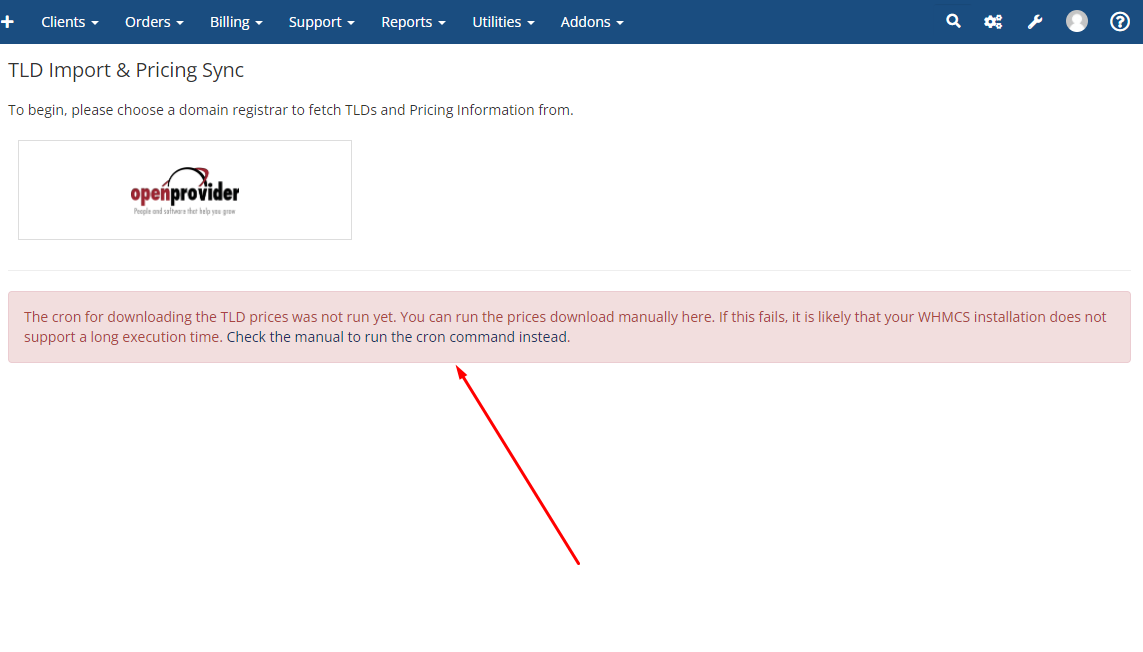
**Update**: This was fixed in version [5.8.0](https://github.com/openprovider/Openprovider-WHMCS-domains/releases/tag/v5.8.0), we strongly recommend you to update the module to [latest version](https://github.com/openprovider/Openprovider-WHMCS-domains/releases/latest).
Due to the number of TLDs supported by Openprovider, some WHMCS installations may have time-outs when synchronizing the TLD pricing. Loading the TLD prices still requires some time to process after running this command. WHMCS requires a significant amount of time to process all TLDs. The speed depends on how fast your server is as well as your browser. In order to resolve the problem, we suggest,
- Running the script a few more times when there are no other WHMCS tasks/cron jobs running.
- Increase the amount of PHP memory allocated for running scripts (memory\_limit=256M or higher).
If you have SSH access, you can try running the script manually as follows:
1. Log in to your server via SSH.
2. Navigate to the folder '**modules/registrars/openprovider/cron**'
3. Execute the following command:
```auto
php -d error_log='' -d max_execution_time=0 -d memory_limit=256M DownloadTldPrices.php
```
If you don't have SSH/terminal access to the server, please try adding a cron job like,
```auto
15 0 * * * php -d max_execution_time=0 -d memory_limit=256M /PATH_TO_WHMCS/modules/registrars/openprovider/cron/DownloadTldPrices.php
```
**Note**: The above cron will run at 12:15 AM at night, please adjust the time if required. Once the cron has been executed, please ensure to remove the cron task since it is a memory-intensive task for your WHMCS server.
## [14. How to Update Openprovider domain registrar module to latest/newer version](#bkmrk-14.-how-to-update-op)
### Updating using script \[Beta\]
- To upgrade the Openprovider domain registrar module, run the following commands from WHMCS root directory as the hosting/website user (e.g., on a cPanel server, run it as the cPanel user under which the WHMCS website is hosted).
- **Note**: Depending on the permissions of the user running the script, you may need to use the sudo command (e.g., sudo /bin/bash -s)
```
curl -s https://raw.githubusercontent.com/openprovider/Openprovider-WHMCS-domains/refs/heads/master/scripts/update_openprovider.sh | /bin/bash -s
```
### Manual update
If you haven’t made any customization to the existing module, you can simply remove the ‘openprovider’ folder from "modules/registrars/" and "modules/addons/" and add/copy those folders from the new version - [https://github.com/openprovider/Openprovider-WHMCS-domains/releases](https://github.com/openprovider/Openprovider-WHMCS-domains/releases/tag/v5.8.0). If you have made any custom changes to current installation, please perform the following steps:
1. Make a backup of your WHMCS database and module folders ('modules/registrars/openprovider', 'includes/hooks', 'resources/domains/additionalfields.php' and 'modules/addons/openprovider'), with any custom modifications.
2. Download the version of the module you need from [releases](https://github.com/openprovider/Openprovider-WHMCS-domains/releases) \[[**Latest Version**](https://github.com/openprovider/Openprovider-WHMCS-domains/releases/latest)\][.](https://github.com/openprovider/Openprovider-WHMCS-domains/releases.) Extract it and upload contents as described in: [Install and configure Openprovider domain registrar module](https://openprovider.help/books/api-integrations/page/whmcs-domain-module-install-and-configure-openprovider-domain-registrar-module).
3. Make sure the advanced config file 'modules/registrars/openprovider/configuration/advanced-module-configurations.php' has the right settings. If you have any custom settings in the current version, please ensure to copy/apply those to the new/old version. You can find detailed documentation about advanced module configuration at: [Advanced configurations](https://github.com/openprovider/Openprovider-WHMCS-domains/blob/master/docs/advanced_configurations.md).
## [15. How to enable/disable ID protection (WPP), DNS management and EPP Code for TLDs](#bkmrk-15.-how-to-enable%2Fdi)
You can configure domain addons you want to offer to your customers like DNS Management, ID protection (Whois Privacy Protection) and EPP code (also known as auth code or transfer code) from your WHMCS Admin Dashboard.
1. Navigate to **Configuration** >> **System Settings** >> **Domain Pricing.**
2. Select the addon options you want to offer/enable for TLDs using the checkboxes.
3. Click on **Save Changes**.
- Enable EPP Code option to require an EPP code for transfers of domains that use this extension. If this option is disabled, clients will be able to submit transfer requests without an EPP code (auth code).
- Openprovider does not offer e-mail forwarding at this moment.
If you would like to offer these addons to your customers with a price, you can also configure it from **Domain Pricing** page (on the right pane).
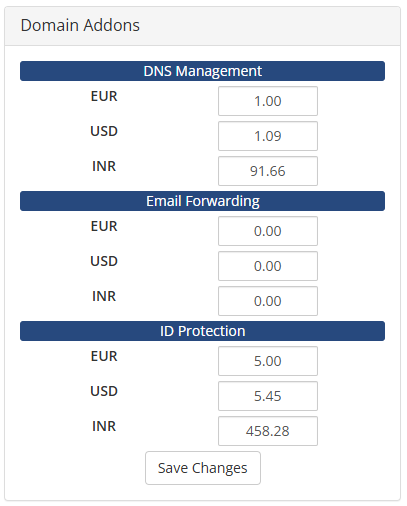
\* ID Protection (Whois Privacy Protection) is free with Openprovider [Membership Plans](https://openprovider.help/books/memberships/page/what-is-a-membership).
For more details about Domain Addons in WHMCS, please refer to official [WHMCS documentation](https://docs.whmcs.com/domains/pricing-and-configuration/domain-pricing/#domain-addons).
## [16. How to enable Domain Auto Registration](#bkmrk-16.-how-to-enable-do)
Automatic domain registration automates registration and transfer request submissions to supported registrars. Openprovider domain module supports automatic domain registration and transfer submissions and this can be enabled for TLDs either from **Registrar TLD Sync** or from **Domain Pricing** page.
From **Registrar TLD Sync** page (**Utilities > Registrar TLD Sync**):
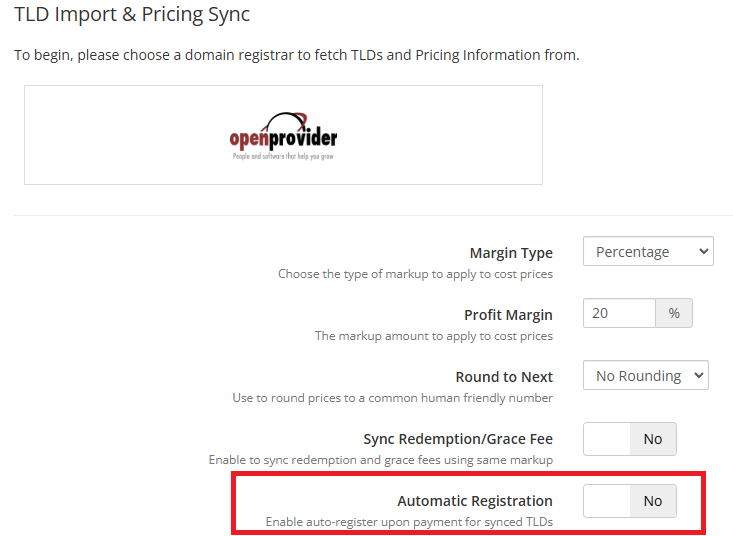
From **Domain Pricing** page (**Configuration >> System Settings >> Domain Pricing**):
For TLDs you would like to enable auto registration/transfer, select Openprovider from Auto Registration drop down list and click on **Save Changes**.

- When you enable this for an extension, WHMCS will automatically submit the request to Openprovider as soon as the client pays you for it. WHMCS never submits domain registrations before you receive payment.
- If you disable automatic domain registration, the system will wait to submit the registration until after a client has paid and an admin manually reviews the order and accepts it.
## [17. TLD Sync Error - Unable to display TLD cost pricing as currency 'XXX' is not defined with an exchange rate.](#bkmrk-17.-tld-sync-error--)
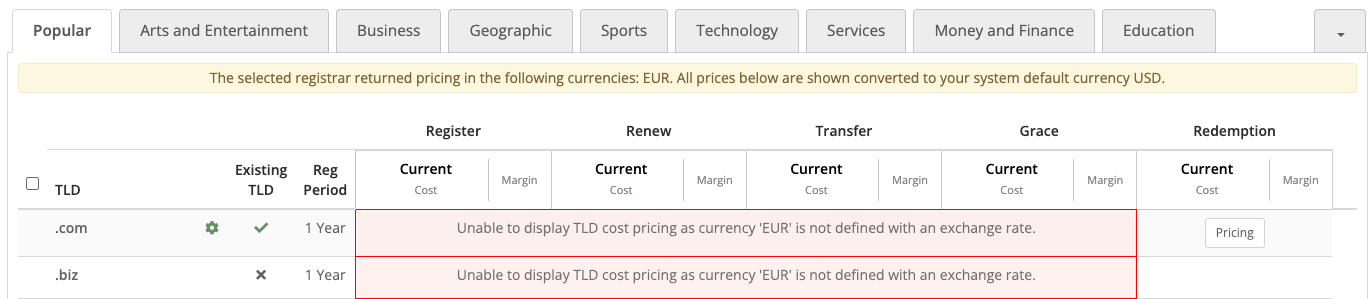
The error indicates that you haven't configured the currency shown in the error message in WHMCS **Currencies** (**Configuration >> System Settings >> Currencies**). For more information, please refer to [https://docs.whmcs.com/payments/currencies/](https://docs.whmcs.com/payments/currencies/)
## [18. How to check my WHMCS, PHP and Openprovider module versions for support?](#bkmrk-18.-how-to-check-my-)
- **Module Version:**
- Starting from version v5.9.0, you can easily check module version from Openprovider widget on WHMCS Admin Dashboard.
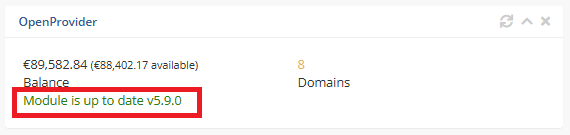
- In versions before v5.9.0, you can check the Openprovider domain registrar module version from WHMCS Admin Dashboard >> **System Settings** >> **Domain Registrars** >> **Openprovider** >> click on "**Configure**" button). You can also check module version in file: **modules/registrars/openprovider/OpenProvider/API/APIConfig.php** (look for a line with "*static public $moduleVersion*").
Eg:

- **WHMCS Version** - You should be able to find the WHMCS version from admin dashboard under System Information (on the left pane).
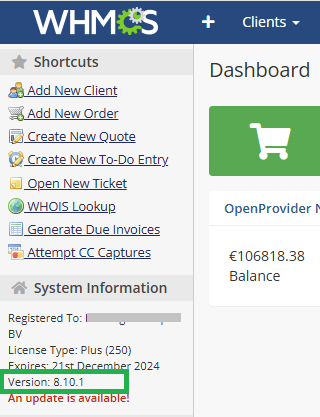
- **PHP version** - You can check this from WHMCS Admin Dashboard >> **Utilities** >> **System** >> **PHP Info**.
## [19. How can I get notified about new module version releases?](#bkmrk-19.-how-can-i-get-no)
- Starting from version v5.9.0, you can easily check for new module version updates (stable releases) from Openprovider widget on WHMCS Admin Dashboard.
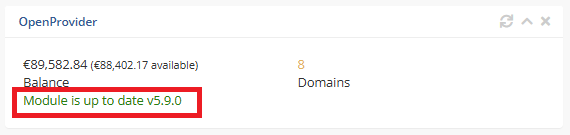
- If you are using an older version of the module or would like to get notified about new module releases including beta version, go to the Openprovider WHMCS module [GitHub repo](https://github.com/openprovider/Openprovider-WHMCS-domains) (ensure to Sign in to your GitHub account).
- Click on **Watch** >> Select **Custom**
**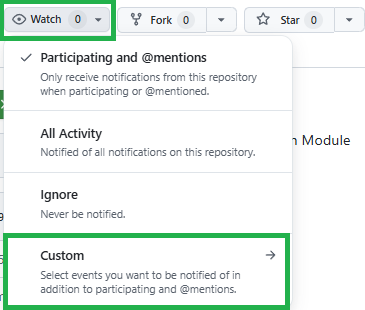**
- Under "**Subscribe to events for openprovider/Openprovider-WHMCS-domains**", select **Releases** checkbox.
- Click on **Apply**.
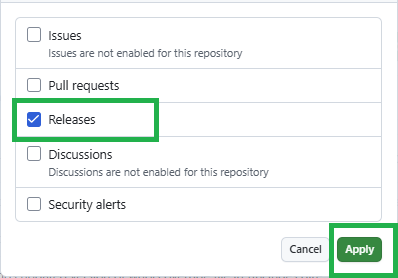
## [20. How should I configure domain renewals between WHMCS and Openprovider to avoid double billing or renewal issues?](https://openprovider.help/link/7198#bkmrk-20.-how-should-i-con)
To ensure domain renewals work smoothly and to avoid problems such as double renewals or incorrect status sync, it is important to configure WHMCS and Openprovider properly.
We **recommend disabling Openprovider’s global auto-renewal** and using WHMCS to manage renewals based on invoice payments. This aligns with WHMCS best practices and prevents duplicate charges or unsynced domain states.
For a full explanation of each scenario, recommended settings, and behavior when domains enter quarantine, please refer to our detailed guide:
[Managing Domain Renewals in WHMCS with Openprovider](https://openprovider.help/books/api-integrations/page/managing-domain-renewals-in-whmcs-with-openprovider)
## [21. How to create and manage private nameservers (glue records) from WHMCS](#bkmrk-21.-how-to-create-an)
If you would like to create and manage (update/delete) nameservers (eg: ns1.yourdomain.tld/dns2.yourdomain.tld) using your domain registered with Openprovider via WHMCS, you can do it following the steps below:
- From WHMCS Client Area, navigate to **Domains** > **My Domains** > Click on the domain 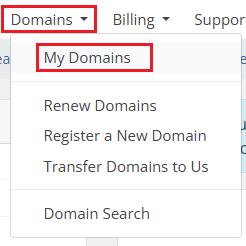
- Click on **Private Nameservers** from the left menu (under **Manage** section) as shown in the image below:
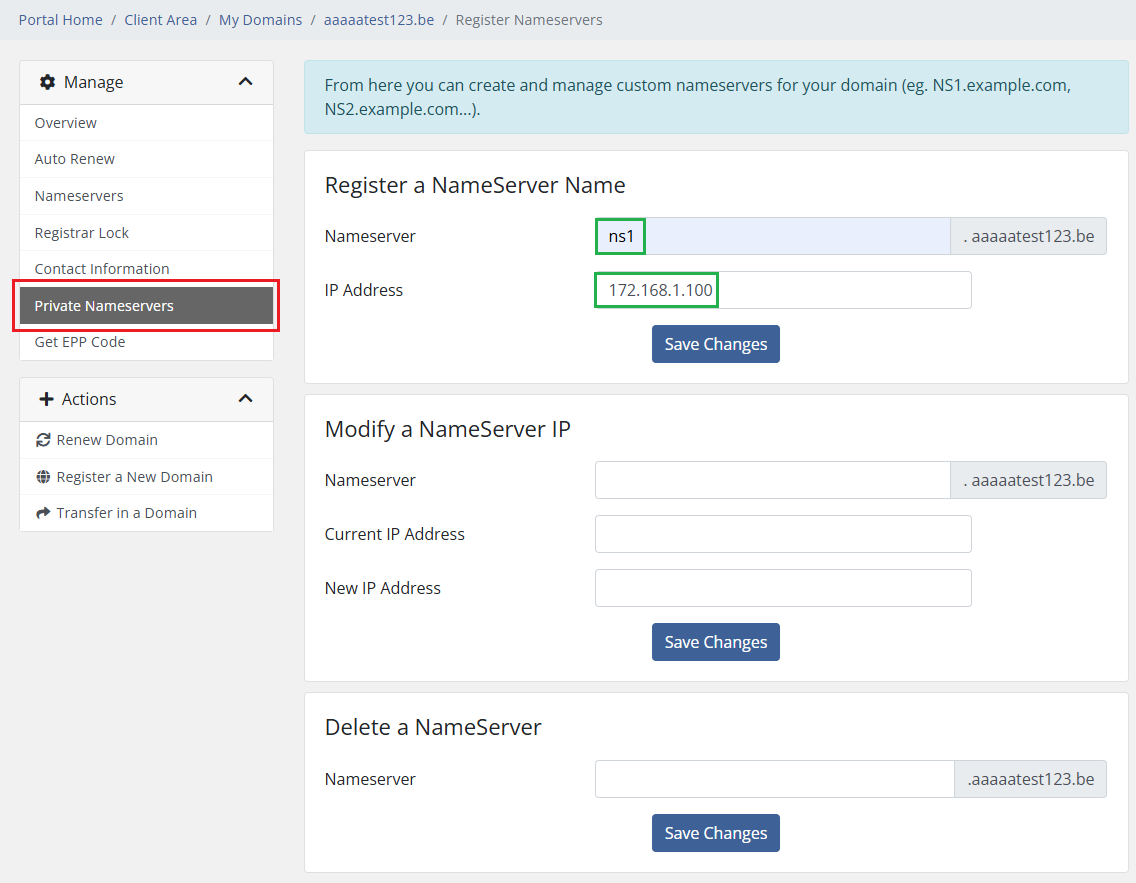- To create/register nameserver object
- **Nameserver**: Enter the name you want to use for the nameserver object. Eg. **ns1** (ns1.yourdomain.tld), **dns2** (dns2.yourdomain.tld)
- **IP Address**: IP address of the DNS server that will host the DNS zone for the domain.
**Notes**:
- Creating nameservers with IPv6 is not currently supported from WHMCS client area. Please use RCP (Reseller Control Panel) > [Domain management > Nameserver management](https://cp.openprovider.eu/nameserver/overview.php) for creating nameserver objects with IPv6 address.
- Although Glue records are created, you must also create the A records to the respective hosts IP (ns1.yourdomain.tld/dns2.yourdomain.tld) in the DNS zone of the domain.
Please refer to [this article](https://openprovider.help/books/dns/page/glue-records-how-to-create-and-modify-glue-records) for more information about nameserver objects/glue records.
# WHMCS Premium Global Anycast DNS module - Installation, configuration and management
Openprovider’s Premium Global Anycast DNS leverages Sectigo’s advanced DNS infrastructure to provide a single, integrated and easy to adopt solution which offers a 99.99% Uptime Guarantee and near real-time updates, features DDoS protection and blazing fast resolution. While our standard DNS service is sufficient for users who don’t have any special needs when it comes to DNS resolution, the Premium Global Anycast DNS service can be an excellent service to your hosting services portfolio. Please refer to the [FAQ article](https://openprovider.help/books/dns/page/premium-global-anycast-dns-service) for more information on Premium Global Anycast DNS.
### Premium Global Anycast DNS Benefits
- **Blazing Fast Resolution**: The first part of a request to your website is typically a DNS lookup. Sectigo’s Premium Global Anycast DNS ensures that your customers are always connected to the closest server, resulting in lower latency and faster access times to your web properties.
- **Global Presence**: All your DNS zones are pushed to Sectigo’s DNS servers around the globe, ensuring an optimal user experience for your global customers.
- **DDoS Protection**: DNS is the first step in the journey to your website. Sectigo’s Premium Global Anycast DNS keeps your DNS zone protected from DDoS DNS attacks at all times.
- **99.99% Uptime Guarantee**: Sectigo’s built-in smart routing and anycast capabilities ensure that your DNS zones are always online. Your websites will always be accessible regardless of regional disruptions.
- **Near Real-Time Updates**: Updates to your DNS records are carried out globally in near real-time.
- **Competitive Pricing**
### Technical dependencies
The Premium Global Anycast DNS module can be used with domains from any registrar, not only domains with Openprovider.
### Module Features
The Openprovider Premium Global Anycast DNS WHMCS module provides a comprehensive set of features to manage Premium DNS zones directly from WHMCS:
- **Create Premium DNS Zone**
- Automatically create a Premium Global Anycast DNS zone when registering a new domain
- Enable Premium Global Anycast DNS during domain transfer
- Set up Premium Global Anycast DNS for existing domains
- **View DNS Zone**
- Retrieve and display existing Premium Global Anycast DNS zone details within WHMCS client area
- **Manage DNS Zone**
- Navigate to and manage your Premium Global Anycast DNS zone via an integrated DNS panel
- **DNSSEC Management**
- Activate or deactivate DNSSEC for Premium Global Anycast DNS zones
- View DNSSEC records and DNSSEC status
- Optionally users can enable DNSSEC during zone creation
- Delete Premium DNS Zone
- Delete Premium DNS zones directly through the WHMCS client area
These features are built to ensure automation, flexibility, and security for your DNS management workflows.
### Installation
1. Download the module files from [GitHub Repo](https://github.com/openprovider/openprovider-whmcs-premiumDNS).
2. Copy the contents of **/modules/servers/openproviderpremiumdns** into **<WHMCS directory>/modules/servers/openproviderpremiumdns**
3. Set up a server and server group for the Openprovider Premium Global Anycast DNS module in WHMCS.
4. Set up a product with the Openprovider-premiumDNS module (make sure to require a domain) and start selling.
5. Note that there is no test environment and records created with the Premium Global Anycast DNS module will be billed to your Openprovider account.
### Configure the server module
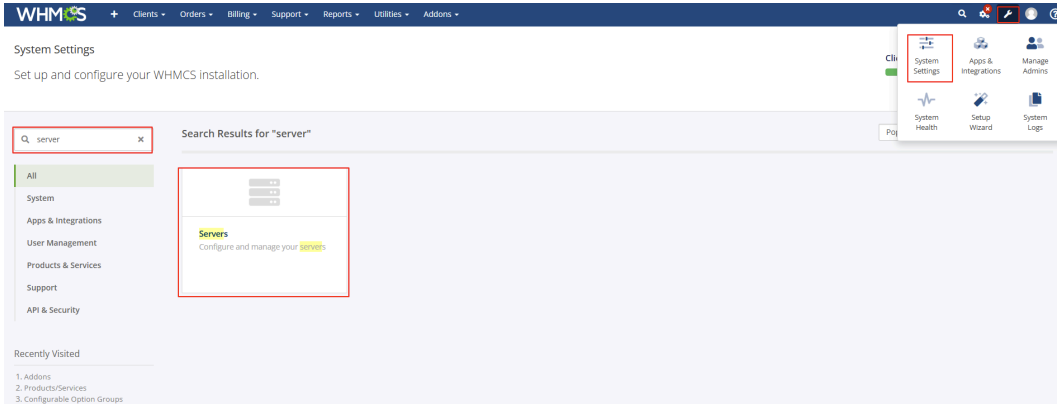
1. From your WHMCS admin area, navigate to **System Settings > Servers**.
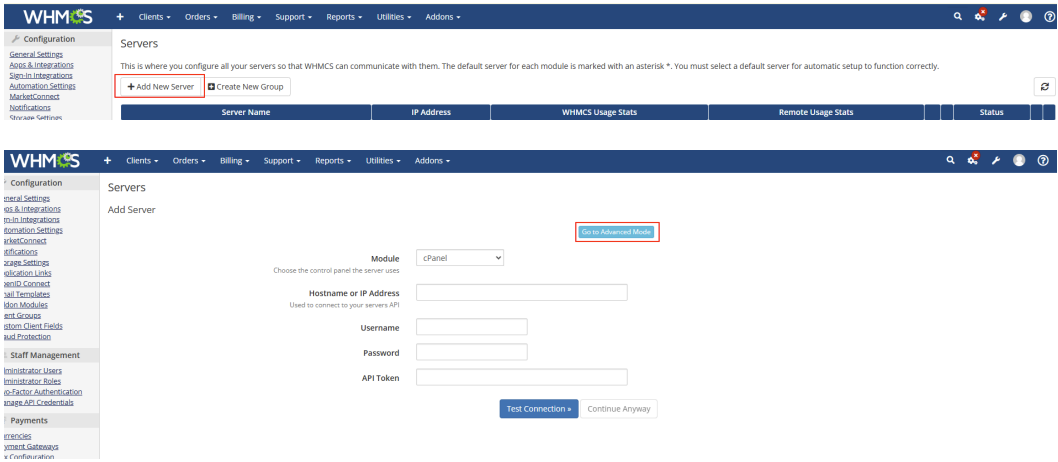
2. Click **Add New Server**, then select **Go to Advanced Mode**.
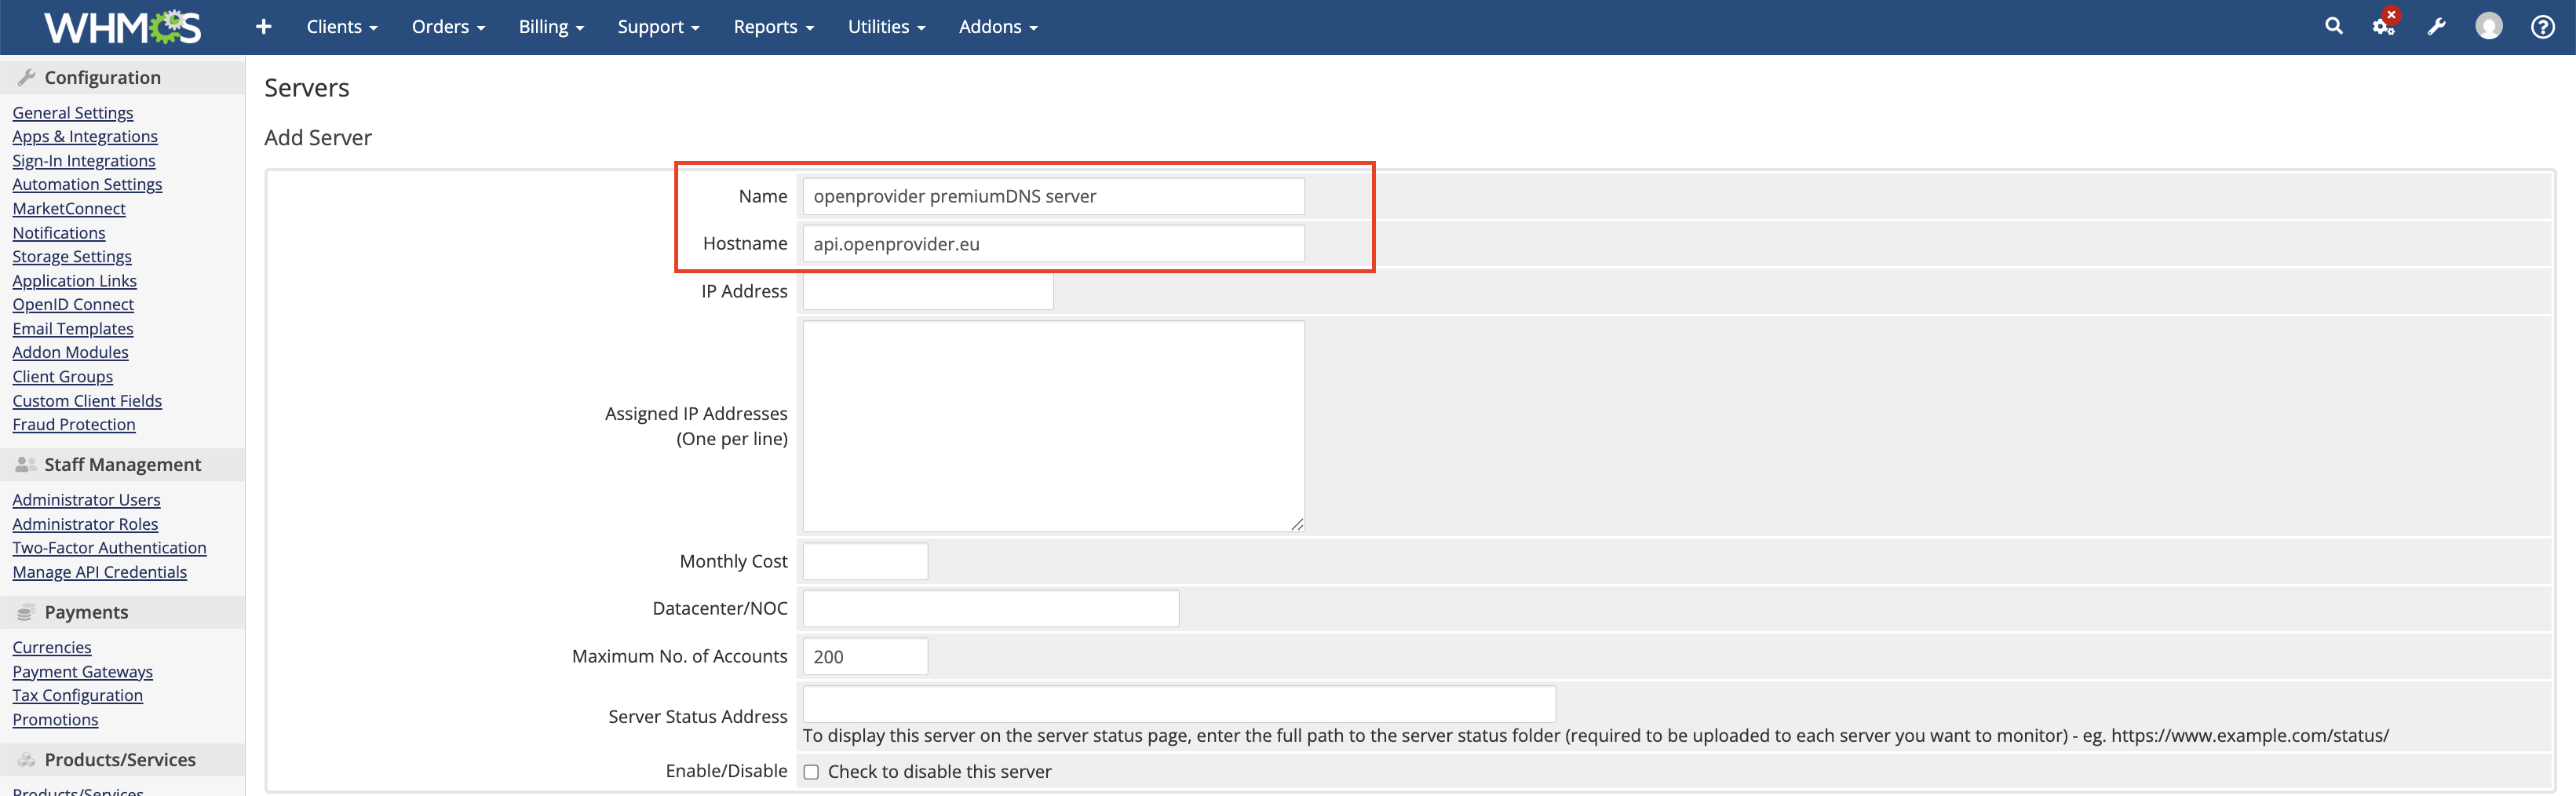
3. Add the server for API connectivity with the following details:
1. **Name**: For example, openprovider premiumDNS server
2. **Hostname**: api.openprovider.eu
3. **Nameservers**:
```auto
ns1.sectigoweb.com
ns2.sectigoweb.com
ns3.sectigoweb.com
ns4.sectigoweb.com
```
4. **Module**: Select Openprovider PremiumDNS module
5. **Username**: Your Openprovider username. **Note**: Please ensure that [API access](https://openprovider.help/books/quick-start/page/how-to-enable-api-access) is enabled for the user.
6. **Password**: Your Openprovider password (regular password, not the HASH)
1. Once complete, click **Save Changes**.
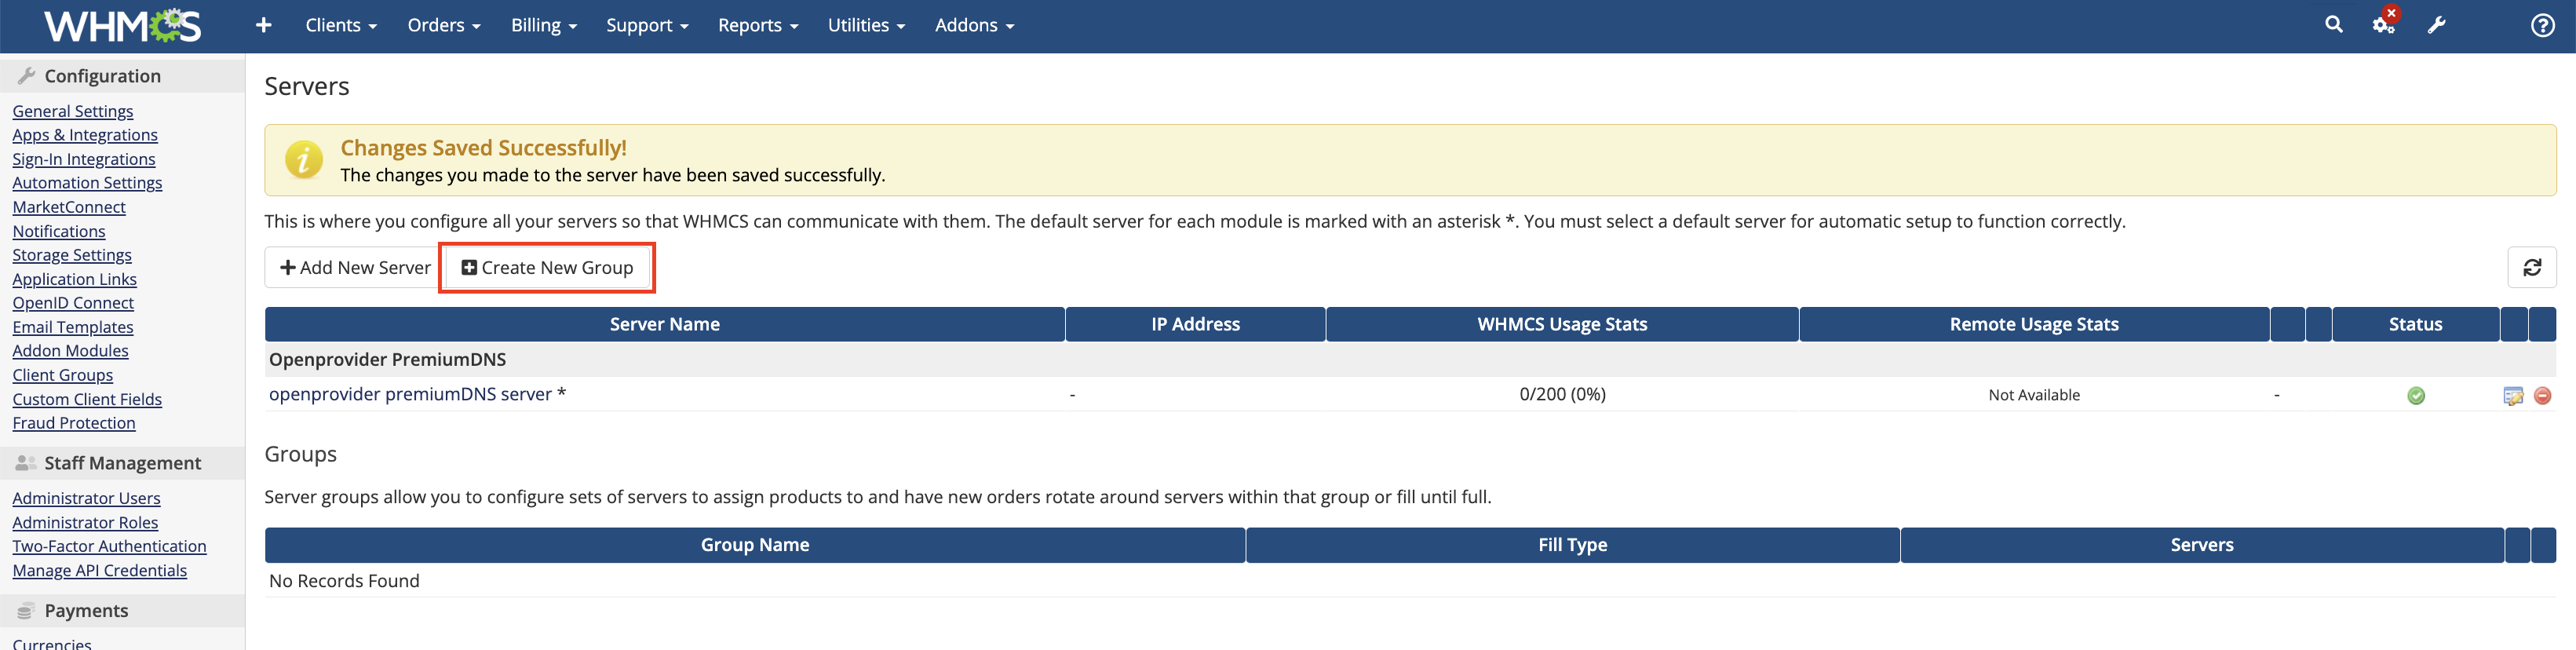
2. After the server is created, click **Create New Group**, provide a group name, assign the server you just created to the group, and **Save Changes**.
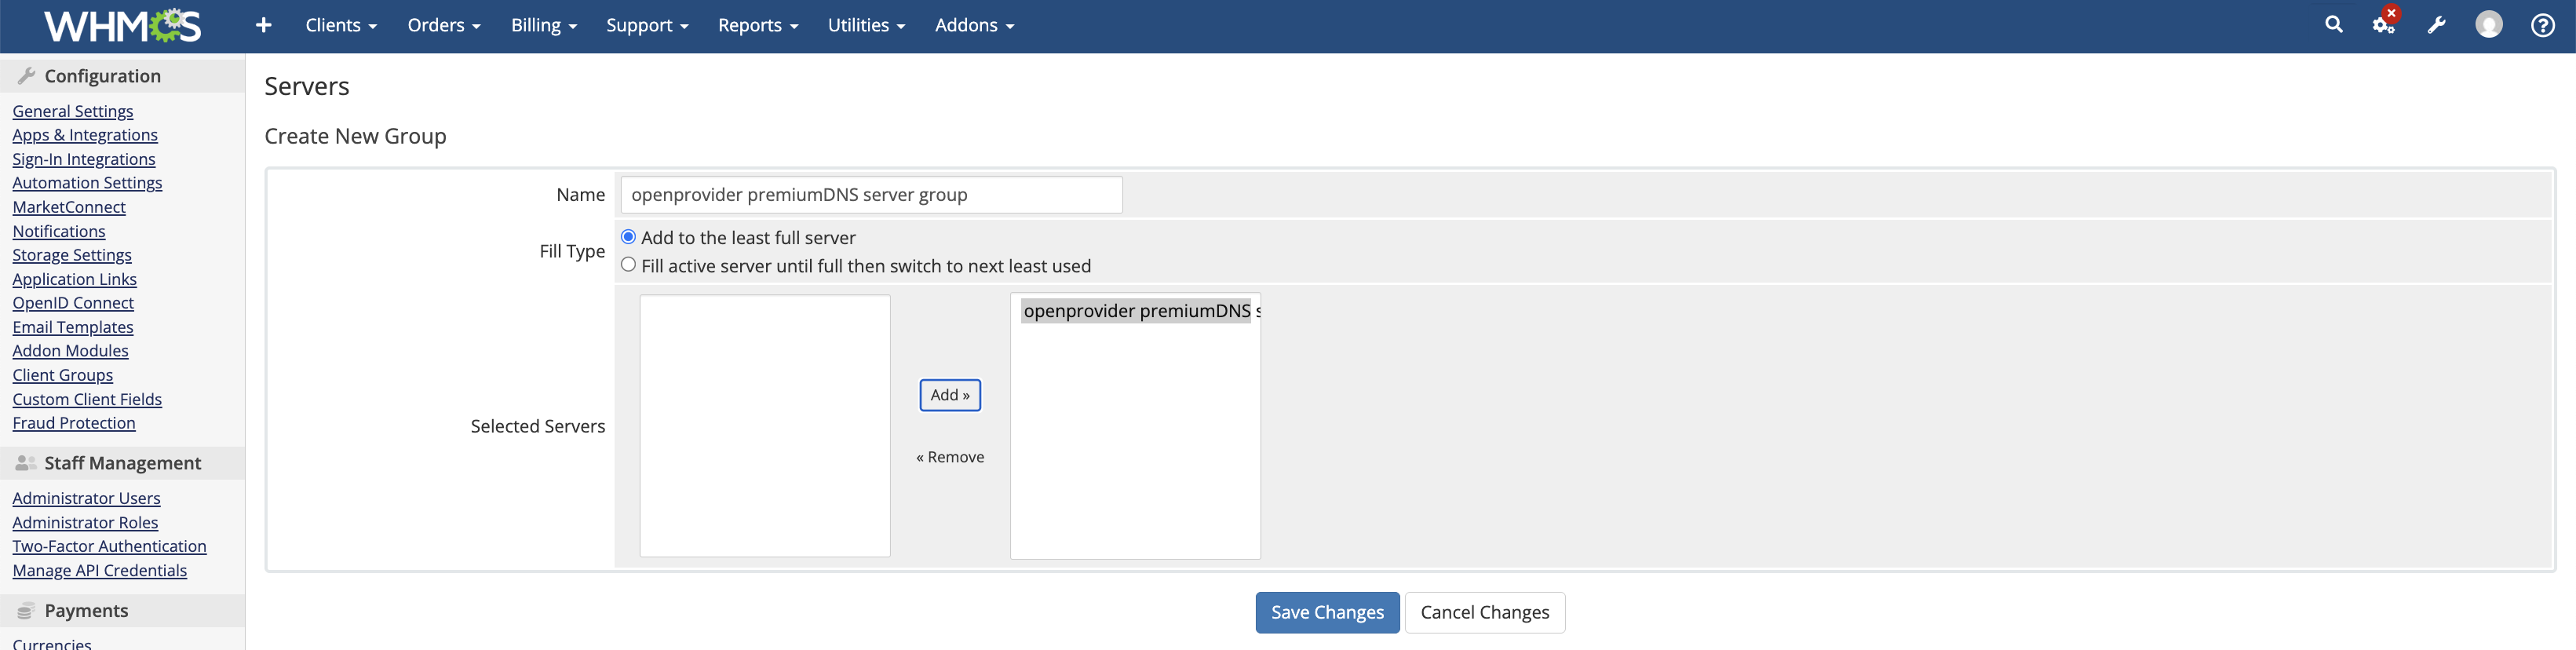### Configure premium DNS product
- Navigate to *products/services*, and create an appropriate product group if necessary.
- Create a new product, and select **Other** as product type and **Openprovider PremiumDNS** from the module dropdown.
- Select the desired product group and name your DNS product something fun.
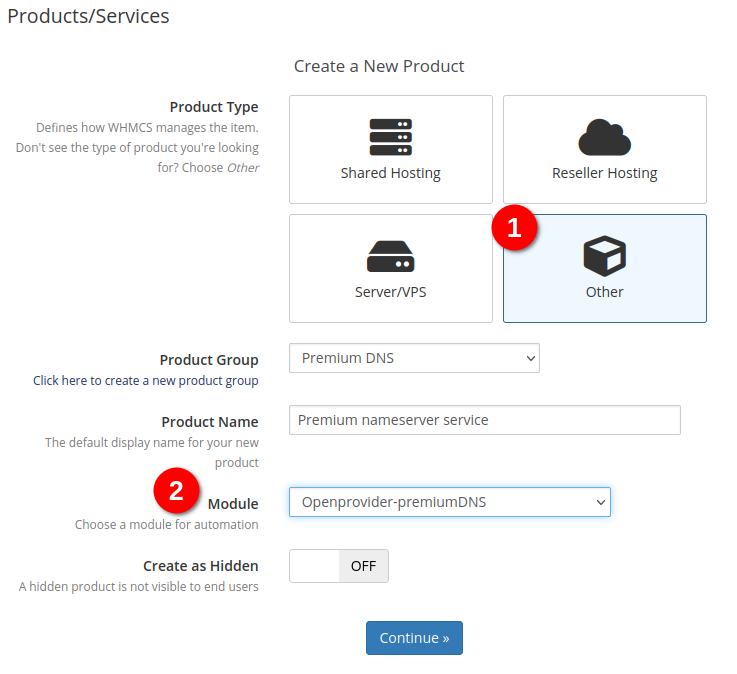
- After continuing to the *edit product* page: on the *details* tab, check the *require domain* tickbox.
- Add the desired description and select welcome email options.
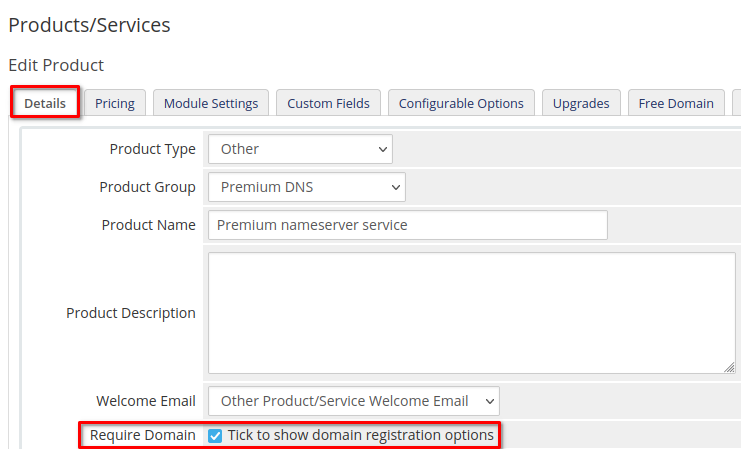
- Set up pricing on the **Pricing** tab. Consult your Openprovider account to determine the cost price for provisioning premium DNS.
- Under the **Module Settings** tab:
1. Select **Openprovider PremiumDNS** as the **Module Name**.
2. Select the **Server Group** that you created with the PremiumDNS server added.
3. Select your desired **Automation Settings** for provisioning this product.

- Under the **Custom Fields** tab, add a new field with the **Field Name** set to DNSSEC, **Field Type** as Checkbox, and a **Description** of your choice - this allows clients to enable DNSSEC during order placement if desired or later with client area Premium DNS zone management. Check the **Show on Order Form** box to make this option visible to clients during the ordering process.

- Configure any other parameters of the product which you deem necessary and then you're ready to start offering premium DNS to your customers.
- ### End user workflow in WHMCS basic cart
- The below example shows one way the provisioning module can work from the end user point of view. Various upsell options can be implemented via WHMCS to improve.
- End user selects from the categories sidebar “Premium DNS” (the name of your product group where premium DNS is located) and choose a premium DNS product.
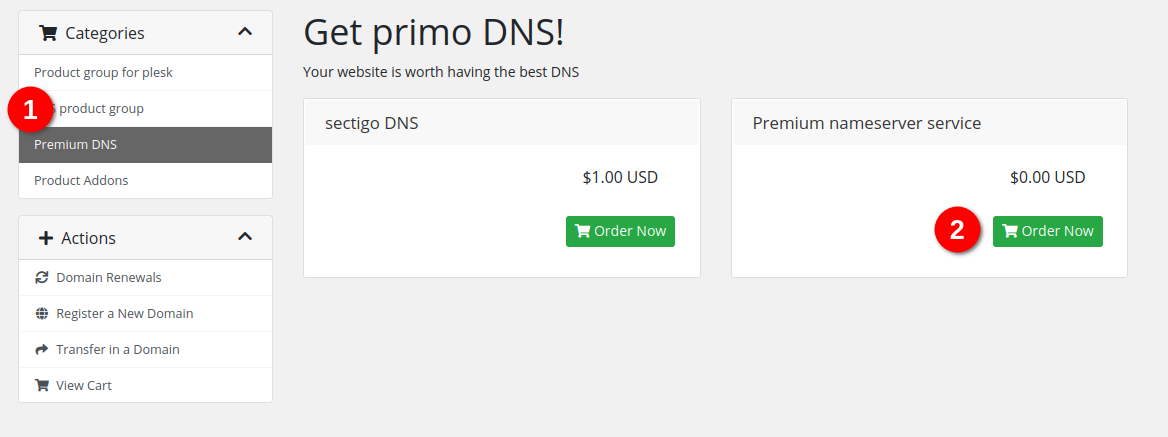
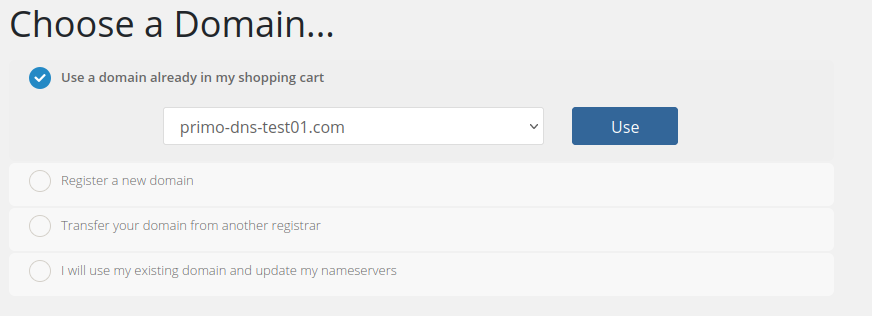
- Customer will have several options for choosing a domain to be connected with the premium DNS service:
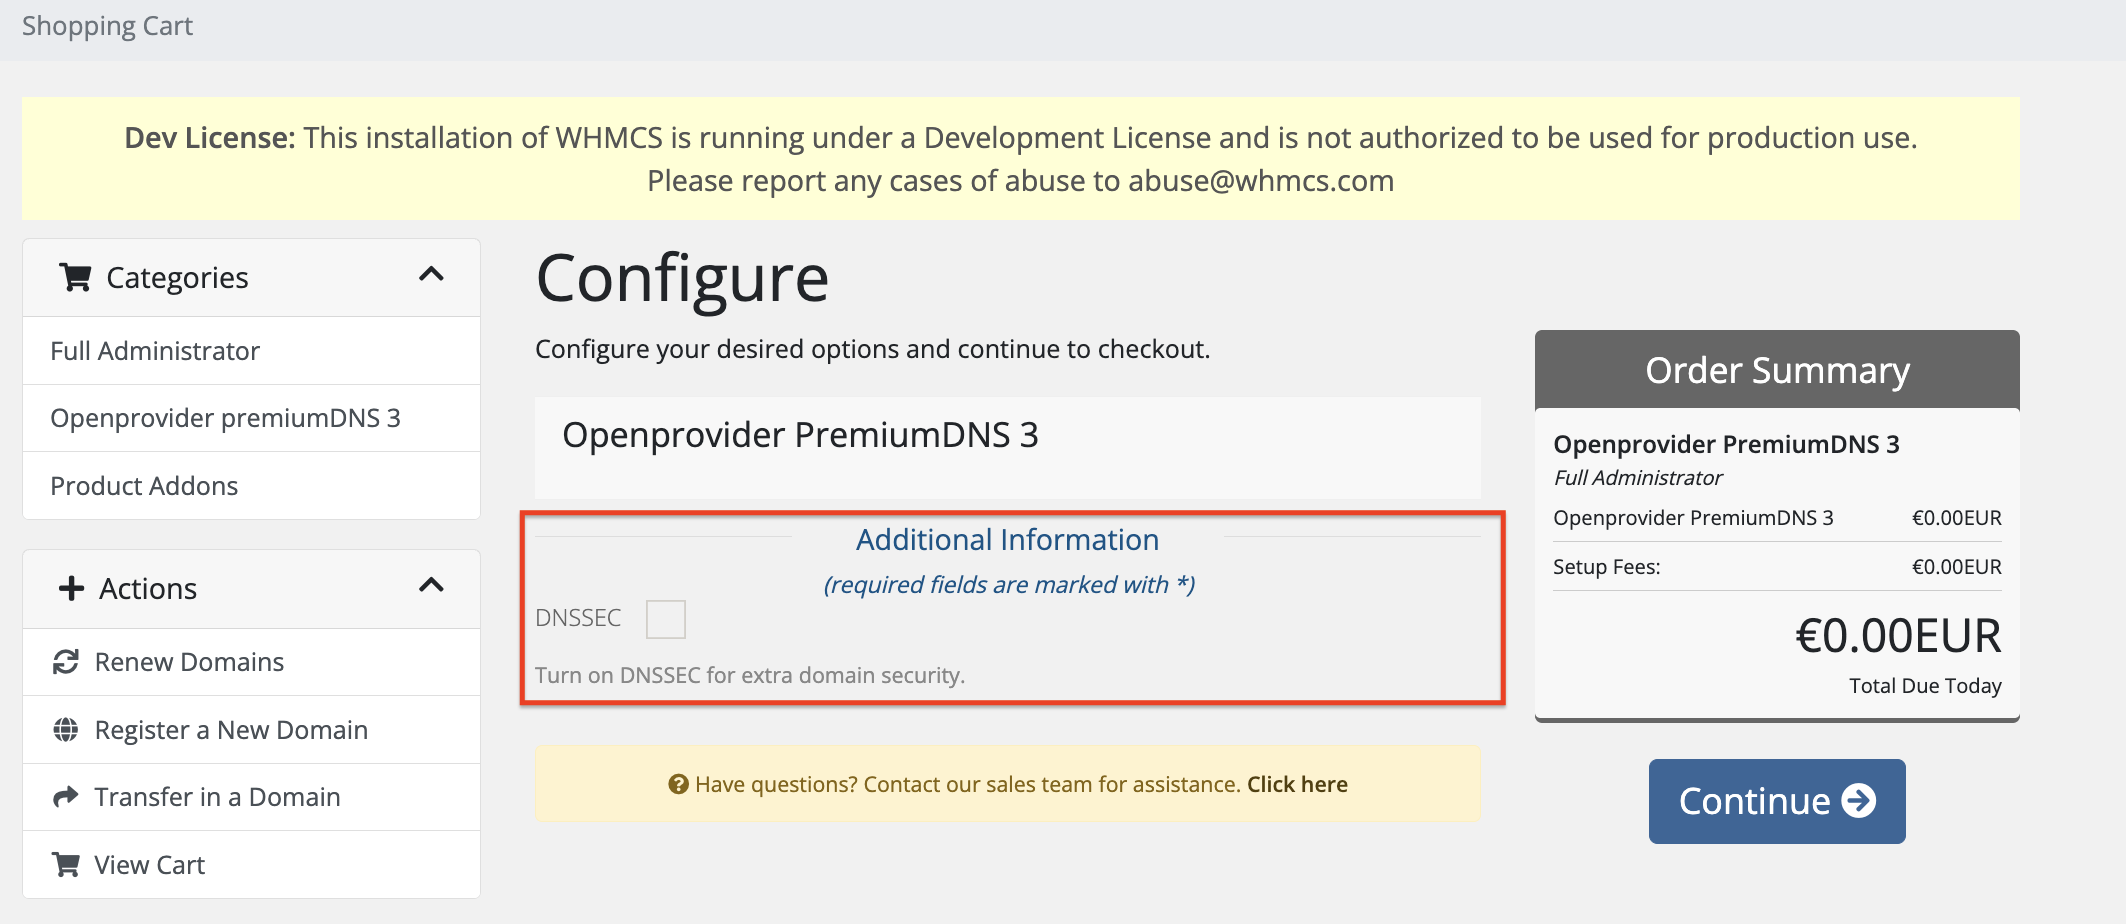
- During checkout, users can optionally enable DNSSEC by selecting the checkbox provided if you have configured the DNSSEC custom field to appear on the order form.
- Once the customer completes the purchase, the module will provision the premium DNS zone in your Openprovider account.
- ### Client Area Premium DNS Product Features
- Once a Premium DNS product is provisioned, clients can manage their service directly from the WHMCS client area. The module provides the following interactive options under the **Actions** panel:
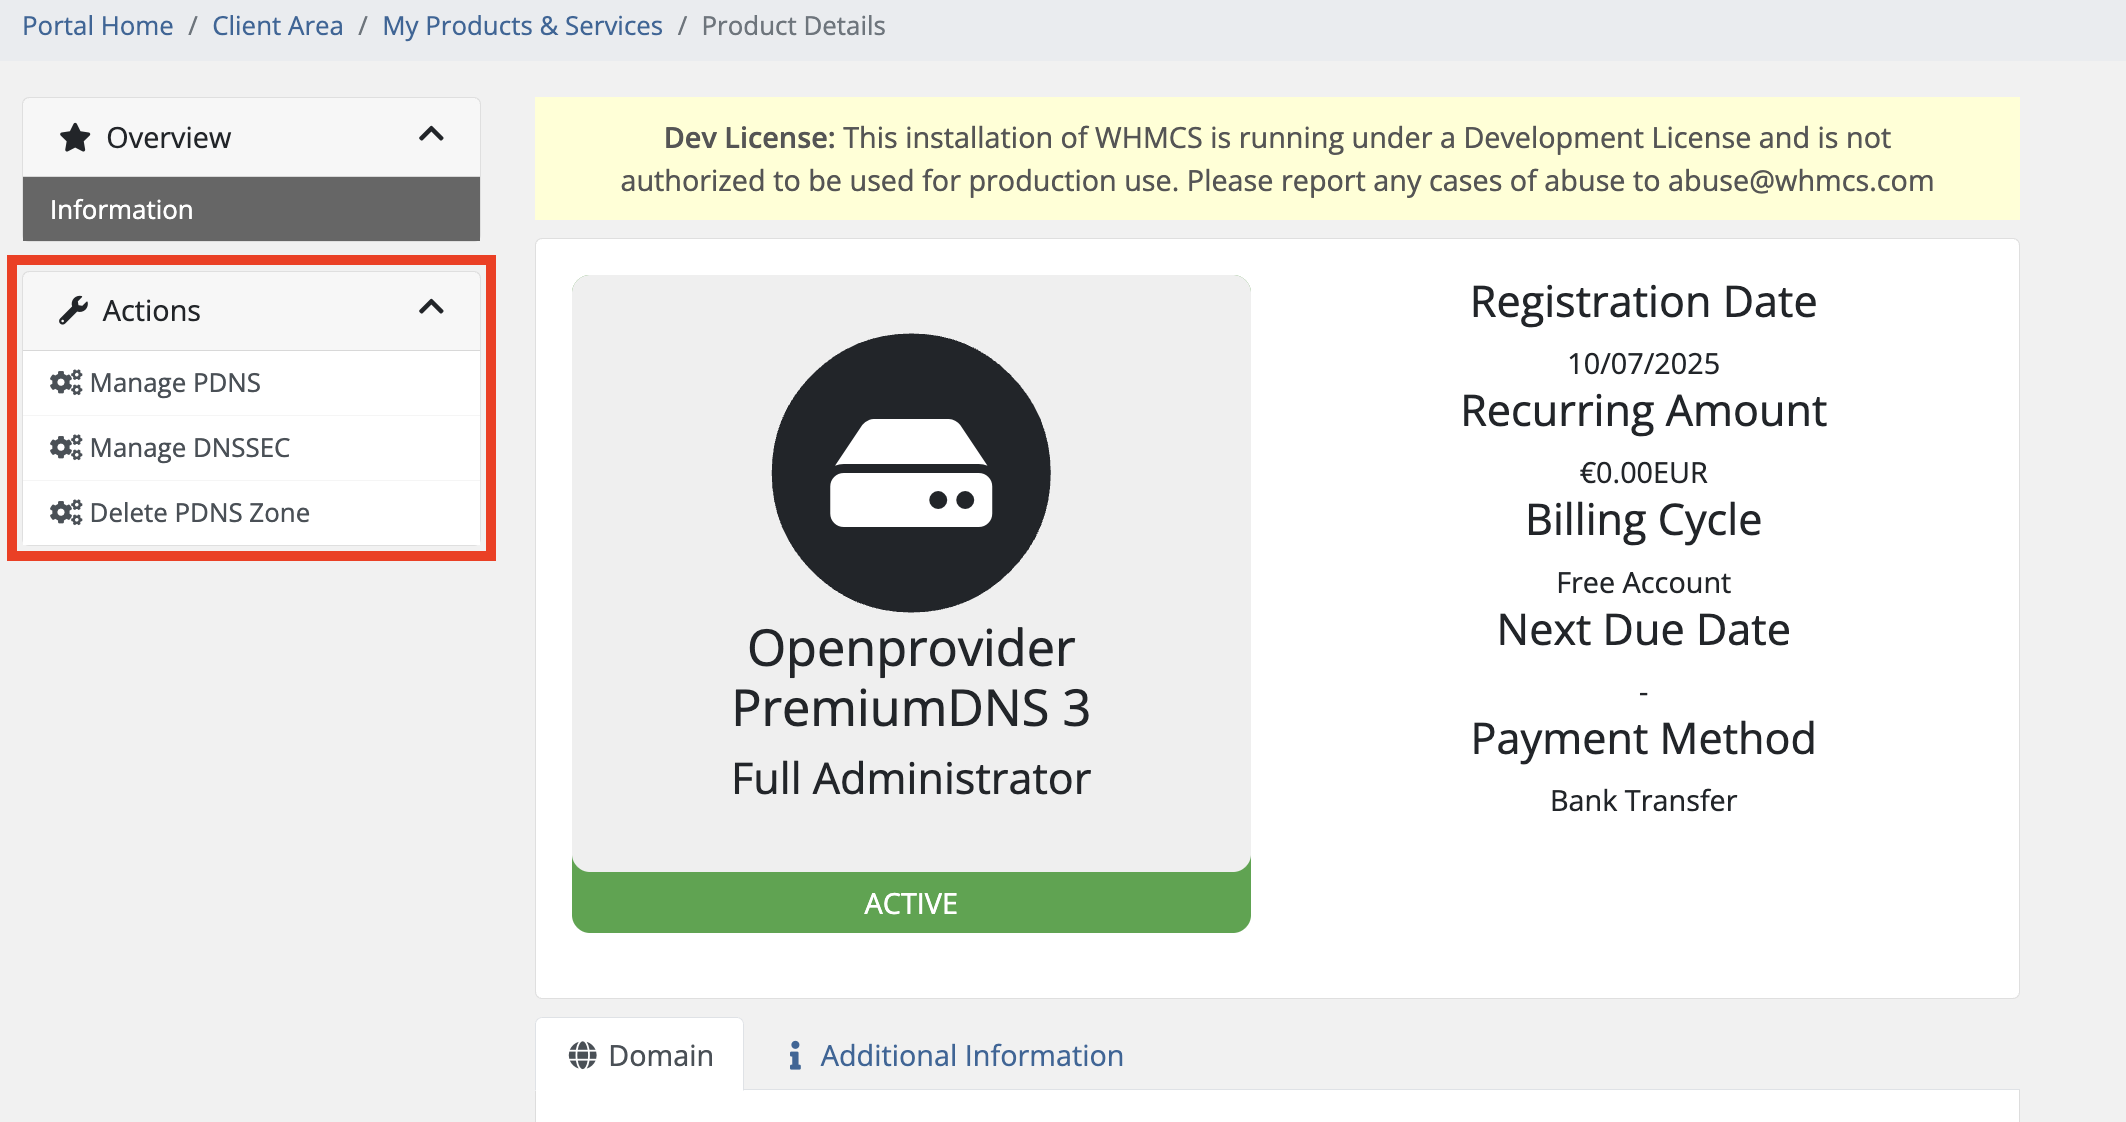- **Manage Premium DNS**
Redirects the user to dnspanel in a new browser tab, allowing them to view and manage DNS records using dnspanel's DNS management interface.
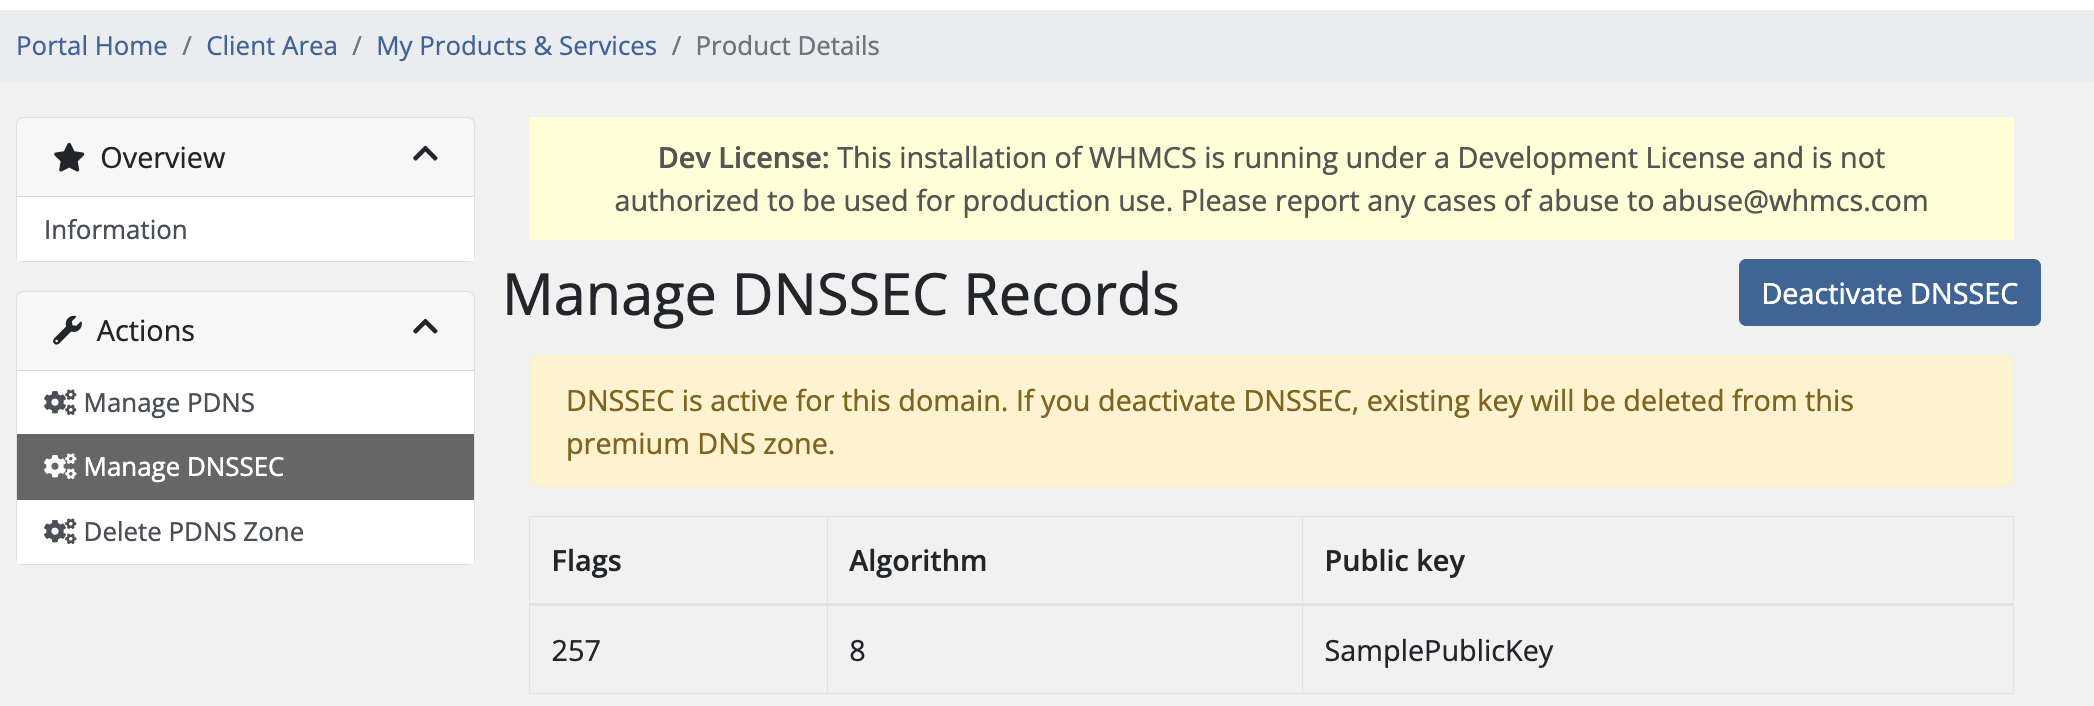
- **Manage DNSSEC**
Opens a WHMCS-integrated screen where users can activate or deactivate DNSSEC for their Premium DNS zone. If DNSSEC is already enabled, the generated DNSSEC key will be displayed.
- **Delete Premium DNS Zone**
Allows clients to delete the associated Premium DNS zone directly from the client area.
These features empower your clients with full control over their DNS configurations without requiring administrative intervention.
# WHMCS Registrar TLD & Pricing Sync Utility doesn't work or blank page is shown when running the sync
**Update**: Please [update the Openprovider domain registrar module](https://openprovider.help/books/api-integrations/page/whmcs-frequently-asked-questions#bkmrk-14.-how-to-update-op) to the latest stable [version](https://github.com/openprovider/Openprovider-WHMCS-domains/releases/latest) if you are experiencing this issue. Please check the details [here ](https://github.com/openprovider/Openprovider-WHMCS-domains/blob/master/docs/TLD_Pricing_sync_Utility.md)to get more information on the matter.
## Symptoms
- TLD and Pricing synchronization utility doesn't produce any results upon running it
- The cogwheel animation in WHMCS is followed by a blank page
## Cause
Due to the number of TLDs supported by Openprovider, some WHMCS installations may have time-outs when synchronizing the TLD pricing. This happens because Openprovider API needs to calculate custom prices (depending on the membership) for one's particular account and WHMCS requires a significant amount of time to process all 1500+ TLDs.
## Resolution
1. Enable System Module Debug Log in WHMCS
2. Increase [max\_execution\_time](https://www.php.net/manual/en/info.configuration.php#ini.max-execution-time) and [memory\_limit](https://www.php.net/manual/en/ini.core.php#ini.memory-limit) for PHP scripts
3. Start TLD Price sync
4. If the page goes blank after the animation disappears, navigate to the System Module Debug Log, and make sure `searchextensionrequest` API request is being called.
5. If it is, find whether or not the response is cut off abruptly.
6. If point 5 is true, then the execution is most probably terminated by the timeout of the web server
7. Try increasing the TimeOut directive in the [config file of httpd service](https://httpd.apache.org/docs/2.4/mod/core.html#timeout) or its equivalent for nginx
8. Restart the synchronization.
# WHMCS SSL module - Installation, configuration and management
Openprovider SSL module allows you to resell our SSL Certificates through your WHMCS website.
### Requirements:
1\. WHMCS versions - 7.x.x to latest
2\. PHP 7.4 or above
3\. Openprovider reseller account
### How to upload the files?
1\. Download the [module file. ](https://github.com/openprovider/Openprovider-WHMCS-SSL/archive/refs/heads/master.zip)Extract the zip file on your computer.
2\. Connect to the server where WHMCS is installed via your web hosting control panel (cPanel/Plesk/Webmin, etc.) or via FTP.
3\. Go to the extracted folder “modules/addons/openprovider\_ssl” and upload this
folder “openprovider\_ssl” into “<WHMCS\_ROOT>/modules/
addons/”
4\. Inside your WHMCS root directory, go to the folder "crons " and upload the file
"priceSync.php" from extracted zip.
5\. Inside your WHMCS installed directory, go to this path "/modules/servers " and upload this
folder "openprovider\_ssl" from extracted zip.
### Configure the addon module
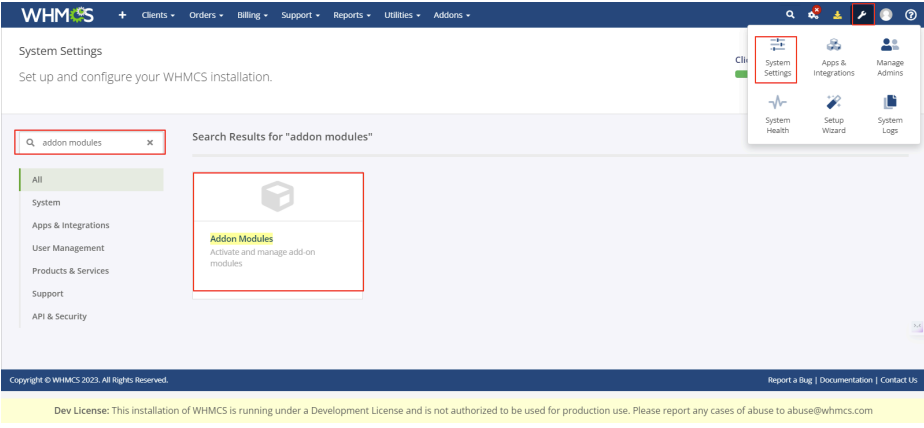
1\. Log in to your WHMCS admin area. Go to **System Settings** >> Find **Addon Modules** and
click on it.
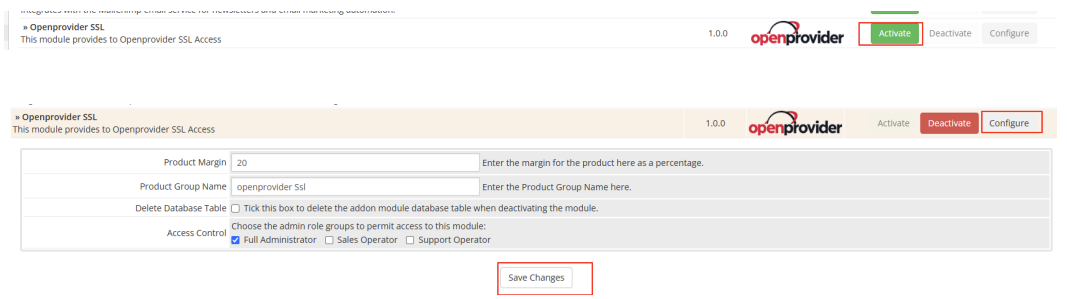
2\. Find the Openprovider SSL Addon module and click the **Activate** button. And after that click **Configure** button. Then check Full Administrator permit access to the module and enter product margin and group name. Once done, click the **Save Changes** button.
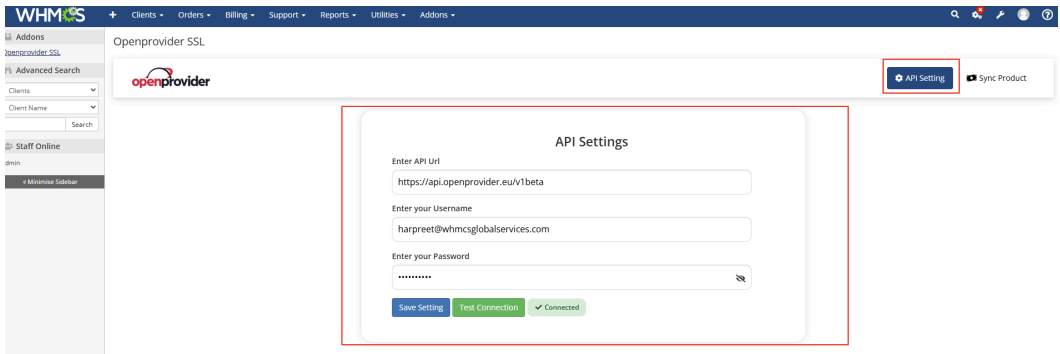
3\. Now, from WHMCS Admin dashboard, navigate to '**Addons**' → '**Openprovider SSL**'

4\. Go to the **API Setting page** to enter the API credentials for API connection.
1. Enter API URL: [https://api.openprovider.eu/v1beta](https://api.openprovider.eu/v1beta/)
2. Enter Username (Openprovider username)
3. Enter Password (Openprovider password)
4. Test connection and then Save Setting
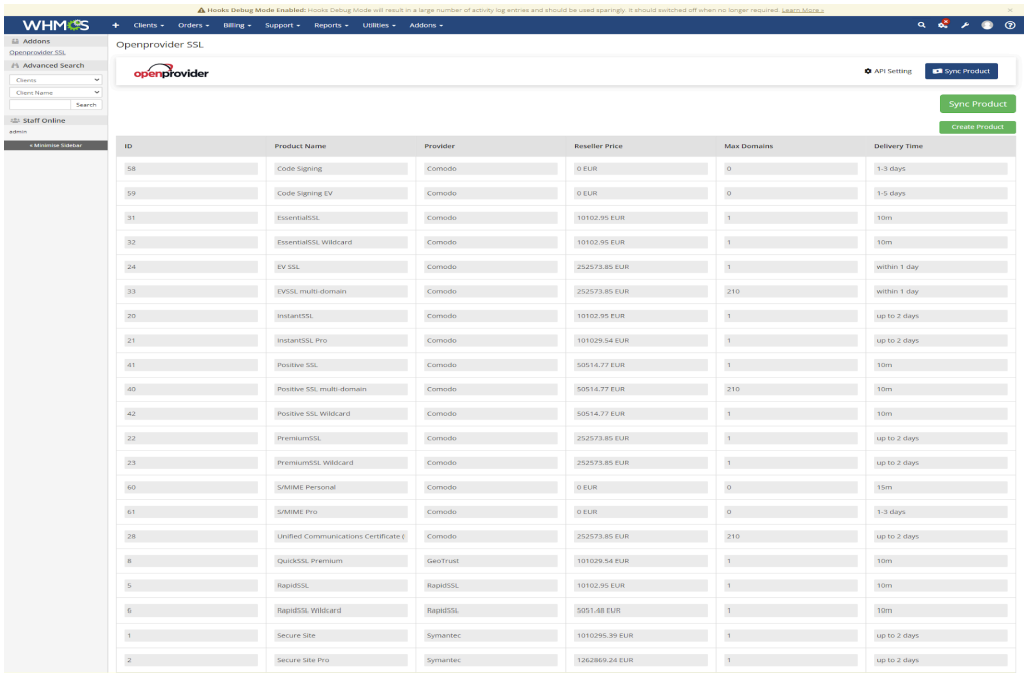
5\. After adding the API credentials, go to the ”**Sync Product**” page and click on ”**Sync Product**”
and then click on ”**Create Product**” to create all packages in WHMCS.
6\. Under ”**Logs**” admin users can see the all performed actions/module operations. Admins can also delete the logs.
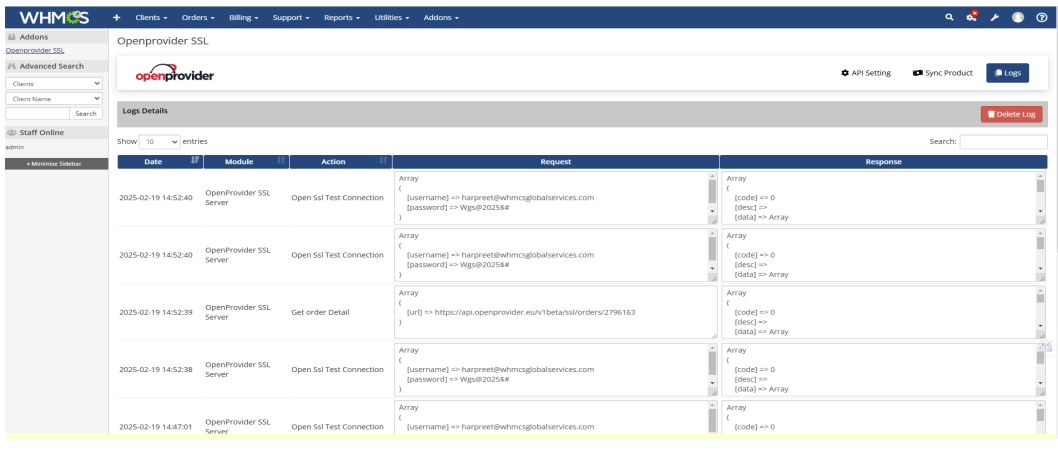
### Configure the server module
1\. From your WHMCS admin area, go to **System Settings** >> **Servers**
**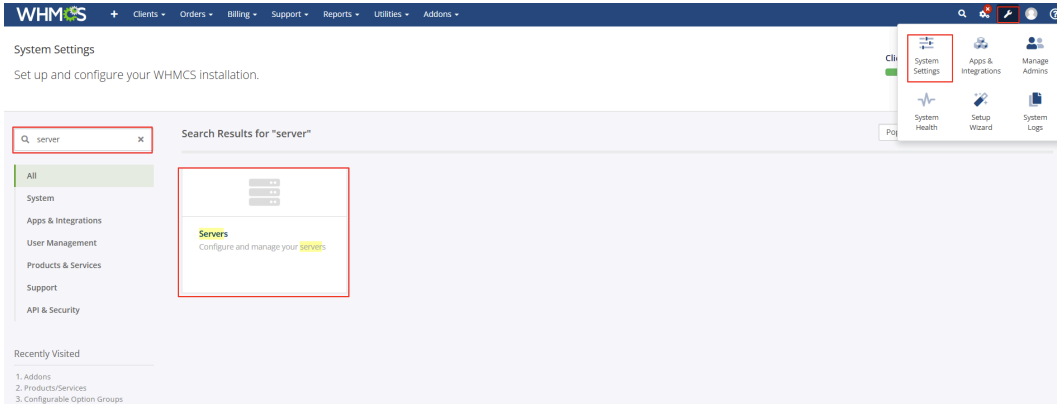**
2\. Click the **Add New Server** and click on the **Go to Advanced Mode** button
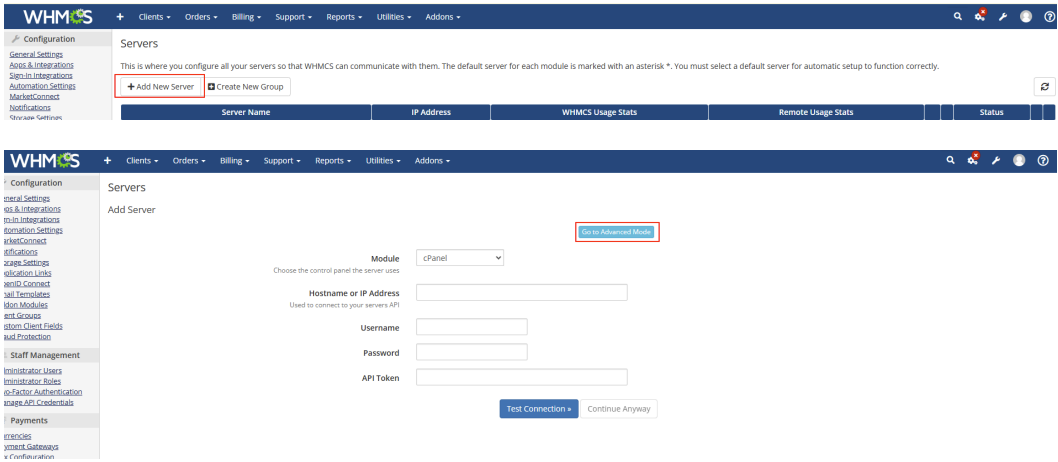
3\. Add the server for API connectivity by entering following details.
1. Enter a name, for example SSL Server
2. Enter API URL under Hostname field “[api.openprovider.eu](https://api.openprovider.eu)”
3. Select “Module” as Openprovider SSL Certificate module”
4. Enter “Username” as your Openprovider username
5. Enter “Password” as Openprovider password
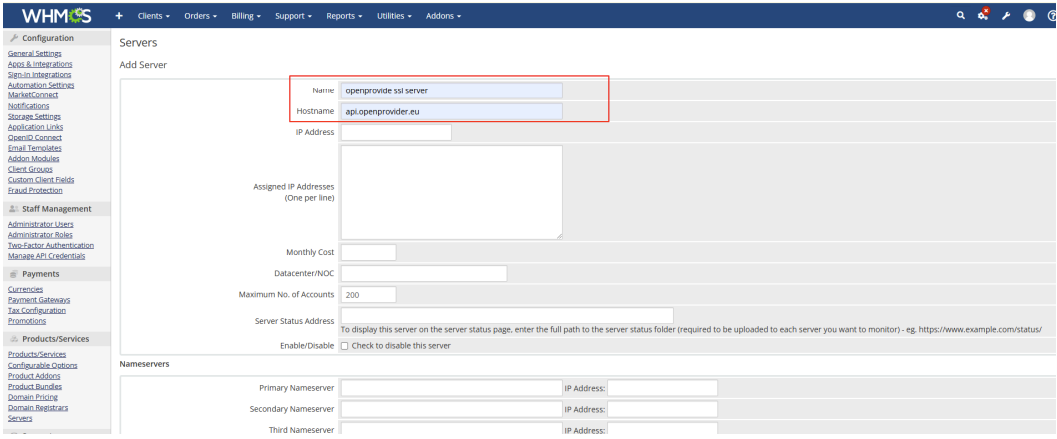
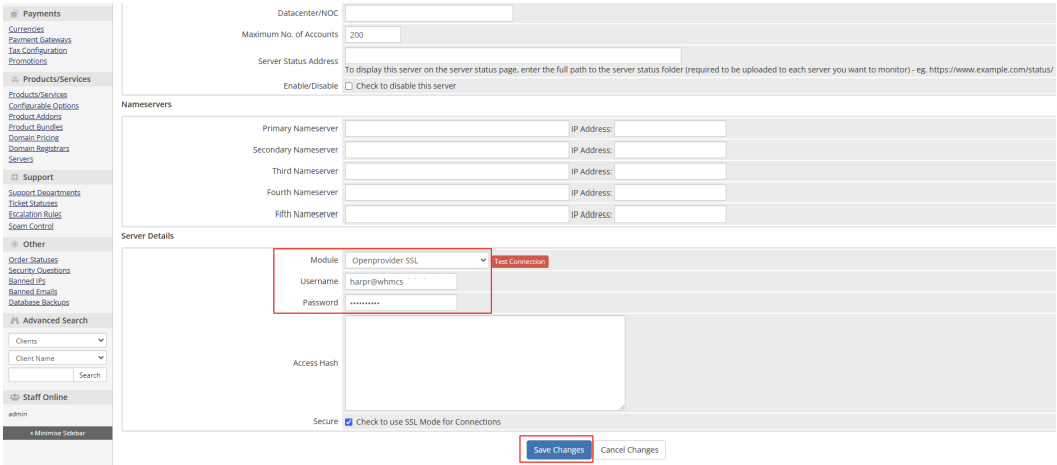
6\. Make “**Test Connection**”
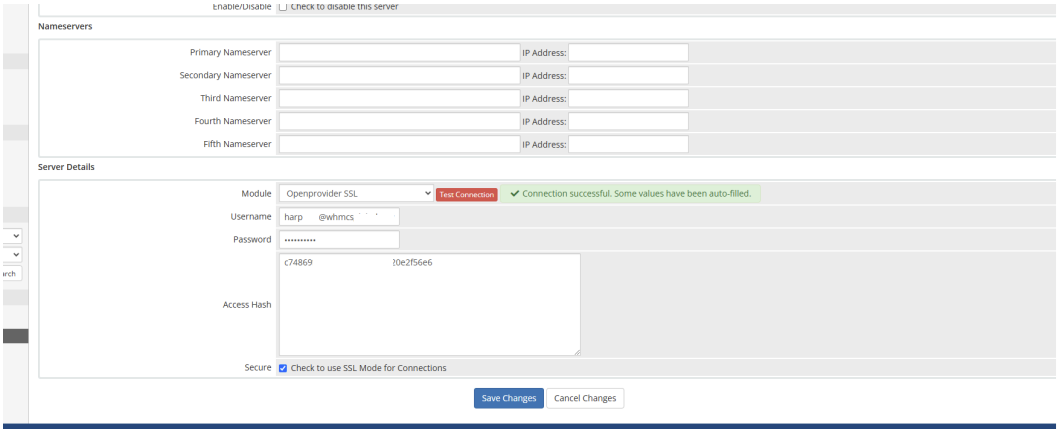
7\. If everything is fine, then click on “**Save Changes**” button to save the configuration.
8\. After creating the server click on Create New Group, Enter Group name and
assign above created server to that group and save the changes.
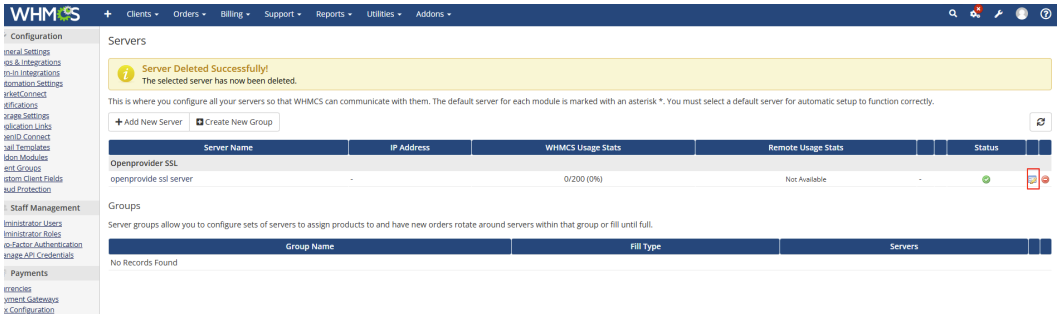
### Configure the Product with Server Module
1\. Go to **System Settings** >> **Products/Services**
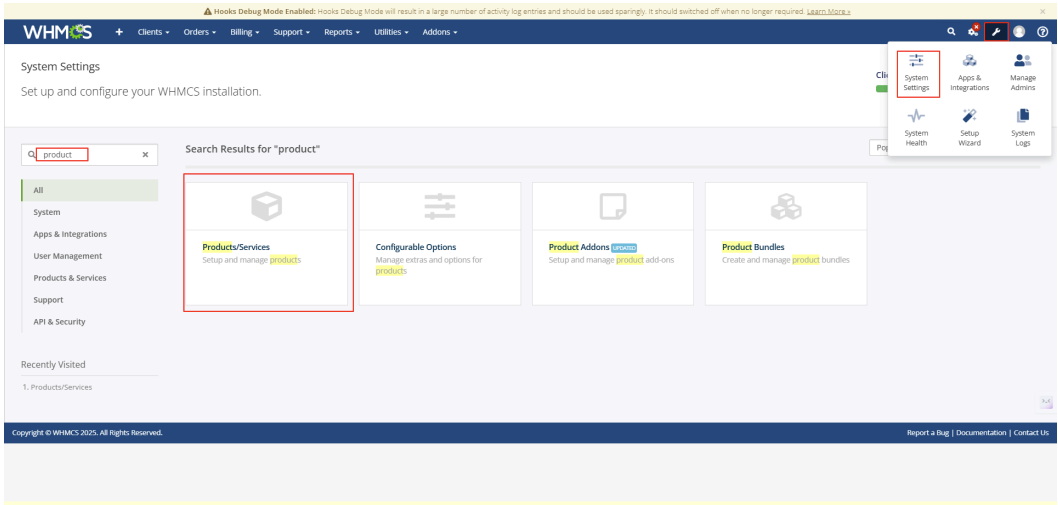
2\. Edit the SSL Products one by one and go to the ”**Module Settings**“ tab. Select the ”**Module Name**” as
OpenProvider SSL.
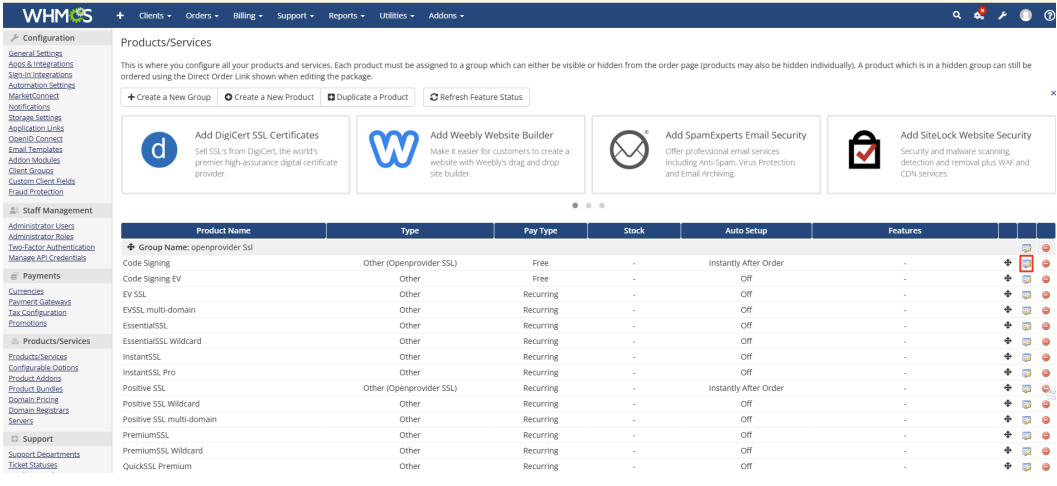
3\. Server Group as “SSL Server” group that you created above for API connectivity.
4\. After that you will have a configuration section to configure the module. Configure
module by choosing and entering correct information as given below.
1. Map specific SSL product
2. Enable “Auto Renew’
3. Enable “DNS Automation”
4. Choose “Signature Hash Algorithm”
5. Choose “Period”
6. CSR (Optional)
7. Make auto provision setting
8. Save Changes
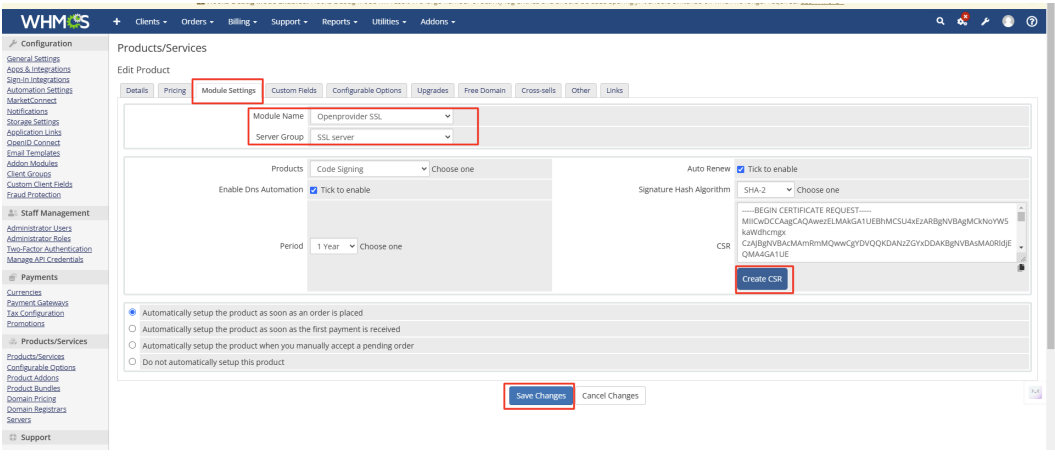
After configuring the module with the product. Go to “**System Settings**” >> “**Configurable Options**”
Module will create the configurable group for number of domains. Find that group
and click on edit button.
After that you will get a configurable option “No. Of domains”. Edit this option to
update the price for specific billing cycles and currencies.
Now your product is ready for order.
### Manage purchased SSL Certificates
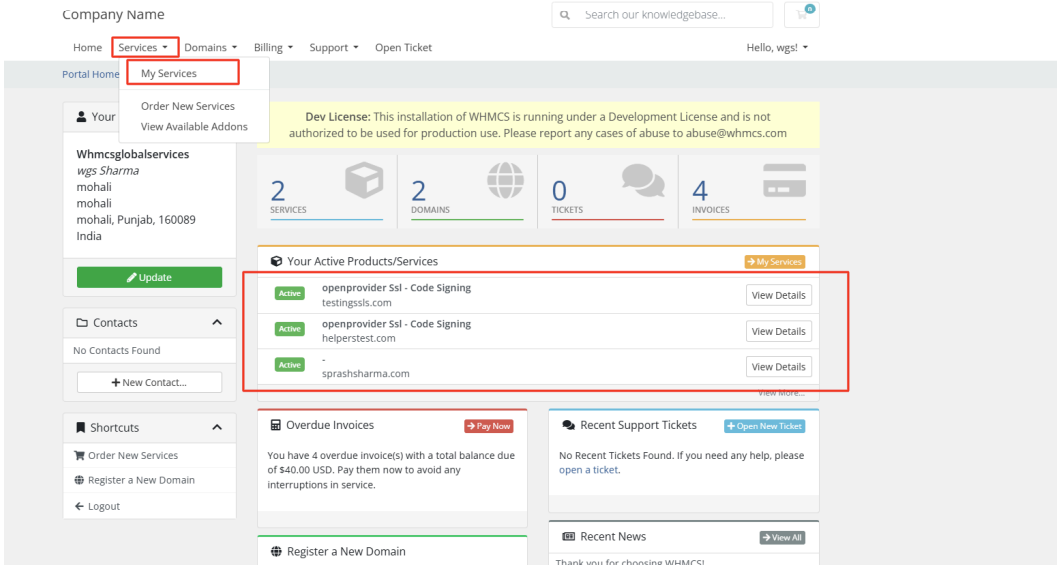
**Client Area**:
1\. Login to your client area
2\. Go to “**Services** >> **My Services**”
3\. Click on purchased SSL certificate.
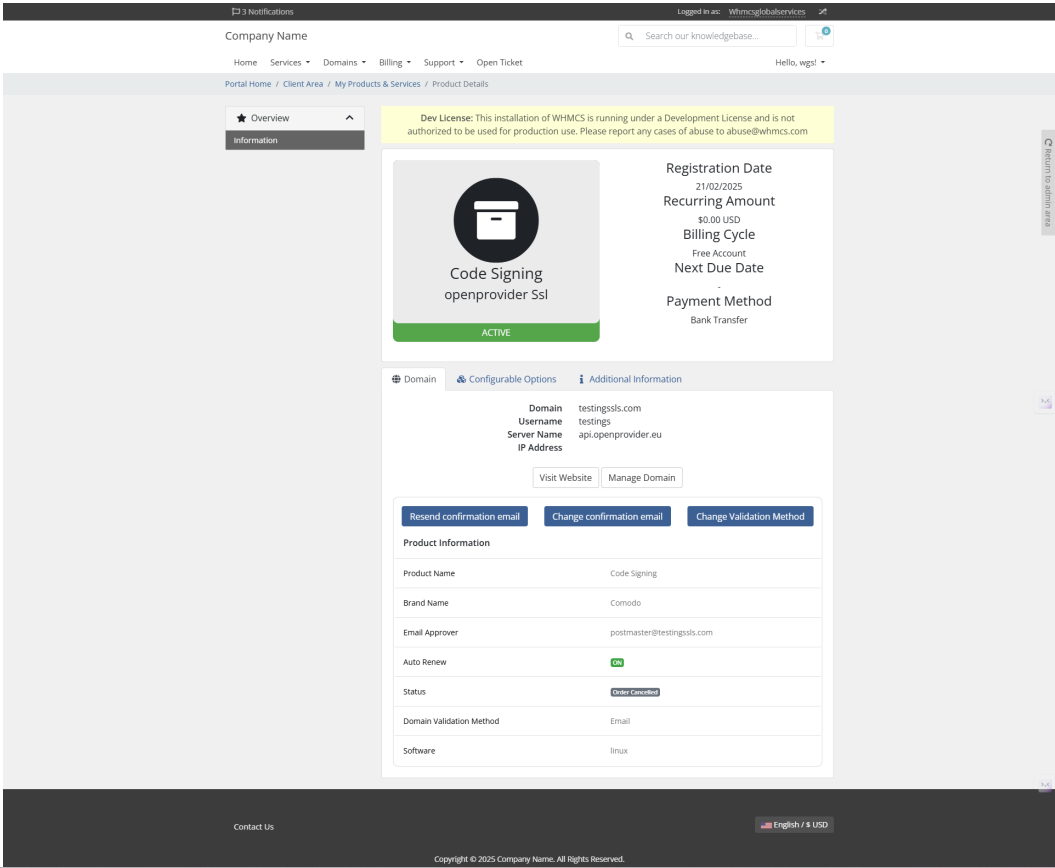
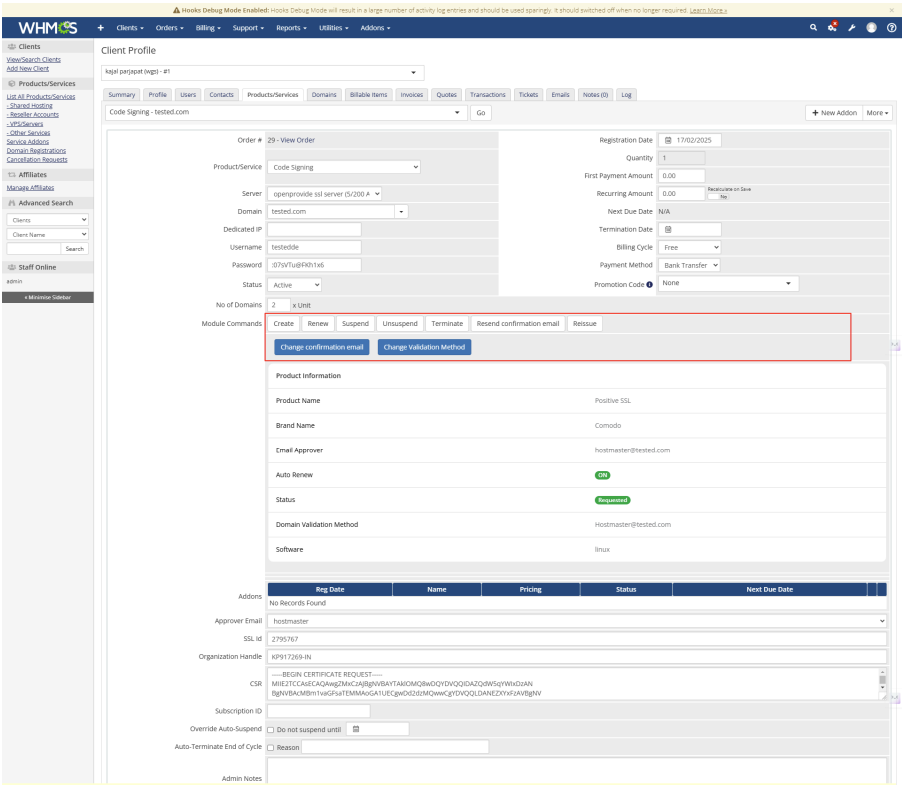
**Admin Dashboard**:
1\. Login as your WHMCS admin >> Go to **Orders** >> **List All Orders**
****
2\. Click on the SSL order you want to view/check.
****
# When submitting a contact the phonenumber is deemed invalid.
WHMCS and our plugin attempt to format your input in such a way that it can be used by our API and other external systems. Sometimes this conflicts with your usual way of working.
####
**131- Invalid telephone country code!**
The most common cause of a phone number being judged as invalid is because users leave the phone number field empty, however this is a mandatory field in Openprovider.
Another common cause of this error is when users add a country code to the number. WHMCS does this as well (using the country of the contact to get the country code) and this results in +3131 making it an invalid country code.
**Solution**: Review the phone number of domain contacts and add/correct it.
#### **133 - Invalid telephone region code number!**
Area/region code is part of the phone number (excluding leading zero). Incomplete phone number or invalid format in phone number can cause this error.
**Solution:** Review the phone number of domain contacts and correct it. If you have the following option disabled in WHMCS Admin Dashboard > **Configuration** > **System Settings** > **General Settings > Localisation** (tab), specify the phone number in a format like +XXX.XXXXXXX having dot (.) symbol included as a delimiter.

By default, WHMCS uses the following phone number format, automatically prefixing the number with the international country dialing code for the client’s selected country:
\+ \[Country Code\] . \[Phone Number\]
#### **135 - Invalid telephone subscribers number!**
Incomplete phone number, invalid format or invalid characters in phone number can cause this error.
**Solution:** Review the phone number of domain contacts and correct it.
If the cause is not clear, feel free to [contact our support department](https://openprovider.help/books/quick-start/page/contact-openprovider-support). They can check the logs and see what is being sent to the API and possibly hint you in the right direction.